My neighbor Margaret watched me trying to balance a grocery bag, a coffee cup, and my apartment keys one rainy Tuesday afternoon. She didn’t say anything at first—just gave me that knowing look over her glasses. Then she reached into her own bag and pulled out a small, foil-wrapped package. “You look like you need this more than I do,” she said, pressing it into my free hand. “It’s my grandmother’s apple crumble pie. But I’ve messed with it over the years, so don’t blame her if it’s not perfect.”
Honestly, I forgot about it for two days. It sat in my fridge while I dealt with work deadlines and a leaky faucet. When I finally unwrapped that foil, the smell of browned butter and cinnamon hit me, and I felt like I’d made a terrible mistake by waiting. The crust was golden and flaky, the apples were tender but not mushy, and the crumble topping had this incredible nutty depth that I couldn’t quite place. I called Margaret the next day, probably sounding a little too desperate, and asked for the recipe.
She laughed and said, “The secret’s in the brown butter, honey. Everything else is just negotiation.”
That conversation—standing in my doorway, rain still dripping from my hair, Margaret explaining how her grandmother never measured anything—became the starting point for this lighter brown butter apple crumble pie. I wanted to keep that same soul-soothing comfort, but I also wanted to be able to eat a second slice without guilt. So I played around with the butter, cut back on the sugar just a touch, and swapped in a few smarter choices that you honestly won’t even notice. Because let’s face it—apple pie should make you feel good, not just taste good. Maybe you’ve been there, standing in your kitchen wondering if you can have your pie and eat it too. This one says yes.
Why You’ll Love This Recipe
This isn’t just another apple pie recipe that promises to be “light” and ends up tasting like cardboard and regret. I’ve tested this version more times than I care to admit—through burnt crumble tops, soggy bottoms, and one particularly tragic incident where I forgot the sugar entirely. Every failure taught me something, and this final version is the one I’d serve to Margaret without apologizing.
- Quick & Easy: Comes together in about an hour and fifteen minutes, with only 20 minutes of active prep. Perfect for those “I need dessert for tomorrow’s dinner party” moments.
- Simple Ingredients: No fancy grocery trips needed. Apples, butter, flour, oats, a little brown sugar, and some pantry staples. You probably have everything right now.
- Perfect for Fall Gatherings: Thanksgiving, Friendsgiving, Sunday dinners, or just a cozy Tuesday when you need something warm and comforting.
- Crowd-Pleaser: I’ve served this to pie purists, health-conscious friends, and picky kids. Every single person went back for seconds. Not one person asked if it was “light.”
- Unbelievably Delicious: The brown butter adds this rich, nutty, almost toffee-like flavor that makes you wonder why you haven’t been browning butter for everything.
What makes this different from the dozens of apple crumble pies out there? It’s the technique of browning the butter for the crumble topping while using a lighter hand with the crust. Instead of a traditional double crust that adds calories and density, this pie uses a single, thinner crust with a generous crumble topping. The apples are lightly sweetened, letting their natural flavor shine, and the crumble gets that deep, caramelized flavor from brown butter instead of loads of extra sugar.
This recipe is the kind that makes you close your eyes after the first bite. It’s comfort food reimagined—healthier, faster, but with the same soul-soothing satisfaction. Perfect for impressing guests without stress, or turning a simple Wednesday into something memorable.
What Ingredients You Will Need
This recipe uses simple, wholesome ingredients to deliver bold flavor and satisfying texture without the fuss. Most of these are pantry staples, which means you’re probably already halfway there.
For the Crust
- 1 ¼ cups all-purpose flour (I prefer King Arthur for consistent results)
- ½ teaspoon salt
- 1 tablespoon granulated sugar
- ½ cup cold unsalted butter, cut into small cubes (freeze it for 10 minutes before using—trust me)
- 3-4 tablespoons ice water (add one at a time, you might not need all of it)
For the Apple Filling
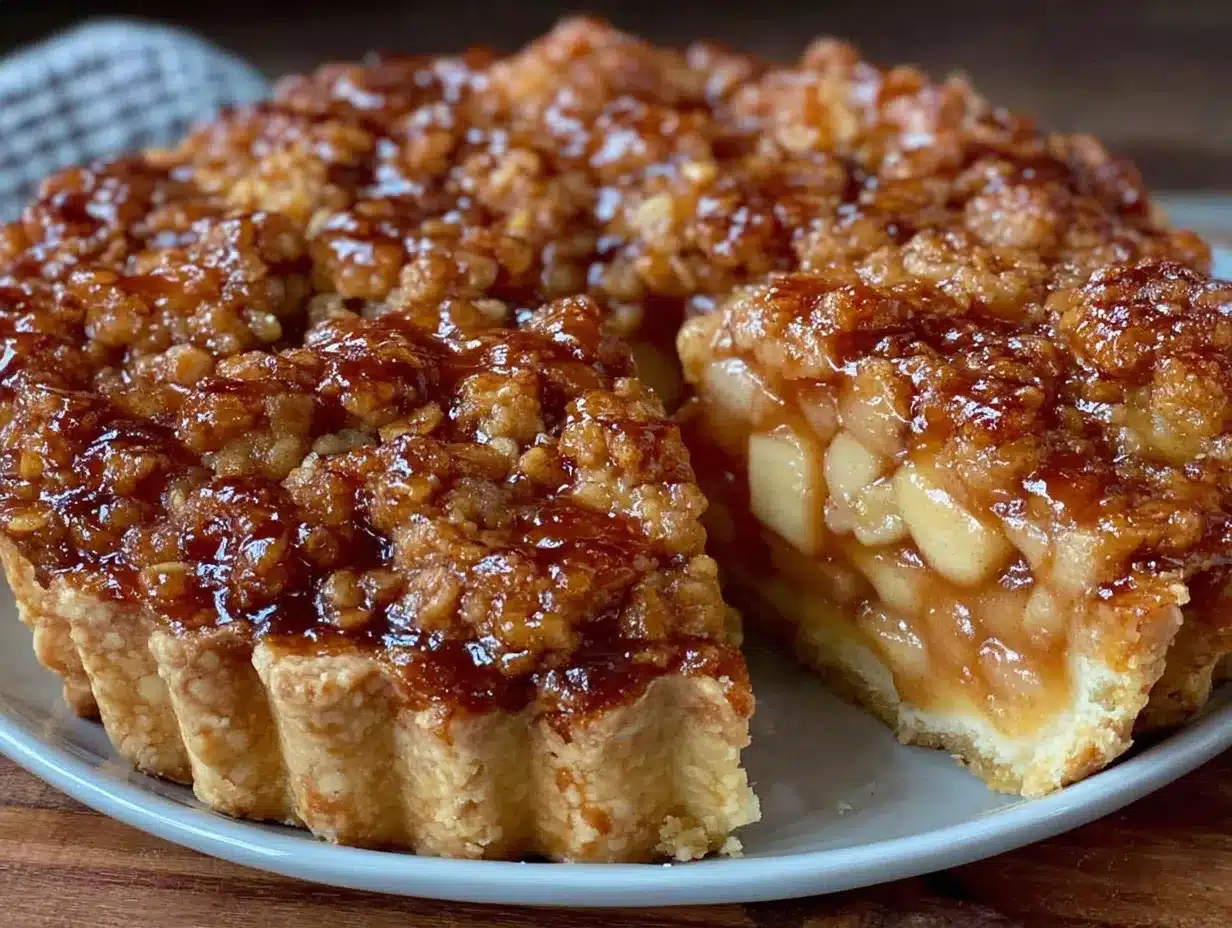
- 6 medium apples, peeled, cored, and sliced ¼-inch thick (I use a mix of Granny Smith and Honeycrisp—the tart and sweet balance is perfect)
- 3 tablespoons brown sugar (use coconut sugar for a lower glycemic option)
- 1 tablespoon all-purpose flour
- 1 teaspoon ground cinnamon
- ¼ teaspoon ground nutmeg (freshly grated if you have it, but pre-ground works fine)
- 1 tablespoon lemon juice (fresh is best, but bottled works in a pinch)
- 1 teaspoon vanilla extract
For the Brown Butter Crumble Topping
- ½ cup unsalted butter (yes, you’ll brown this—it’s the star of the show)
- ¾ cup old-fashioned rolled oats (not quick oats—they get mushy)
- ½ cup all-purpose flour
- ⅓ cup brown sugar (packed)
- ¼ teaspoon salt
- ½ teaspoon cinnamon
A quick note on apples: I really recommend using two different varieties. Granny Smith holds its shape beautifully and provides that necessary tartness, while Honeycrisp adds natural sweetness and a tender texture. If you only have one type on hand, go with all Granny Smith and adjust the sugar up by a tablespoon. For the butter, I use Land O’Lakes for everyday baking—it browns evenly and has a consistent fat content. If you’re dairy-free, you can use a plant-based butter, but make sure it’s one with a high fat content (like Miyoko’s) for the best browning results.
Equipment Needed
You don’t need a fancy kitchen to pull this off. Here’s what you’ll actually use:
- 9-inch pie dish (glass or ceramic works best for even browning)
- Rolling pin (a wine bottle works in a pinch—I’ve done it)
- Large skillet or saucepan for browning butter (light-colored pan helps you see the color change)
- Mixing bowls (one medium, one large)
- Sharp knife or apple peeler
- Measuring cups and spoons
- Pastry cutter or two forks (for cutting butter into flour)
- Plastic wrap
- Baking sheet (place it under the pie in the oven to catch drips)
If you don’t have a pastry cutter, honestly, two forks work just as well. Or you can use your hands—just work quickly so the butter doesn’t warm up too much. I’ve also used a food processor for the crust in a hurry, but be careful not to overmix. A few pulses is all you need.
Preparation Method
Let’s get to the good part. Take your time with each step—rushing is the number one reason pie goes wrong.
- Make the crust. In a medium bowl, whisk together the flour, salt, and sugar. Add the cold butter cubes and cut them in using a pastry cutter or two forks until the mixture looks like coarse meal with some pea-sized butter pieces remaining. Drizzle 3 tablespoons of ice water over the mixture and stir with a fork until the dough starts to come together. If it seems dry, add the remaining tablespoon of water. Turn the dough out onto a floured surface, shape it into a disk, wrap it in plastic, and refrigerate for at least 30 minutes. (I once skipped this step and ended up with a crust that shrunk into a tiny, sad little bowl. Don’t be like me.)
- Preheat your oven to 375°F (190°C). Place a baking sheet on the lower rack to catch any drips—trust me, this saves you from a smoky kitchen and a messy oven floor.
- Brown the butter. In a light-colored skillet or saucepan over medium heat, melt the ½ cup butter for the crumble topping. Stir constantly with a wooden spoon or spatula. The butter will foam, then bubble, and then start to turn golden. Watch carefully—it can go from perfect to burnt in seconds. When you see brown specks forming at the bottom and the butter smells nutty and amazing (about 4-6 minutes), remove it from the heat immediately. Pour it into a heatproof bowl to stop the cooking process. Let it cool slightly while you prepare the apples.
- Prepare the apples. In a large bowl, toss the sliced apples with brown sugar, flour, cinnamon, nutmeg, lemon juice, and vanilla extract. Let them sit for 10-15 minutes while you roll out the crust. This helps the apples release some liquid, which means your filling won’t be watery later.
- Roll out the crust. On a lightly floured surface, roll the chilled dough into a 12-inch circle, about ⅛-inch thick. Carefully transfer it to your pie dish by rolling it around your rolling pin and unrolling it over the dish. Gently press the dough into the bottom and up the sides. Trim the excess dough, leaving about a ½-inch overhang, then fold it under and crimp the edges however you like. (I do a simple pinched edge because I’m not trying to win a beauty contest.) Place the crust in the fridge while you finish the crumble.
- Make the crumble topping. In a medium bowl, combine the oats, flour, brown sugar, salt, and cinnamon. Pour the slightly cooled brown butter over the dry ingredients and stir until everything is evenly moistened and clumps together. Set aside.
- Assemble the pie. Remove the crust from the fridge. Pour the apple filling into the crust, spreading it evenly. Don’t pack it down—you want some air between the apples. Sprinkle the brown butter crumble topping evenly over the apples. It should cover the entire surface.
- Bake. Place the pie on the preheated baking sheet and bake for 45-55 minutes, or until the crumble is golden brown and the filling is bubbling up around the edges. If the crumble starts browning too quickly (after about 30 minutes), tent the pie loosely with foil. The pie is done when you can insert a knife into the center and the apples are tender.
- Cool. Let the pie cool on a wire rack for at least 2 hours before slicing. I know, the waiting is torture, but if you cut it too soon, the filling will run everywhere and you’ll have a delicious mess instead of beautiful slices. The pie needs time to set.
Cooking Tips & Techniques
I’ve made this pie so many times that I’ve collected a few hard-earned lessons along the way. Here’s what I wish someone had told me:
Don’t skip browning the butter. I know it adds an extra step, but this is what gives the crumble its incredible depth. The first time I tried this recipe with regular melted butter, it was good. The second time with brown butter? It was unforgettable. The nutty, caramelized flavor transforms the entire pie.
Watch the butter like a hawk. I’ve burned brown butter more times than I’d like to admit. The trick is to use a light-colored pan so you can actually see the color change, and to keep stirring constantly. The moment you see those brown specks form and smell that nutty aroma, pull it off the heat. It will continue cooking for a few seconds in the hot pan, so transferring it to a cool bowl is crucial.
Let the apples macerate. That 10-15 minute rest after tossing them with sugar and spices isn’t just for show. It draws out excess moisture, which concentrates the apple flavor and prevents a soggy pie. I learned this the hard way after serving a pie that literally had a puddle of apple juice in the bottom of the dish.
Use a mix of apple varieties. This is non-negotiable for me now. Granny Smith holds its shape and adds tartness, while Honeycrisp or Fuji adds sweetness and tenderness. Using all of one type gives you a one-dimensional filling. You want that complexity.
Chill the crust. That 30-minute rest in the fridge isn’t just for relaxation—it helps the gluten relax and the butter firm up, which means your crust won’t shrink or get tough. I’ve skipped this step when I was in a hurry, and every single time I regretted it.
Variations & Adaptations
This pie is forgiving, so feel free to make it your own. Here are a few variations I’ve tried and loved:
Gluten-Free Version: Substitute the all-purpose flour in both the crust and crumble with a 1:1 gluten-free baking flour blend. I’ve used Bob’s Red Mill with great results. The crust will be a bit more delicate, so handle it gently. The crumble topping works perfectly with gluten-free oats.
Vegan Adaptation: Use a high-quality vegan butter for both the crust and the brown butter crumble. Miyoko’s European-style cultured butter works beautifully for browning. For the crust, just make sure your vegan butter is very cold. The filling is already vegan-friendly.
Seasonal Fruit Swap: In the summer, swap half the apples for ripe pears or peaches. Reduce the sugar by a tablespoon since stone fruits are sweeter. In the winter, add a handful of fresh cranberries to the apple filling for a tart pop of color and flavor.
Spice It Up: Add ¼ teaspoon of cardamom or ginger to the apple filling for a warm, aromatic twist. I once added a pinch of black pepper to the crumble topping, and it was surprisingly amazing—the heat brings out the sweetness.
Individual Ramekins: Make personal-sized pies by dividing the filling and crumble among 4-6 ramekins. Bake for 20-25 minutes instead of 45-55. Perfect for dinner parties when everyone wants their own little pie.
Serving & Storage Suggestions
This pie is best served warm, but not hot. Let it cool for at least 2 hours after baking so the filling sets properly. If you’re impatient like me, you can speed this up by placing the pie in the fridge for about 45 minutes after it’s cooled to room temperature.
For serving, I love a scoop of vanilla bean ice cream or a dollop of lightly sweetened whipped cream. The cold creaminess against the warm, nutty crumble and tender apples is pure magic. If you’re keeping it lighter, a drizzle of Greek yogurt mixed with a touch of honey works beautifully too.
This pie pairs wonderfully with a cup of hot coffee or a glass of cold milk. For a fall gathering, try it with a warm apple cider or a spiced chai latte.
Storage: Cover the pie loosely with foil or plastic wrap and store at room temperature for up to 2 days. After that, refrigerate for up to 5 days. The crumble will soften slightly in the fridge, but it’s still delicious.
Reheating: Pop individual slices in the microwave for 20-30 seconds, or reheat the whole pie in a 300°F (150°C) oven for 10-15 minutes. The oven method helps restore some crunch to the crumble topping.
Freezing: You can freeze the unbaked pie (without the crumble topping) for up to 3 months. Wrap it tightly in plastic wrap and then foil. When ready to bake, add the crumble topping and bake from frozen, adding 15-20 minutes to the baking time. You can also freeze the fully baked and cooled pie for up to 3 months.
The flavors actually deepen after a day or two in the fridge. I’ve found that day-old pie is sometimes even better than fresh—the spices meld together and the apples absorb all that brown butter goodness.
Nutritional Information & Benefits
Per slice (based on 8 servings): Approximately 320 calories, 14g fat, 48g carbohydrates, 4g fiber, 4g protein. These values are estimates and will vary based on specific ingredients and portion sizes.
This lighter version saves about 80 calories and 6 grams of fat per slice compared to a traditional apple crumble pie, thanks to the thinner crust and reduced sugar in the filling. The apples provide a good dose of fiber and vitamin C, while the oats in the crumble add soluble fiber that helps with heart health.
If you’re watching your sugar intake, you can reduce the brown sugar in the filling by another tablespoon without sacrificing too much sweetness—the apples do a lot of the heavy lifting. The brown butter crumble is where the flavor magic happens, so I wouldn’t recommend cutting back there.
This recipe is naturally vegetarian and can easily be made gluten-free or vegan with the substitutions mentioned above. It contains dairy and gluten in its standard form, so be mindful if you’re cooking for someone with allergies.
Conclusion
This lighter brown butter apple crumble pie has become my go-to dessert for every fall gathering, every cozy night in, and every time I need to remind myself that eating well doesn’t mean eating boring. It’s the recipe I pull out when I want to impress without stress, and it never lets me down.
I love that this pie lets me have my comfort food and feel good about it too. The brown butter adds that luxurious depth that makes you close your eyes after the first bite, while the lighter approach means I can go back for seconds without a second thought. Margaret’s grandmother would probably approve—after all, she was all about making food that feeds the soul.
I’d love to hear how this turns out for you. Did you try a variation? Swap in a different fruit? Add your own spice blend? Drop a comment below and let me know. And if you share a photo on Pinterest, tag me—I want to see your beautiful pie in all its golden, crumbly glory. Happy baking, friends!
Frequently Asked Questions
Can I use pre-made pie crust to save time?
Absolutely. A store-bought refrigerated pie crust works perfectly in a pinch. Just blind bake it for about 10 minutes at 375°F before adding the filling to prevent a soggy bottom. The brown butter crumble will still make it taste homemade.
Why did my crumble topping turn out soggy?
This usually happens if the butter was too warm when you mixed it into the dry ingredients, or if the pie wasn’t baked long enough. Make sure your brown butter has cooled slightly (but is still liquid) before mixing. Also, don’t skip the baking sheet under the pie—it helps the bottom cook evenly.
Can I make this pie ahead of time?
Yes! You can assemble the entire pie (without the crumble topping) a day ahead, cover it, and refrigerate. Add the crumble just before baking. Or bake the pie fully, cool it, and reheat gently before serving. The flavors actually improve after a day.
What’s the best apple for this pie?
I recommend a mix of Granny Smith and Honeycrisp. Granny Smith holds its shape and provides tartness, while Honeycrisp adds sweetness and tenderness. If you only have one variety, use all Granny Smith and increase the sugar by a tablespoon.
How do I know when the pie is done baking?
The crumble should be golden brown, and you should see the filling bubbling up around the edges. Insert a knife into the center—the apples should be tender but not mushy. If the crumble is browning too quickly, tent the pie with foil for the last 15-20 minutes of baking.
Pin This Recipe!
Lighter Brown Butter Apple Crumble Pie
A lighter version of classic apple crumble pie with a nutty brown butter topping, thinner crust, and reduced sugar. It delivers soul-soothing comfort without the guilt, perfect for fall gatherings or cozy nights in.
- Prep Time: 20 minutes
- Cook Time: 45-55 minutes
- Total Time: 1 hour 15 minutes
- Yield: 8 servings 1x
- Category: Dessert
- Cuisine: American
Ingredients
- 1 ¼ cups all-purpose flour
- ½ teaspoon salt
- 1 tablespoon granulated sugar
- ½ cup cold unsalted butter, cut into small cubes
- 3–4 tablespoons ice water
- 6 medium apples, peeled, cored, and sliced ¼-inch thick (mix of Granny Smith and Honeycrisp)
- 3 tablespoons brown sugar
- 1 tablespoon all-purpose flour
- 1 teaspoon ground cinnamon
- ¼ teaspoon ground nutmeg
- 1 tablespoon lemon juice
- 1 teaspoon vanilla extract
- ½ cup unsalted butter (for crumble)
- ¾ cup old-fashioned rolled oats
- ½ cup all-purpose flour (for crumble)
- ⅓ cup brown sugar (packed, for crumble)
- ¼ teaspoon salt (for crumble)
- ½ teaspoon cinnamon (for crumble)
Instructions
- Make the crust: In a medium bowl, whisk together flour, salt, and sugar. Add cold butter cubes and cut in using a pastry cutter or two forks until mixture resembles coarse meal with some pea-sized butter pieces. Drizzle 3 tablespoons ice water over mixture and stir with a fork until dough starts to come together. If dry, add remaining tablespoon water. Turn dough onto floured surface, shape into a disk, wrap in plastic, and refrigerate for at least 30 minutes.
- Preheat oven to 375°F (190°C). Place a baking sheet on the lower rack to catch drips.
- Brown the butter: In a light-colored skillet over medium heat, melt ½ cup butter for crumble. Stir constantly until butter foams, bubbles, turns golden, and smells nutty (about 4-6 minutes). Remove from heat immediately and pour into a heatproof bowl to stop cooking. Let cool slightly.
- Prepare the apples: In a large bowl, toss sliced apples with brown sugar, flour, cinnamon, nutmeg, lemon juice, and vanilla extract. Let sit for 10-15 minutes.
- Roll out the crust: On a lightly floured surface, roll chilled dough into a 12-inch circle, about ⅛-inch thick. Transfer to pie dish, press into bottom and up sides. Trim excess dough, leaving ½-inch overhang, fold under and crimp edges. Place crust in fridge while finishing crumble.
- Make the crumble topping: In a medium bowl, combine oats, flour, brown sugar, salt, and cinnamon. Pour slightly cooled brown butter over dry ingredients and stir until evenly moistened and clumpy. Set aside.
- Assemble the pie: Remove crust from fridge. Pour apple filling into crust, spreading evenly. Sprinkle brown butter crumble topping evenly over apples.
- Bake: Place pie on preheated baking sheet and bake for 45-55 minutes, until crumble is golden brown and filling bubbles around edges. If crumble browns too quickly, tent with foil after 30 minutes. Pie is done when a knife inserted into center meets tender apples.
- Cool: Let pie cool on a wire rack for at least 2 hours before slicing to allow filling to set.
Notes
Don’t skip browning the butter—it gives the crumble incredible depth. Watch the butter carefully to avoid burning. Let apples macerate for 10-15 minutes to prevent a soggy pie. Use a mix of apple varieties (Granny Smith and Honeycrisp) for best texture and flavor. Chill the crust for at least 30 minutes to prevent shrinking. For gluten-free, use a 1:1 gluten-free flour blend and gluten-free oats. For vegan, use high-quality vegan butter. The pie can be made ahead and stored at room temperature for up to 2 days or refrigerated for up to 5 days. Reheat in a 300°F oven for 10-15 minutes to restore crunch.
Nutrition
- Serving Size: 1 slice (1/8 of pie)
- Calories: 320
- Sugar: 24
- Sodium: 220
- Fat: 14
- Saturated Fat: 8
- Carbohydrates: 48
- Fiber: 4
- Protein: 4
Keywords: apple crumble pie, brown butter, lighter dessert, fall baking, apple pie, crumble topping, healthier pie


