The school fall festival was in six hours and I’d completely forgotten about the dessert auction. Everyone else would be bringing those elaborate pumpkin rolls that look like they belong on a magazine cover, or those fancy apple tarts with the lattice crust that takes hours. I had a box of instant pudding, some crushed chocolate cookies I’d been meaning to use for something, and a bag of candy corn that was probably left over from last year. Let me tell you, the panic was real. I mean, my kitchen looked like a tiny disaster zone, and I was this close to just buying a store-bought pie and hoping nobody noticed.
But then I spotted a can of pumpkin puree in the back of the pantry, and something clicked. Why not just… throw it together? Honestly, I wasn’t aiming for anything special. I just needed something that looked like I tried, even if I hadn’t. So I whipped up a quick pumpkin pudding, layered it with crushed cookies, and stuck a few gummy worms on top for fun. I called it “Pumpkin Patch Dirt Pudding Cups” because, well, that’s exactly what they looked like. I walked into that festival feeling like a fraud, carrying these little cups in a cardboard box.
And then the bidding started. My little cups went for more than the fancy pie. People were actually fighting over them. The lady next to me, who spent two days on her caramel apple cheesecake, looked at me like I’d cheated. But you know what? Sometimes the simplest thing wins, especially when you’re not trying to impress anyone. These light & easy pumpkin patch dirt pudding cups have been my go-to ever since. Maybe you’ve been there too—scrambling at the last minute and somehow stumbling onto something amazing. That’s this recipe. It’s the underdog that always comes out on top.
Why You’ll Love This Recipe
Let’s be real for a second. There are about a million pumpkin dessert recipes out there, and most of them require serious effort. These pudding cups? They’re the opposite. Here’s what makes them stand out:
- Quick & Easy: You can have these ready in under 20 minutes. No baking, no complicated steps, just mix and layer. Perfect for those days when you need dessert fast.
- Simple Ingredients: Everything comes from your regular grocery store. No fancy extracts or hard-to-find spices. You probably have most of this stuff already.
- Perfect for Fall Gatherings: Whether it’s a Halloween party, Thanksgiving potluck, or just a cozy night in, these cups fit right in. They’re portable, individual-sized, and always a hit.
- Crowd-Pleaser: Kids love the gummy worms and cookie “dirt.” Adults love the light, creamy pumpkin flavor. It’s the rare dessert that makes everyone happy.
- Unbelievably Delicious: The texture is silky and smooth, with just the right amount of crunch from the cookies. It tastes like fall in a cup, but without the heavy feeling you get from traditional pumpkin desserts.
What makes this different from every other pumpkin dessert? It’s the lightness. Most pumpkin pies and cheesecakes are dense and rich. These cups are airy and refreshing, thanks to the way the pudding comes together. I’ve tested this with full-fat, low-fat, and even dairy-free ingredients, and it works every time. It’s not just another version—it’s the version that won’t weigh you down.
This is the kind of dessert that makes you close your eyes after the first bite. It’s comfort food reimagined—healthier, faster, but with the same soul-soothing satisfaction. Perfect for impressing guests without stress, or turning a simple Tuesday into something memorable.
What Ingredients You Will Need
This recipe uses simple, wholesome ingredients to deliver bold fall flavor without the fuss. Most of these are pantry staples, especially if you do any fall baking.
For the Pumpkin Pudding Layer
- 1 can (15 oz) pumpkin puree (not pumpkin pie filling—make sure it’s 100% pure pumpkin)
- 1 package (3.4 oz) instant vanilla pudding mix (I prefer Jell-O brand for consistent results)
- 1 cup cold milk (whole milk gives the creamiest texture, but 2% works fine)
- 1/2 cup cold heavy cream (adds richness without being heavy)
- 1 teaspoon pumpkin pie spice (or make your own with cinnamon, nutmeg, ginger, and cloves)
- 1/2 teaspoon vanilla extract
- 2 tablespoons maple syrup (optional, for extra sweetness—use if you like things a bit sweeter)
For the “Dirt” Layer
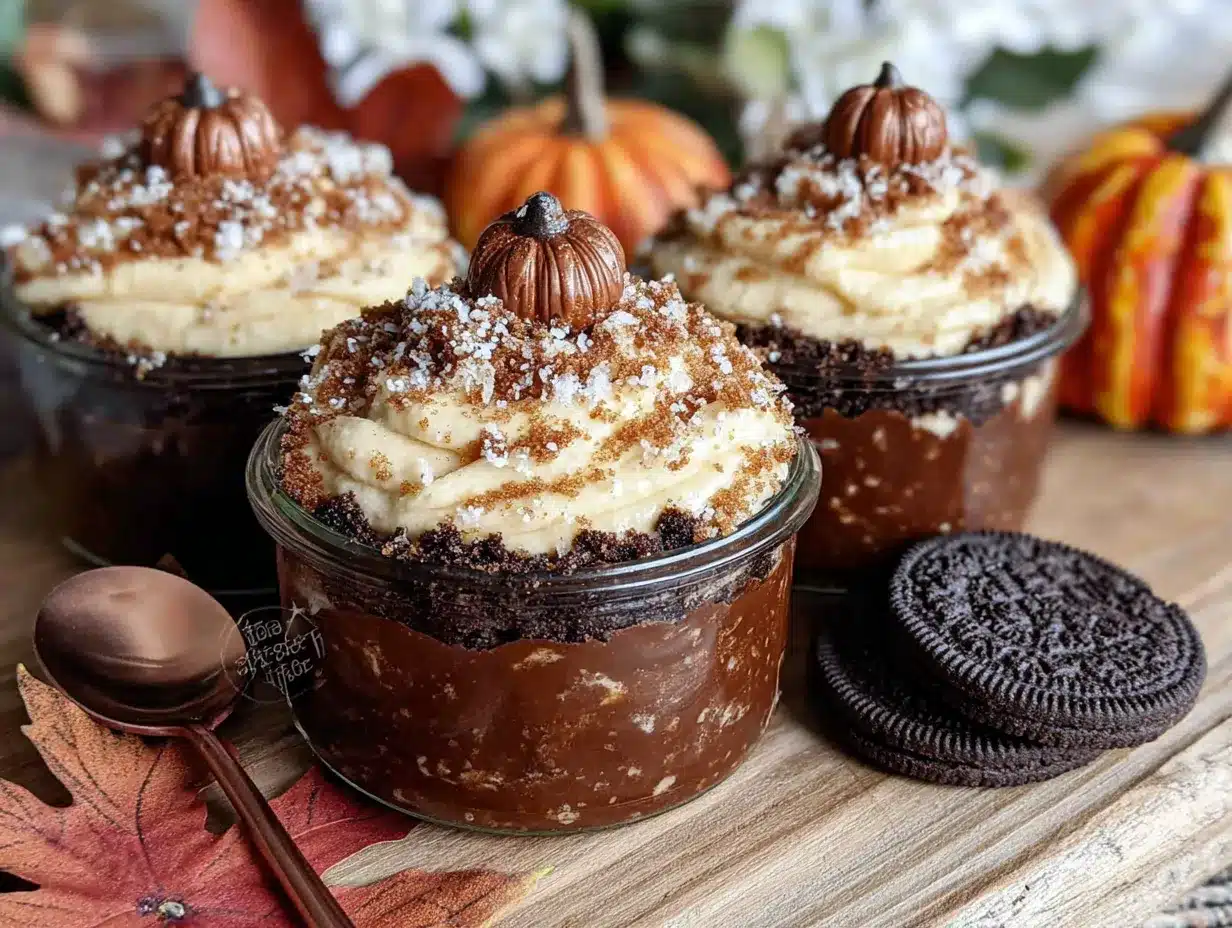
- 1 1/2 cups chocolate cookie crumbs (about 15-18 Oreos, cream removed, or chocolate graham crackers)
- 2 tablespoons unsalted butter, melted (helps the crumbs stick together slightly)
For the Topping & Decoration
- 1/2 cup whipped topping (Cool Whip or homemade—your choice)
- Gummy worms (the classic dirt dessert addition)
- Candy pumpkins or candy corn (for that pumpkin patch look)
- Optional: A few whole chocolate cookies for garnish
Ingredient selection tip: Look for pumpkin puree that’s thick and dark orange, not watery. Libby’s is my go-to brand because it’s consistently smooth and not stringy. For the cookies, I’ve found that Oreos give the best “dirt” color, but chocolate graham crackers work in a pinch and are slightly less sweet.
Substitution guidance: Use almond milk or oat milk for a dairy-free version, and dairy-free butter for the crumbs. For a gluten-free option, use gluten-free chocolate cookies—there are some great ones out there now. If you don’t have pumpkin pie spice, mix 1/2 teaspoon cinnamon, 1/4 teaspoon nutmeg, 1/8 teaspoon ginger, and a pinch of cloves.
Equipment Needed
You don’t need much for this recipe, which is part of the beauty. Here’s what you’ll need:
- Mixing bowls: A medium bowl for the pudding and a small one for the cookie crumbs.
- Whisk: For combining the pudding ingredients. A hand whisk works perfectly, no electric mixer required.
- Measuring cups and spoons: For accurate measurements. Trust me, pudding is forgiving but measuring helps.
- Small cups or jars: 6 to 8 small glasses, mason jars, or plastic cups. I use 6-ounce mason jars because they’re cute and portable.
- Food processor or zip-top bag: For crushing the cookies. A food processor gives fine crumbs, but a rolling pin over a bag works just as well.
- Spatula: For scraping every last bit of pudding into the cups. Waste not, want not.
If you don’t have small cups, you can use a large dish and make it a trifle-style dessert. Just layer everything in a big glass bowl. I’ve done that for parties, and it looks just as impressive. No food processor? No problem. Put the cookies in a zip-top bag, seal it, and go at it with a rolling pin. It’s a great stress reliever too!
Preparation Method
Let’s get to the fun part. Here’s how to make these light & easy pumpkin patch dirt pudding cups, step by step.
- Crush the cookies (5 minutes): Start by making your “dirt.” If you’re using Oreos, scrape off the cream filling first—you can save it for another use or just eat it. I won’t judge. Place the cookies in a food processor and pulse until you get fine crumbs. Alternatively, put them in a zip-top bag and crush with a rolling pin. You want a mixture of fine crumbs and slightly chunkier pieces for texture. Transfer to a small bowl, pour in the melted butter, and stir with a fork until the crumbs are evenly moistened. Set aside.
- Make the pumpkin pudding (5 minutes): In a medium bowl, whisk together the cold milk and cold heavy cream. Sprinkle the instant vanilla pudding mix over the top and whisk vigorously for about 2 minutes until it starts to thicken. Don’t walk away—this happens fast. Once it’s thick and smooth, add the pumpkin puree, pumpkin pie spice, vanilla extract, and maple syrup if using. Whisk until everything is completely combined. The mixture should be smooth, creamy, and a beautiful orange color. If it looks a little lumpy, keep whisking—it’ll smooth out.
- Check the consistency (1 minute): Let the pudding sit for about 2-3 minutes. It will continue to thicken as it sits. You want it thick enough to hold its shape when spooned, but not so thick that it’s stiff. If it’s too thin, let it sit another minute. If it’s too thick, whisk in a tablespoon of milk.
- Layer the cups (5 minutes): Grab your cups or jars. Start with a layer of cookie crumbs at the bottom—about 1 to 2 tablespoons, depending on your cup size. Press them down lightly with the back of a spoon. This creates the “dirt” base. Next, spoon or pipe the pumpkin pudding over the crumbs. Fill about halfway up the cup. Tap the cup gently on the counter to settle the pudding and remove any air bubbles. Add another layer of cookie crumbs, then more pudding, leaving about 1/2 inch of space at the top. Finish with a final sprinkle of cookie crumbs on top.
- Chill (at least 1 hour): Place the cups in the refrigerator for at least 1 hour. This allows the pudding to fully set and the flavors to meld together. The cookies will also soften slightly, giving that perfect “dirt” texture. If you’re in a rush, 30 minutes works, but an hour is better.
- Decorate (5 minutes): Just before serving, add a dollop of whipped topping on top of each cup. Stick a few gummy worms into the “dirt” so they look like they’re crawling out. Add a couple of candy pumpkins or candy corn on top. If you want to get fancy, crumble a whole cookie over the whipped topping. The presentation is half the fun with these cups!
Pro tip: For the cleanest layers, use a piping bag or a zip-top bag with the corner snipped off to pipe the pudding. It gives you more control and keeps the sides of the cup clean. But honestly, spooning it in works fine too—it’s going to get eaten anyway!
Cooking Tips & Techniques
I’ve made these pumpkin patch dirt pudding cups more times than I can count, and I’ve learned a few things along the way. Here are my best tips:
Don’t skip chilling the milk and cream. Cold dairy is essential for the pudding to set properly. If your milk is warm, the pudding will be runny and won’t set right. I learned this the hard way when I was rushing and used room-temperature milk. The result was soup, not pudding. Save yourself the disappointment and keep everything cold.
Watch the pudding consistency. Instant pudding is tricky because it sets fast. Once you add the milk, you have about 3-4 minutes before it firms up. If you’re layering, work quickly. If it gets too thick before you’re done, you can microwave it for 5-10 seconds to soften it, but be careful not to overheat it.
Crush cookies to different sizes. For the most realistic “dirt” effect, don’t crush all the cookies to a fine powder. Leave some slightly larger pieces. It gives the texture more interest and looks more like actual soil. Plus, those bigger pieces are delicious when they soften slightly from the pudding.
Let the flavors meld. These cups taste better after a few hours in the fridge. The pumpkin spice really develops, and the cookies soften to the perfect texture. I’ve made them a day ahead for parties, and they were even better the next day. Just add the gummy worms and candy right before serving so they don’t get soggy.
Use a piping bag for clean layers. If you want those Instagram-worthy layers, pipe the pudding instead of spooning it. It keeps the sides of the cup clean and gives you perfect separation between the dirt and pudding layers. Not necessary, but it does look pretty.
Don’t overmix the pudding. Once the pudding mix is incorporated, stop whisking. Overmixing can make the pudding thin and watery. You want it smooth, not beaten to death.
Variations & Adaptations
One of the best things about this recipe is how easily it adapts. Here are some variations I’ve tried and loved:
Dairy-Free Version
Use full-fat oat milk or coconut milk for the pudding, and coconut cream instead of heavy cream. For the cookie crumbs, use dairy-free chocolate cookies. The texture is slightly different—a bit less creamy—but the flavor is still fantastic. I made this for a friend with dairy allergies, and she asked for the recipe.
Gluten-Free Version
This one’s easy. Just use gluten-free chocolate cookies for the dirt layer. There are several good brands available now. The pudding itself is naturally gluten-free, so you’re good there. I’ve used gluten-free Oreo-style cookies before, and nobody noticed the difference.
Extra Pumpkin Spice Version
For those who want more fall flavor, add an extra teaspoon of pumpkin pie spice to the pudding. You can also mix a pinch of cinnamon into the cookie crumbs for a warm, spiced dirt layer. This version is perfect for Thanksgiving when you want maximum pumpkin flavor.
No-Bake Pumpkin Cheesecake Version
Add 4 ounces of softened cream cheese to the pudding mixture. Beat the cream cheese first until smooth, then fold in the pudding. This gives you a richer, cheesecake-like texture while keeping it light. It’s incredible, though slightly less “light” than the original.
Adult Version
Add a splash of bourbon or dark rum to the pudding mixture. About 1 tablespoon is enough to give it a grown-up kick without overwhelming the pumpkin flavor. I tried this for a Halloween party, and it was the first thing to disappear.
Serving & Storage Suggestions
These pumpkin patch dirt pudding cups are best served cold, straight from the fridge. The contrast between the cool, creamy pudding and the slightly softened cookie crumbs is pure magic. I like to serve them in clear cups so everyone can see the layers—it’s part of the fun.
Presentation ideas: For a Halloween party, add plastic spiders or skeleton fingers to the cups for a spooky touch. For Thanksgiving, skip the gummy worms and top with a sprinkle of cinnamon and a small cookie. For a kids’ party, let them decorate their own cups with gummy worms, candy corn, and sprinkles.
Storage: These cups keep well in the refrigerator for up to 3 days. Cover each cup with plastic wrap or a lid to prevent the pudding from absorbing fridge odors. The cookie layer will soften over time, which some people actually prefer. I think they’re best on day 2.
Freezing: I don’t recommend freezing these cups. The pudding becomes watery when thawed, and the texture is just not right. If you need to make them ahead, do it up to 2 days in advance and keep them refrigerated.
Reheating: These are served cold, so no reheating needed. If you’ve stored them and they seem a bit firm, let them sit at room temperature for 10 minutes before serving.
Flavor development: The pumpkin spice flavor actually intensifies after a day in the fridge. If you’re making these for a special occasion, I highly recommend making them the day before. The flavors meld together beautifully, and the texture is perfect.
Nutritional Information & Benefits
Here’s the thing about these light & easy pumpkin patch dirt pudding cups—they’re actually pretty reasonable as desserts go. Per serving (based on 8 servings):
- Calories: Approximately 220-250
- Fat: 10g (mostly from the heavy cream and butter)
- Carbohydrates: 32g
- Protein: 4g
- Fiber: 3g (thanks to the pumpkin puree)
- Sugar: 20g (can be reduced with sugar-free pudding mix)
Health benefits: Pumpkin puree is packed with vitamin A, which is great for eye health and immune function. It’s also a good source of fiber, which helps with digestion and keeps you feeling full. The cookies and pudding add sugar, sure, but the pumpkin brings real nutritional value to the table. It’s not health food, but it’s a smarter choice than most store-bought desserts.
Dietary considerations: This recipe can easily be made dairy-free, gluten-free, and even lower in sugar. For a low-carb version, use sugar-free pudding mix and replace the cookie crumbs with crushed nuts or sugar-free chocolate cookies. The pumpkin itself is naturally low in carbs and high in nutrients.
Allergens: Contains dairy and gluten (unless modified). The gummy worms may contain gelatin, so check labels if serving vegetarians. Candy corn is typically vegan, but always verify.
My personal take: I love that this dessert lets me enjoy the flavors of fall without feeling like I need a nap afterward. It’s light enough that you can have one after dinner and still feel good. And honestly, knowing there’s actual pumpkin in there makes me feel a tiny bit virtuous. Even if I’m eating gummy worms on top.
Conclusion
These light & easy pumpkin patch dirt pudding cups are proof that you don’t need fancy techniques or complicated ingredients to make something memorable. They’re the dessert that saves you when you’re in a pinch, the one that wins over the crowd without breaking a sweat, and the one that tastes like fall without the heavy feeling.
I love how customizable they are—you can dress them up for a party or keep them simple for a weeknight treat. Swap the gummy worms for candy corn, add a sprinkle of cinnamon, or leave them plain. They work every time. And the best part? You probably have most of the ingredients in your kitchen right now.
So go ahead and give these a try. Make them for your next gathering, or make them just because it’s Tuesday. Trust me, once you taste that creamy pumpkin pudding with the crunchy chocolate dirt, you’ll understand why this recipe has become my fall favorite. And when you make them, come back and let me know how they turned out. I’d love to hear about your own pumpkin patch creations!
Happy fall, friends. May your days be cozy and your desserts be delicious.
Frequently Asked Questions
Can I use homemade pumpkin puree instead of canned?
Absolutely! Just make sure your homemade puree is thick and not watery. If it seems runny, strain it through a cheesecloth or paper towel for about 30 minutes before using. Canned pumpkin is more consistent, but homemade works great too.
How far in advance can I make these cups?
You can make them up to 2 days ahead. Just keep them covered in the fridge and add the gummy worms and candy right before serving. The cookies will soften over time, but that’s actually a good thing for the “dirt” texture.
Can I use sugar-free pudding mix?
Yes, sugar-free instant vanilla pudding works perfectly. The texture is slightly different—a bit less creamy—but the flavor is still great. Just follow the same instructions and adjust the sweetness if needed.
My pudding turned out runny. What went wrong?
Most likely, your milk and cream weren’t cold enough. Instant pudding needs cold dairy to set properly. Also, make sure you’re using instant pudding, not cook-and-serve. If it’s still runny after 10 minutes in the fridge, whisk in a little more pudding mix.
Can I use a different type of cookie for the dirt layer?
Definitely. Chocolate graham crackers work well, as do chocolate wafer cookies. For a different flavor, try ginger snaps or speculoos cookies—they add a nice spice that complements the pumpkin. Just crush them the same way.
PrintLight & Easy Pumpkin Patch Dirt Pudding Cups
These no-bake pumpkin pudding cups are layered with chocolate cookie ‘dirt’ and topped with gummy worms and candy pumpkins. They’re quick, easy, and perfect for fall gatherings.
- Prep Time: 15 minutes
- Cook Time: 0 minutes
- Total Time: 1 hour 15 minutes (includes chilling)
- Yield: 8 servings 1x
- Category: Dessert
- Cuisine: American
Ingredients
- 1 can (15 oz) pumpkin puree (not pumpkin pie filling)
- 1 package (3.4 oz) instant vanilla pudding mix
- 1 cup cold milk
- 1/2 cup cold heavy cream
- 1 teaspoon pumpkin pie spice
- 1/2 teaspoon vanilla extract
- 2 tablespoons maple syrup (optional)
- 1 1/2 cups chocolate cookie crumbs (about 15–18 Oreos, cream removed)
- 2 tablespoons unsalted butter, melted
- 1/2 cup whipped topping
- Gummy worms for decoration
- Candy pumpkins or candy corn for decoration
Instructions
- Crush the cookies: Remove cream from Oreos (optional). Pulse cookies in a food processor or crush in a zip-top bag with a rolling pin until fine crumbs form. Transfer to a bowl, add melted butter, and stir until evenly moistened. Set aside.
- Make the pumpkin pudding: In a medium bowl, whisk together cold milk and cold heavy cream. Sprinkle instant vanilla pudding mix over top and whisk vigorously for about 2 minutes until thickened. Add pumpkin puree, pumpkin pie spice, vanilla extract, and maple syrup (if using). Whisk until smooth and creamy.
- Check consistency: Let pudding sit for 2-3 minutes to thicken further. If too thin, let sit longer; if too thick, whisk in a tablespoon of milk.
- Layer the cups: In small cups or jars, add 1-2 tablespoons cookie crumbs and press down lightly. Spoon or pipe pumpkin pudding over crumbs to fill halfway. Tap cup gently to settle. Add another layer of crumbs, then more pudding, leaving 1/2 inch space at top. Finish with a final sprinkle of cookie crumbs.
- Chill: Refrigerate cups for at least 1 hour to set.
- Decorate: Just before serving, add a dollop of whipped topping. Insert gummy worms and place candy pumpkins or candy corn on top.
Notes
For cleanest layers, use a piping bag or zip-top bag with corner snipped to pipe pudding. These cups taste even better the next day. Add gummy worms and candy just before serving to prevent sogginess.
Nutrition
- Serving Size: 1 cup
- Calories: 235
- Sugar: 20
- Sodium: 280
- Fat: 10
- Saturated Fat: 6
- Carbohydrates: 32
- Fiber: 3
- Protein: 4
Keywords: pumpkin, dirt pudding, no-bake, fall dessert, Halloween, Thanksgiving, easy dessert, pumpkin patch


