I was standing in the spice aisle of my local grocery store last Tuesday when a woman walked by holding a pumpkin pie. The scent hit me—that warm, clove-and-cinnamon cloud—and suddenly I was seven years old, sitting on my aunt Margo’s cracked vinyl kitchen stool, watching her crush graham crackers with a rolling pin because her food processor was broken. She’d let me lick the butter-sugar mixture off my finger, and I remember thinking, “This is the best part.” She passed away a few years ago, and honestly, I haven’t had a proper pumpkin dessert since that didn’t make me a little sad. But standing there in the aisle, I realized I could make something that felt like her—but faster, easier, and without turning on the oven. Because let’s face it, who has time for that on a Tuesday?
That’s how these Easy No-Bake Pumpkin Cheesecake Bars were born. They’re not a replica of her pie, but they capture that same feeling—the creamy filling, the buttery crust, the little sigh you let out after the first bite. I made a batch that night, and by the time I was done, the kitchen smelled like fall, and I had a dessert ready in the time it takes to watch one episode of a show. Maybe you’ve been there—wanting something that tastes like effort but actually takes none. These bars are that recipe.
They’re the kind of dessert you make when you’re short on time but still want to impress. Or when you just need a little comfort, fast. No oven, no fuss, just pure pumpkin cheesecake goodness.
Why You’ll Love This Recipe
I’ve tested this recipe about six times to get it just right—not too sweet, not too dense, with a crust that actually holds together without crumbling everywhere. Here’s why these bars are a game-changer for busy weeknights:
- Quick & Easy: Comes together in about 10 minutes of active prep. No baking, no waiting for the oven to preheat.
- Simple Ingredients: You probably already have most of these in your pantry—graham crackers, cream cheese, pumpkin puree, and basic spices.
- Perfect for Fall Gatherings: Great for Thanksgiving, potlucks, or just a Tuesday night treat when you need something cozy.
- Crowd-Pleaser: Even people who “don’t like pumpkin” have asked me for the recipe. The cream cheese balances the pumpkin perfectly.
- Unbelievably Delicious: The texture is silky and smooth, with that satisfying crunch from the crust. It’s comfort food without the oven heat.
What makes this version different from the rest? It’s the ratio. I spent a lot of time tweaking the pumpkin-to-cream cheese balance so it’s not too pumpkin-heavy or too cheesecake-like. Plus, I use a little trick—chilling the crust before adding the filling—so it stays firm and doesn’t get soggy. This isn’t just another no-bake dessert; it’s the one you’ll make again and again because it actually works.
Honestly, this recipe is the kind that makes you close your eyes after the first bite. It’s fall in a pan, but without the stress.
What Ingredients You Will Need
This recipe uses simple, wholesome ingredients to deliver that rich, creamy flavor without any complicated steps. Most of these are pantry staples, especially during pumpkin season.
For the Crust
- 2 cups graham cracker crumbs (about 14-16 full sheets, crushed finely) – I prefer using Honey Maid brand for consistent texture. You can also use gluten-free graham crackers if needed.
- 1/2 cup unsalted butter, melted – Adds richness and helps the crust hold together. Salted butter works too, just skip the added salt.
- 1/4 cup granulated sugar – Just enough sweetness to balance the buttery crust.
- 1/4 teaspoon salt – Enhances the flavors and prevents the crust from tasting flat.
For the Pumpkin Cheesecake Filling
- 16 oz (450g) cream cheese, softened – Full-fat cream cheese gives the best texture. Let it sit at room temperature for about 30 minutes before mixing so it blends smoothly.
- 1 cup (240g) pumpkin puree – Make sure it’s 100% pure pumpkin, not pumpkin pie filling. I recommend Libby’s brand for consistent results.
- 1/2 cup (100g) granulated sugar – Adds sweetness without overpowering the pumpkin.
- 1/4 cup (60ml) heavy cream – Makes the filling extra creamy. You can substitute with full-fat coconut cream for a dairy-free option.
- 1 teaspoon vanilla extract – Pure vanilla extract adds depth. Avoid imitation vanilla if possible.
- 1 teaspoon pumpkin pie spice – A blend of cinnamon, nutmeg, ginger, and cloves. If you don’t have it, use 1/2 teaspoon cinnamon + 1/4 teaspoon nutmeg + 1/4 teaspoon ginger.
- 1/2 teaspoon ground cinnamon – Extra warmth and flavor.
- Pinch of salt – Balances the sweetness and brightens the flavors.
For the Topping (Optional but Recommended)
- 1/2 cup (120ml) heavy cream – For whipped cream. Add 1 tablespoon powdered sugar and 1/2 teaspoon vanilla extract if you want it sweetened.
- Caramel sauce or chopped pecans – For drizzling or sprinkling on top. Store-bought caramel works great, or use my quick homemade version (1/2 cup brown sugar + 2 tablespoons butter + 2 tablespoons heavy cream, simmered for 2 minutes).
Equipment Needed
You don’t need fancy tools for this recipe, which is part of the beauty. Here’s what you’ll need:
- 8×8-inch baking pan or 9×9-inch pan – A square pan works best for bars. If using a 9×9, the bars will be slightly thinner.
- Parchment paper – Lining the pan makes lifting out the bars super easy. Leave some overhang on two sides for handles.
- Mixing bowls – One medium bowl for the crust, one large bowl for the filling.
- Electric hand mixer or stand mixer – A hand mixer works perfectly. You can also mix by hand if you have a strong arm, but the cream cheese needs to be very soft.
- Food processor or zip-top bag + rolling pin – For crushing graham crackers. I’ve used both methods; the food processor is faster, but a rolling pin and bag gives you a little arm workout.
- Spatula – For pressing the crust and spreading the filling evenly.
- Measuring cups and spoons – Standard set for accurate measurements.
If you don’t have a food processor, just put the graham crackers in a zip-top bag and crush them with a rolling pin. It’s a little messy but works great. I actually prefer it because I can control the texture better—some finer crumbs, some slightly chunkier bits for texture.
Preparation Method
Let’s get to the fun part. This recipe moves fast, so have everything ready before you start.
- Prepare the pan: Line your 8×8-inch baking pan with parchment paper, leaving an overhang on two opposite sides. This will help you lift the bars out later. Set aside.
- Make the crust: In a medium bowl, combine 2 cups graham cracker crumbs, 1/4 cup sugar, and 1/4 teaspoon salt. Pour in 1/2 cup melted butter and stir with a fork until all the crumbs are moistened. The mixture should look like wet sand and hold together when squeezed.
- Press the crust: Transfer the crumb mixture to your prepared pan. Press it down firmly and evenly using the bottom of a measuring cup or a flat glass. Don’t skip this—a tight crust prevents crumbling later. Pop the pan in the fridge while you make the filling (at least 10 minutes). This helps the crust set.
- Beat the cream cheese: In a large bowl, beat 16 oz softened cream cheese with an electric mixer on medium speed until smooth and creamy, about 2 minutes. Scrape down the sides and bottom of the bowl with a spatula.
- Add sugar and pumpkin: Add 1/2 cup sugar and beat until combined. Then add 1 cup pumpkin puree, 1/4 cup heavy cream, 1 teaspoon vanilla extract, 1 teaspoon pumpkin pie spice, 1/2 teaspoon cinnamon, and a pinch of salt. Beat on medium-low until everything is smooth and fully incorporated. Don’t overmix—just until it’s combined. Overmixing can incorporate too much air, which can cause cracks as it sets.
- Check the texture: The filling should be thick but spreadable. If it looks too thin, it might need a little more cream cheese. If it’s too thick, add a tablespoon more heavy cream. It should hold its shape when you lift the spatula.
- Assemble: Remove the crust from the fridge. Spoon the pumpkin cheesecake filling over the crust and spread it evenly with a spatula. Tap the pan gently on the counter a few times to release any air bubbles.
- Chill: Cover the pan with plastic wrap or foil and refrigerate for at least 4 hours, preferably overnight. This is the hardest part—waiting. But it’s essential for the bars to set properly. The filling needs time to firm up so you can slice clean bars.
- Slice and serve: Once fully chilled, lift the bars out using the parchment overhang. Place on a cutting board and slice into 9 or 16 squares, depending on how big you want them. Wipe the knife clean between cuts for neat edges.
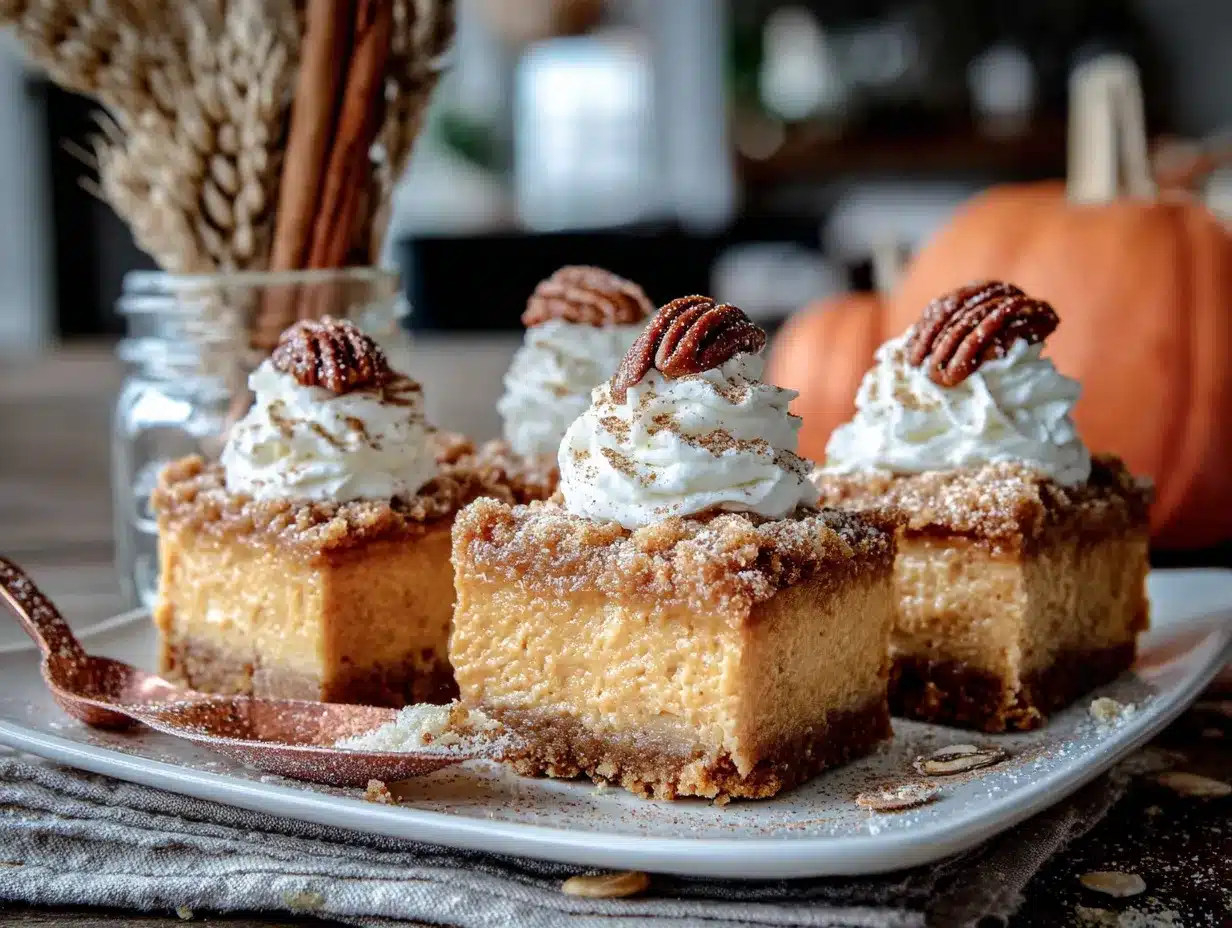
- Add toppings: If using whipped cream, beat 1/2 cup heavy cream with 1 tablespoon powdered sugar and 1/2 teaspoon vanilla until stiff peaks form. Pipe or spoon onto each bar. Drizzle with caramel sauce and sprinkle with chopped pecans if desired.
Cooking Tips & Techniques
I’ve made this recipe enough times to know where things can go wrong. Here are my best tips to ensure success every time:
- Room temperature cream cheese is non-negotiable. Cold cream cheese will leave you with lumpy filling. Take it out of the fridge 30-40 minutes before you start. If you forget, cut it into small cubes and microwave in 10-second bursts until softened but not melted.
- Don’t skip chilling the crust. I made this mistake once because I was impatient. The crust absorbed moisture from the filling and turned soggy. Chilling it for at least 10 minutes creates a barrier that keeps it crisp.
- Use full-fat cream cheese. Low-fat or Neufchâtel cream cheese has a higher water content, which can make the filling runny. Trust me, the full-fat version is worth it for the texture.
- Let the bars chill overnight if you can. Four hours is the minimum, but overnight gives you perfectly firm bars that slice like a dream. The flavors also meld together beautifully.
- For clean slices, use a sharp knife and wipe it clean between cuts. Run the knife under hot water, dry it, then slice. Repeat for each cut. This gives you those Instagram-worthy edges.
- If your filling seems too soft, add a tablespoon more cream cheese. Sometimes pumpkin puree can vary in moisture content. A little extra cream cheese helps thicken it up.
One time, I was in a rush and didn’t let the cream cheese soften properly. The filling was lumpy, and I spent 10 minutes trying to smooth it out. It still tasted fine, but the texture wasn’t as silky. Lesson learned—patience pays off.
Variations & Adaptations
This recipe is super flexible. Here are some ways to make it your own:
- Gluten-Free Version: Use gluten-free graham crackers or crushed gluten-free cookies (like Simple Mills almond flour crackers). The rest of the ingredients are naturally gluten-free.
- Dairy-Free Version: Substitute the cream cheese with a high-quality dairy-free cream cheese (like Kite Hill or Tofutti). Use coconut cream in place of heavy cream, and vegan butter or coconut oil for the crust. Let the dairy-free cream cheese soften well, as some brands can be a bit grainy when cold.
- Pumpkin Spice Latte Twist: Add 1-2 tablespoons of brewed espresso or strong coffee to the filling along with an extra 1/4 teaspoon cinnamon. It gives a subtle coffee flavor that pairs beautifully with the pumpkin.
- Chocolate Pumpkin Cheesecake Bars: Melt 1/2 cup semi-sweet chocolate chips and swirl it into the filling before chilling. Use a knife to create a marbled effect. The chocolate and pumpkin combo is surprisingly good.
- Gingersnap Crust: Replace the graham crackers with crushed gingersnap cookies. The spicy ginger flavor complements the pumpkin perfectly. Just reduce the sugar to 2 tablespoons since gingersnaps are already sweet.
- Keto/Low-Carb Option: Use a crust made from almond flour, butter, and a low-carb sweetener like erythritol. For the filling, use full-fat cream cheese, pumpkin puree, and a sugar substitute like Swerve. The texture will be slightly different but still delicious.
I once tried a version with a pecan shortbread crust—crushed pecans mixed with butter and a little brown sugar. It was amazing but a bit crumbly. If you try it, press the crust extra firmly and chill it longer.
Serving & Storage Suggestions
These bars are best served cold, straight from the fridge. The filling is firm but creamy, and the crust stays perfectly crisp. Here’s how to serve and store them:
- Serving Temperature: Serve chilled. Let them sit at room temperature for 5-10 minutes if you want a slightly softer texture, but don’t leave them out too long or they’ll get too soft.
- Presentation: Top each bar with a dollop of whipped cream, a drizzle of caramel sauce, and a sprinkle of chopped pecans or a dusting of cinnamon. For a cleaner look, pipe the whipped cream using a star tip.
- Complementary Dishes: These bars pair beautifully with a hot cup of coffee, chai latte, or spiced apple cider. They also make a great dessert after a hearty fall meal like roasted chicken or butternut squash soup.
- Storage: Store leftover bars in an airtight container in the refrigerator for up to 5 days. Place a sheet of parchment paper between layers to prevent sticking.
- Freezing: These bars freeze wonderfully. Freeze them on a baking sheet until solid, then wrap each bar individually in plastic wrap and store in a freezer-safe bag for up to 3 months. Thaw in the fridge overnight before serving. The crust stays remarkably crisp after freezing.
- Make-Ahead Tip: These bars are perfect for make-ahead desserts. Prepare them up to 2 days in advance and keep them chilled. Add the whipped cream and toppings just before serving for the best presentation.
The flavors actually deepen after a day in the fridge, so don’t be afraid to make them ahead. I’ve found they taste even better on day two.
Nutritional Information & Benefits
Here’s an approximate nutritional breakdown per bar (based on 16 servings, without toppings):
- Calories: 220
- Fat: 16g
- Carbohydrates: 18g
- Fiber: 1g
- Sugar: 12g
- Protein: 4g
- Vitamin A: 120% DV (from pumpkin)
Pumpkin is packed with vitamin A, which supports eye health and immune function. It’s also a good source of fiber and antioxidants. The cream cheese adds calcium and protein, making this dessert a little more balanced than typical sweets. If you’re watching your sugar intake, you can reduce the sugar to 1/3 cup without affecting the texture too much. For a lower-calorie option, use reduced-fat cream cheese and skip the whipped cream topping.
I’m not a nutritionist, but I like knowing that this dessert has some redeeming qualities. It’s not health food, but it’s not empty calories either—there’s real pumpkin in there!
Conclusion
These Easy No-Bake Pumpkin Cheesecake Bars are everything I wanted that day in the spice aisle—comfort, flavor, and simplicity. They’re the kind of dessert that feels special without making you spend hours in the kitchen. Whether you’re making them for a holiday gathering or just because it’s Wednesday and you need a little fall magic, they deliver every time.
I love that I can make these bars without turning on the oven, especially when the weather is still warm or I’m just too tired to deal with baking. They’ve become my go-to for potlucks and family dinners, and I always get asked for the recipe. Honestly, I don’t mind sharing—it’s so easy that anyone can make it.
Now it’s your turn. Try this recipe and let me know how it turns out! Leave a comment below with your favorite variation, or share a photo of your bars on Pinterest. I’d love to see your creations. Happy no-baking!
Frequently Asked Questions
Can I use pumpkin pie filling instead of pumpkin puree?
No, I wouldn’t recommend it. Pumpkin pie filling already has sugar and spices added, which would make the filling too sweet and throw off the spice balance. Stick with 100% pure pumpkin puree for the best results. If you only have pumpkin pie filling, reduce the sugar to 1/4 cup and skip the added spices, but the texture might be a bit softer.
How long do these bars need to chill?
At least 4 hours, but overnight is ideal. The filling needs time to firm up so you can get clean slices. If you’re in a hurry, you can pop them in the freezer for 1-2 hours, but watch them closely—they can freeze solid if left too long. For the best texture, I always aim for overnight chilling.
Can I make these bars vegan?
Yes, with a few swaps. Use vegan cream cheese (like Kite Hill or Violife), coconut cream instead of heavy cream, and vegan butter or coconut oil for the crust. Make sure your graham crackers are vegan (some brands use honey). The texture will be slightly different, but still delicious. I’ve made a vegan version for a friend, and she loved it.
Why is my filling lumpy?
Lumpy filling usually means your cream cheese was too cold when you mixed it. Make sure it’s at room temperature before beating. If you already have lumps, try beating the mixture on high speed for 30 seconds, then scraping the bowl. If that doesn’t work, strain the filling through a fine-mesh sieve before pouring it over the crust. It’s a bit of a hassle, but it saves the texture.
Can I skip the crust and make this a crustless cheesecake?
You can, but the bars will be much softer and harder to slice. The crust provides structure and texture. If you want to skip it, line the pan with parchment and pour the filling directly in. Chill for at least 6 hours, and serve with a spoon or as a parfait with crushed cookies on top. It’s more like a pumpkin mousse than a cheesecake bar, but it’s still tasty.
PrintEasy No-Bake Pumpkin Cheesecake Bars: Best 10-Minute Dessert
These Easy No-Bake Pumpkin Cheesecake Bars are a quick and simple dessert that captures the cozy flavors of fall without turning on the oven. With a buttery graham cracker crust and a creamy pumpkin cheesecake filling, they come together in just 10 minutes of active prep and are perfect for busy weeknights or holiday gatherings.
- Prep Time: 10 minutes
- Cook Time: 0 minutes
- Total Time: 4 hours 10 minutes (includes chilling time)
- Yield: 16 servings 1x
- Category: Dessert
- Cuisine: American
Ingredients
- 2 cups graham cracker crumbs (about 14–16 full sheets, crushed finely)
- 1/2 cup unsalted butter, melted
- 1/4 cup granulated sugar
- 1/4 teaspoon salt
- 16 oz (450g) cream cheese, softened
- 1 cup (240g) pumpkin puree
- 1/2 cup (100g) granulated sugar
- 1/4 cup (60ml) heavy cream
- 1 teaspoon vanilla extract
- 1 teaspoon pumpkin pie spice
- 1/2 teaspoon ground cinnamon
- Pinch of salt
- 1/2 cup (120ml) heavy cream (for whipped cream topping, optional)
- 1 tablespoon powdered sugar (for whipped cream, optional)
- 1/2 teaspoon vanilla extract (for whipped cream, optional)
- Caramel sauce or chopped pecans (for topping, optional)
Instructions
- Line an 8×8-inch baking pan with parchment paper, leaving an overhang on two opposite sides. Set aside.
- In a medium bowl, combine 2 cups graham cracker crumbs, 1/4 cup sugar, and 1/4 teaspoon salt. Pour in 1/2 cup melted butter and stir with a fork until all the crumbs are moistened and the mixture looks like wet sand.
- Transfer the crumb mixture to the prepared pan. Press it down firmly and evenly using the bottom of a measuring cup or a flat glass. Refrigerate for at least 10 minutes while you make the filling.
- In a large bowl, beat 16 oz softened cream cheese with an electric mixer on medium speed until smooth and creamy, about 2 minutes. Scrape down the sides and bottom of the bowl.
- Add 1/2 cup sugar and beat until combined. Then add 1 cup pumpkin puree, 1/4 cup heavy cream, 1 teaspoon vanilla extract, 1 teaspoon pumpkin pie spice, 1/2 teaspoon cinnamon, and a pinch of salt. Beat on medium-low until smooth and fully incorporated. Do not overmix.
- Remove the crust from the fridge. Spoon the pumpkin cheesecake filling over the crust and spread it evenly with a spatula. Tap the pan gently on the counter a few times to release air bubbles.
- Cover the pan with plastic wrap or foil and refrigerate for at least 4 hours, preferably overnight, until the bars are firm.
- Once fully chilled, lift the bars out using the parchment overhang. Place on a cutting board and slice into 9 or 16 squares. Wipe the knife clean between cuts for neat edges.
- If using whipped cream, beat 1/2 cup heavy cream with 1 tablespoon powdered sugar and 1/2 teaspoon vanilla until stiff peaks form. Pipe or spoon onto each bar. Drizzle with caramel sauce and sprinkle with chopped pecans if desired.
Notes
For best results, use full-fat cream cheese and let it come to room temperature before mixing. Chilling the crust before adding the filling helps keep it crisp. For clean slices, use a sharp knife and wipe it clean between cuts. The bars can be stored in the refrigerator for up to 5 days or frozen for up to 3 months.
Nutrition
- Serving Size: 1 bar (without toppi
- Calories: 220
- Sugar: 12
- Sodium: 180
- Fat: 16
- Saturated Fat: 9
- Carbohydrates: 18
- Fiber: 1
- Protein: 4
Keywords: no-bake pumpkin cheesecake bars, easy pumpkin dessert, no-bake cheesecake, pumpkin bars, fall dessert, quick dessert


