It was 10:47 PM on a random Wednesday in early October, and I had a very specific, slightly unhinged craving for something that tasted like childhood but looked like a graveyard. I didn’t have time to bake a full cake or fuss with fancy piping bags, but I had a package of Oreos that was about to go stale, a box of instant chocolate pudding, and this wild idea that maybe, just maybe, I could make dessert feel like a Halloween party without leaving my kitchen. Honestly, I was tired. The kind of tired where you just want to sit on the counter and eat frosting straight from the tub, but also the kind where you still want to impress yourself a little. You know that feeling, right?
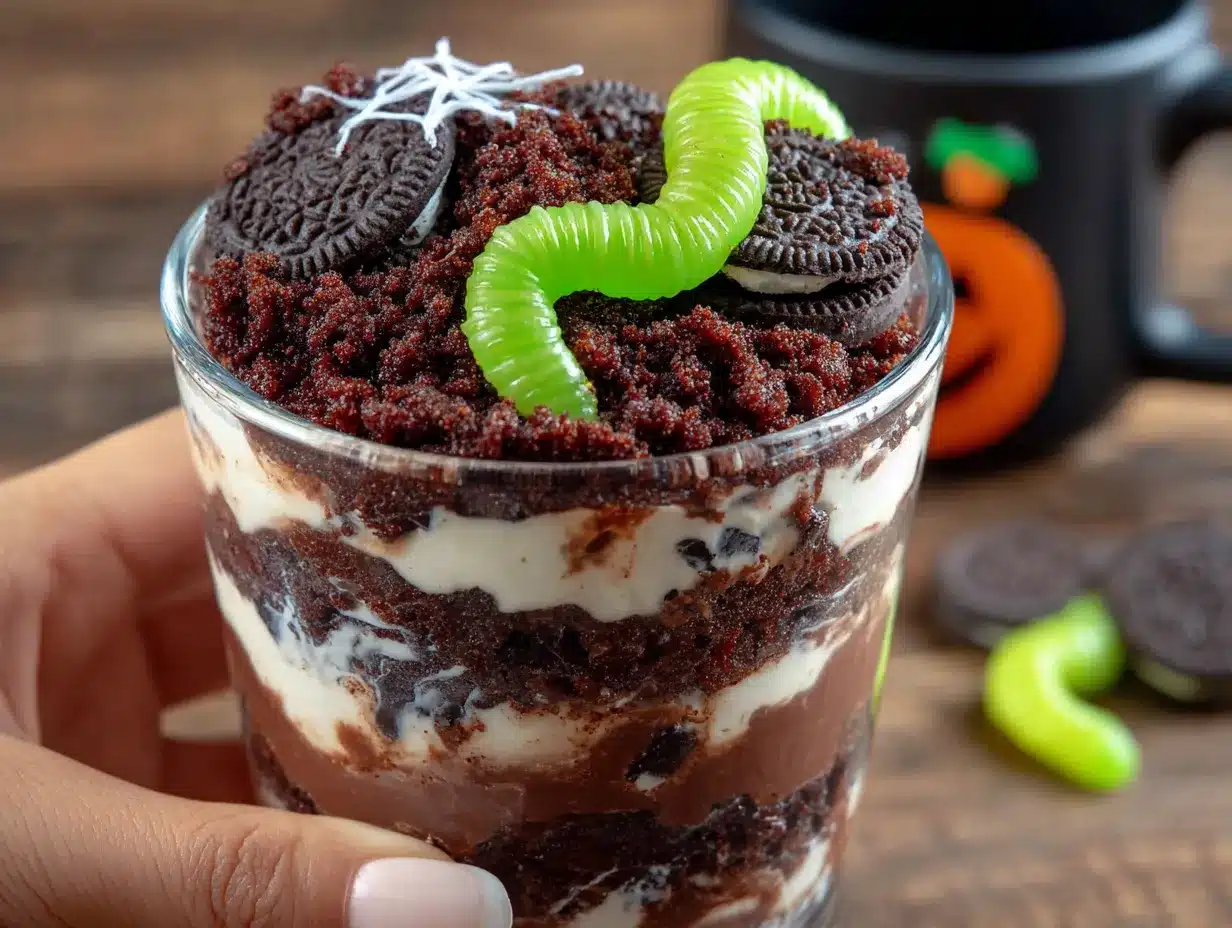
So there I was, standing in my sock feet, crushing cookies in a Ziploc bag with a rolling pin—which, by the way, made an absurd amount of noise for 11 PM. I was convinced my neighbors were going to think I was up to something suspicious. But the weird hours matter. Something about the late night loosened the usual rules. I wasn’t following a recipe; I was building a tiny edible landscape. I layered the chocolate pudding, sprinkled the Oreo “dirt,” and poked gummy worms through the surface so they looked like they were crawling out of a grave. I stood back and honestly laughed out loud. It was ridiculous and perfect and exactly what I needed.
That first bite had this unexpected texture—the creamy pudding, the crunchy crumb, the chewy gummy worm all at once. It was chaos in a cup, but it worked. And I realized that this is what Halloween dessert should be: fun, a little messy, and completely stress-free. No baking, no melting chocolate, no tempering eggs. Just assembly and pure, unapologetic joy. I’ve been making these Spooky Halloween Dirt Cups with Oreo Soil and Gummy Worms every year since, and they never fail to get the same reaction—big, delighted grins from kids and adults alike. Maybe you’ve been there, staring into your pantry at 10 PM, wondering what kind of magic you can make with almost nothing. Trust me, this is the answer.
Why You’ll Love This Recipe
Let me tell you, after years of testing Halloween desserts—some that flopped, some that took way too long, and some that were just plain disappointing—these Spooky Halloween Dirt Cups with Oreo Soil and Gummy Worms are the ones I keep coming back to. They’ve been tested on picky kids, skeptical adults, and even a few Halloween party guests who swore they weren’t “dessert people.” Every single time, the cups come back empty. Here’s why this recipe is different from the rest:
- Quick & Easy: Comes together in under 15 minutes. No oven, no stove, no complicated steps. Perfect for last-minute Halloween parties or a fun after-school project with the kids.
- Simple Ingredients: You probably have most of these in your pantry right now. Oreos, instant pudding mix, milk, and gummy worms. That’s it. No fancy grocery trips needed.
- Perfect for Halloween: These are the ultimate spooky treat for classroom parties, trick-or-treat gatherings, or a cozy night in watching Hocus Pocus. They look impressive but take almost no effort.
- Crowd-Pleaser: Kids love the gummy worms, adults love the nostalgic flavor, and everyone loves how fun they are to eat. Trust me, these disappear fast.
- Unbelievably Delicious: The combination of silky chocolate pudding, crunchy Oreo crumb, and chewy candy is pure comfort food. It’s like eating a deconstructed Oreo milkshake with a Halloween twist.
What makes this recipe my best version? It’s the texture. I use full-fat milk for the pudding to make it extra creamy, and I crush the Oreos to a perfect mix of fine dust and small chunks. That way, you get that “dirt” texture that actually looks like soil, but with little pockets of cookie crunch. Plus, I add a secret trick: a tiny pinch of salt to the pudding mix. It sounds weird, but it balances the sweetness and makes the chocolate flavor pop. This isn’t just another dirt cup recipe—it’s the one that tastes like you actually tried, even though you barely did.
This recipe is the kind that makes you close your eyes after the first bite. It’s comfort food reimagined—faster, simpler, but with the same soul-soothing satisfaction. Perfect for impressing Halloween guests without stress, or turning a simple Tuesday night into something memorable.
What Ingredients You Will Need
This recipe uses simple, wholesome ingredients to deliver that classic dirt cup flavor. Most of these are pantry staples, so you can whip these up anytime a Halloween craving hits. Here’s what you’ll need, along with a few tips I’ve learned from making these dozens of times.
For the Chocolate Pudding Base
- 1 (3.9 oz) box instant chocolate pudding mix – I recommend Jell-O brand for the smoothest texture, but any brand works. Make sure it’s instant, not cook-and-serve, or the texture will be off. (Pro tip: dark chocolate pudding mix adds a richer flavor if you can find it.)
- 2 cups cold whole milk – Whole milk gives the creamiest, most luxurious pudding. You can use 2% or oat milk in a pinch, but the texture won’t be quite as thick. For a dairy-free version, use full-fat canned coconut milk—it’s rich enough to work beautifully.
- 1/8 teaspoon fine sea salt – Optional but highly recommended. It cuts the sweetness and makes the chocolate taste deeper. Don’t skip it—it’s my little chef’s secret.
For the Oreo “Dirt”
- 1 (14.3 oz) package regular Oreo cookies – About 36 cookies. You need the whole cookie, filling and all. The cream center helps the crumb stick together and gives it that realistic dirt texture. Don’t use Double Stuf—too much filling makes it greasy. (I learned this the hard way after a very sad, soggy batch.)
- Optional: 2 tablespoons unsweetened cocoa powder – If your Oreos are on the lighter side, a dusting of cocoa powder makes the “dirt” look darker and more authentic. I only do this if I’m serving them at a party where presentation matters.
For the Spooky Decorations
- 1 (5 oz) bag gummy worms – The classic choice. Look for sour or regular—both work great. I like the bright green and red ones for maximum Halloween contrast against the dark “dirt.” If you can find Halloween-themed gummy worms with spooky shapes, even better.
- Optional garnishes: Small candy pumpkins, candy eyeballs, or crushed graham crackers for “sand.” I sometimes add a few chocolate sprinkles on top to look like tiny pebbles. Get creative!
For the Cups
- 6 to 8 small clear plastic or glass cups – Clear cups are essential for showing off the layers. I use 5-ounce plastic party cups for kids’ parties (they’re cheap and disposable), but small mason jars or glass tumblers work beautifully for a more grown-up presentation. Just make sure they’re wide enough to fit a spoon.
Ingredient sourcing tip: For the best texture, look for Oreos that are fresh—check the expiration date. Stale cookies won’t crush as evenly and can taste a bit cardboard-y. For the gummy worms, I’ve had the best luck with Trolli or Black Forest brands; they’re softer and chewier than some store brands.
Substitution guidance: If you’re gluten-free, use gluten-free chocolate sandwich cookies (like Glutino or Kinnikinnick) and a gluten-free instant pudding mix. For a vegan version, use plant-based milk and vegan chocolate pudding mix, plus vegan sandwich cookies (Oreos are actually vegan!). The gummy worms are usually not vegan (they contain gelatin), so look for vegan gummy options if needed.
Equipment Needed
You don’t need a fancy kitchen to make these Spooky Halloween Dirt Cups with Oreo Soil and Gummy Worms. In fact, you probably already own everything on this list. Here’s what you’ll need, plus a few alternatives I’ve tested over the years.
- Large mixing bowl and whisk – For making the pudding. A hand whisk works fine, but an electric mixer on low speed makes it even smoother and cuts down on lumps. If you’re using a whisk, just be prepared to put in a little elbow grease for about 2 minutes.
- Ziploc bag (gallon size) and rolling pin – This is my go-to method for crushing Oreos. Put the cookies in the bag, seal it (squeeze out the air first), and go to town with the rolling pin. It’s oddly satisfying and gives you control over the crumb size. No rolling pin? A heavy skillet or even a wine bottle works in a pinch. (I’ve used both—don’t judge.)
- Food processor or blender (optional) – If you want perfectly uniform “dirt” in about 10 seconds, a food processor is your best friend. Just pulse the Oreos until they resemble coarse sand. Be careful not to over-process—you want some texture, not a paste. I only use this method when I’m making a big batch for a party.
- Measuring cups and spoons – For the milk and salt. I recommend using a liquid measuring cup for the milk to get an accurate measurement.
- Small spatula or spoon – For layering the pudding and dirt into the cups. A rubber spatula helps scrape every last bit of pudding out of the bowl—waste not, want not.
- 6 to 8 clear cups – As mentioned above, clear cups are key for showing off the layers. I’ve used everything from shot glasses (for mini versions) to pint-sized mason jars (for giant, shareable portions).
Budget-friendly tip: You don’t need to buy special Halloween cups. Just use clear plastic cups from the grocery store—they’re cheap and work perfectly. If you want to get fancy, add a Halloween-themed sticker or a strip of washi tape to the outside.
Maintenance tip: If you use a food processor, wash it immediately after crushing the Oreos. The sugar and cream can stick to the blade and become a nightmare to clean if left to dry. Trust me on this one.
Preparation Method
Alright, let’s get to the fun part. This recipe is all about assembly, so take your time and enjoy the process. Here’s exactly how to make Spooky Halloween Dirt Cups with Oreo Soil and Gummy Worms, step by step.
- Make the chocolate pudding. In a large mixing bowl, combine the instant chocolate pudding mix, 2 cups cold whole milk, and 1/8 teaspoon salt (if using). Whisk vigorously for about 2 minutes, or until the mixture thickens and becomes smooth. It will start out thin, then suddenly get thick—that’s normal. If you’re using an electric mixer, beat on low speed for 1-2 minutes. Let the pudding sit for 5 minutes to set up completely. (Pro tip: Taste it here. If you want a richer chocolate flavor, add an extra tablespoon of cocoa powder and whisk again.)
- Crush the Oreos. While the pudding sets, prepare the Oreo “dirt.” Place the entire package of Oreos (filling and all) into a gallon-size Ziploc bag. Seal the bag tightly, squeezing out as much air as possible. Using a rolling pin, crush the cookies until they resemble coarse sand with a few small chunks. You want a mix of fine dust and tiny pieces—it looks more like real soil that way. If you’re using a food processor, pulse the cookies in batches until you reach the desired texture. Be careful not to over-process; you don’t want a paste. (I once got distracted and ended up with Oreo butter. It was delicious but not useful for dirt cups.)
- Layer the cups. Now comes the fun part—assembly. Spoon about 2 tablespoons of the crushed Oreos into the bottom of each clear cup. This creates the “base layer” of soil. Gently press it down with the back of a spoon to make it even. Next, spoon or pipe the chocolate pudding on top of the Oreo layer, filling the cup about halfway. Use a spatula to spread it evenly. Then, add another layer of crushed Oreos on top of the pudding—about 2 more tablespoons. This creates the “topsoil.” You should have a clear layering effect: dirt, pudding, dirt.
- Add the gummy worms. Here’s where the magic happens. Take 2-3 gummy worms and gently press them into the top layer of Oreo dirt, leaving part of the worm sticking out. Arrange them so they look like they’re crawling out of the soil. For extra spookiness, you can have one worm “dangling” over the edge of the cup, as if it’s escaping. (I like to do a mix of buried and partially exposed worms—it adds visual interest.)
- Chill (optional but recommended). For the best texture, refrigerate the dirt cups for at least 30 minutes before serving. This allows the pudding to firm up and the Oreo crumbs to soften slightly, creating a more cohesive texture. If you’re serving them immediately, they’ll still be delicious—just a bit more crunchy. (I’ve done both, and the chilled version is my favorite.)
- Garnish and serve. Just before serving, add any optional garnishes—a candy pumpkin on top, a pair of candy eyeballs peeking out of the dirt, or a sprinkle of chocolate sprinkles. Serve the cups with spoons and watch them disappear. (Sensory cue: The pudding should be silky and smooth, the Oreo dirt should have a satisfying crunch, and the gummy worms should be chewy and bright against the dark soil.)
Troubleshooting tip: If your pudding is too thin, you may have used warm milk or not whisked it long enough. Instant pudding needs cold milk and at least 2 minutes of vigorous whisking to set. If it’s still runny after 5 minutes, pop it in the fridge for 10 minutes to firm up. If your Oreo dirt is too clumpy, you may have crushed the cookies too finely or used Double Stuf Oreos. Just break up the clumps with your fingers before layering.
Cooking Tips & Techniques
After making these Spooky Halloween Dirt Cups with Oreo Soil and Gummy Worms about a dozen times (no exaggeration), I’ve picked up a few tricks that make the process smoother and the final result even better. Here are my top tips, straight from my messy kitchen to yours.
Crush the Oreos in batches. If you’re making a double batch, don’t try to crush all the cookies at once. Work in batches of 10-12 cookies to ensure even crushing. I learned this the hard way when I tried to crush a whole family-size bag at once and ended up with a Ziploc explosion. Oreo dust everywhere. It was a tragedy and a mess.
Use a piping bag for the pudding. For clean, even layers, transfer the pudding to a piping bag (or a Ziploc bag with the corner snipped off) and pipe it into the cups. This prevents drips on the sides of the cup and gives you more control over the amount. It also makes the kids feel like they’re getting a fancy bakery treat. If you don’t have a piping bag, use a spoon and go slowly—wipe the sides of the cup with a paper towel if needed.
Don’t over-chill the Oreo dirt. If you refrigerate the assembled cups for too long (more than 4 hours), the Oreo crumbs can become soggy and lose their crunch. The pudding will also start to seep into the bottom layer of dirt, making it less distinct. For best results, assemble the cups within 2 hours of serving, or keep the components separate and assemble just before serving. (I once made them the night before a party, and while they were still tasty, the layers were a bit muddy. Still delicious, just not as pretty.)
Make it a decorating activity. If you’re making these with kids, set up a “dirt cup bar” with different toppings—gummy worms, candy eyeballs, pumpkin candies, sprinkles, and even small plastic spiders (washed and food-safe, of course). Let everyone assemble their own cup. It’s a great activity for Halloween parties and keeps the kids entertained for at least 20 minutes. Trust me, the mess is worth it.
Double-check your gummy worms. Not all gummy worms are created equal. Some are too stiff and won’t “crawl” convincingly. I recommend Trolli or Black Forest brand—they’re soft and pliable, so they look more realistic when poked into the dirt. If your worms are too stiff, microwave them for 5 seconds on a paper towel to soften them slightly. (Yes, I’ve done this. Yes, it works.)
Variations & Adaptations
One of the best things about this recipe is how easy it is to customize. Over the years, I’ve tried all sorts of variations, and here are my favorites. Feel free to mix and match based on what you have on hand or what your crowd prefers.
Dietary Variations
- Gluten-Free: Use gluten-free chocolate sandwich cookies (like Glutino) and a gluten-free instant pudding mix. The texture will be slightly different, but still delicious. I’ve tested this version for a friend with celiac disease, and she gave it two thumbs up.
- Vegan: Use plant-based milk (oat or almond work best), a vegan chocolate pudding mix, and vegan sandwich cookies (Oreos are actually vegan!). For the gummy worms, look for vegan gummy options made without gelatin—they’re available at most health food stores.
- Low-Sugar: Use sugar-free instant pudding mix and sugar-free sandwich cookies. The gummy worms will add some sugar, but you can use sugar-free gummy worms if you can find them. The taste won’t be quite as indulgent, but it’s a good option for those watching their sugar intake.
Flavor Twists
- Peanut Butter Dirt: Add 2 tablespoons of creamy peanut butter to the pudding mix before whisking. It adds a rich, nutty flavor that pairs beautifully with the chocolate. (Warning: This version is dangerously addictive.)
- Mint Chocolate: Use mint-flavored chocolate pudding mix and crush mint Oreos (the ones with green filling) for the dirt. Add a few drops of green food coloring to the pudding for an extra-spooky green glow. It tastes like a Thin Mint in a cup.
- Cookies and Cream: Use white chocolate pudding instead of chocolate, and use golden Oreos for the dirt. The contrast of white pudding and golden crumbs looks like a sandy beach—perfect for a non-Halloween version. (I’ve made these for summer parties, and they’re a hit.)
Other Fun Add-Ins
- Crushed pretzels: Mix a handful of crushed pretzels into the Oreo dirt for a salty-sweet crunch. It’s a game-changer.
- Chocolate chips: Sprinkle mini chocolate chips between the layers for extra chocolate flavor. Because why not?
- Whipped cream: Add a dollop of whipped cream on top before the final layer of dirt. It adds a light, airy texture that contrasts with the dense pudding.
Serving & Storage Suggestions
These Spooky Halloween Dirt Cups with Oreo Soil and Gummy Worms are best served cold, straight from the fridge. The contrast between the chilled pudding and the crunchy Oreo dirt is pure magic. Here’s how to serve and store them for the best experience.
Serving temperature: Serve the cups chilled, but not ice-cold. Take them out of the fridge about 10 minutes before serving to let the flavors come to life. If you’re serving them at a party, set them on a tray with a few extra gummy worms scattered around for decoration. (I once arranged them on a black platter with fake spider webs—it looked amazing.)
Presentation ideas: For a spooky tablescape, place each cup on a small bed of crushed Oreos or chocolate sprinkles. Add a plastic spider ring to the rim of each cup for a fun, non-edible decoration. If you’re serving them to adults, use small mason jars and tie a piece of orange or black ribbon around the neck. It’s a small touch that makes a big difference.
Complementary dishes: These dirt cups pair beautifully with other Halloween treats. Serve them alongside spider web dip with pretzels, or a platter of mummy hot dogs for a savory-sweet combo. For drinks, try a glass of cold milk, a pumpkin spice latte, or a spooky punch made with lime sherbet and ginger ale.
Storage instructions: Store any leftover dirt cups in the refrigerator, covered with plastic wrap or a lid. They’ll keep for up to 3 days, but the Oreo dirt will start to soften after 24 hours. For best texture, eat them within 1 day of assembly. If you’re making them ahead, store the components separately—pudding in one container, crushed Oreos in another—and assemble just before serving. This keeps the dirt crunchy and the layers distinct.
Freezer instructions: I don’t recommend freezing assembled dirt cups. The pudding will become icy and the texture will be off. However, you can freeze the crushed Oreos in a Ziploc bag for up to 3 months, and the pudding can be made a day ahead and refrigerated. Assemble fresh when you’re ready to serve.
Flavor development: Interestingly, the flavor of the pudding deepens slightly after a few hours in the fridge. The chocolate becomes more pronounced, and the Oreo crumbs absorb a bit of moisture, creating a more cohesive texture. If you can wait, make them 2-3 hours before serving for the best flavor.
Nutritional Information & Benefits
Let’s be real—these Spooky Halloween Dirt Cups with Oreo Soil and Gummy Worms are a treat, not a health food. But that doesn’t mean they can’t have a place in a balanced diet. Here’s a rough breakdown of what you’re getting in each serving.
Estimated nutritional values (per cup, based on 8 servings):
- Calories: Approximately 320-350 calories
- Total Fat: 12-15g (mostly from the Oreo filling and whole milk)
- Saturated Fat: 5-7g
- Carbohydrates: 50-55g
- Sugar: 35-40g
- Protein: 5-7g
- Fiber: 1-2g
- Sodium: 350-400mg
Health benefits of key ingredients:
- Chocolate pudding (in moderation): Made with milk, it provides calcium, vitamin D, and protein. Dark chocolate pudding also contains antioxidants called flavonoids, which can support heart health when consumed in small amounts.
- Oreos: Let’s be honest—they’re not a health food. But they do provide a small amount of iron and B vitamins from the enriched flour. The real benefit is the joy they bring. Sometimes that’s enough.
- Milk: A good source of calcium, vitamin D, and protein. Using whole milk adds creaminess and helps you feel satisfied with a smaller portion.
Dietary considerations: This recipe contains gluten (from the Oreos), dairy (from the milk and pudding), and soy (from the Oreos). It can be made gluten-free, vegan, or low-sugar with the substitutions listed above. Always check labels if you’re serving someone with allergies—some gummy worms are made in facilities that process nuts, for example.
My personal wellness perspective: I believe in balance. These dirt cups are a fun, indulgent treat for a special occasion—Halloween comes once a year, and it’s okay to enjoy it. I pair them with a protein-rich meal earlier in the day (like eggs for breakfast or a chicken salad for lunch) so I feel good about the sugar. And honestly, the smile on a kid’s face when they see a gummy worm crawling out of “dirt” is worth every calorie.
Conclusion
So there you have it—my tried-and-true recipe for Spooky Halloween Dirt Cups with Oreo Soil and Gummy Worms. These little cups of joy are proof that you don’t need to spend hours in the kitchen to create something that feels special. They’re quick, they’re fun, and they taste like the best parts of childhood—crunchy, creamy, and a little bit silly.
What I love most about this recipe is how it brings people together. I’ve made them for my niece’s Halloween party, for a potluck with friends, and for a quiet night in when I just wanted to smile. Every single time, someone says, “Wait, these are so easy? I’m making these for my party!” And that’s the best compliment I can get. This recipe is meant to be shared, adapted, and made your own. Add extra gummy worms. Use different pudding flavors. Throw in some candy corn if that’s your thing. The rules are loose here—that’s the whole point.
I’d love to hear how yours turn out! Drop a comment below and let me know what variations you tried, or tag me in your photos on social media. Did your kids go wild for the gummy worms? Did you add a secret ingredient that took it to the next level? I’m always looking for new ideas. And if you’re looking for more Halloween inspiration, check out my recipe for pumpkin patch dip or these graveyard brownies—they’re both just as easy and just as fun.
Until next time, happy haunting—and happy snacking!
Frequently Asked Questions
Can I make these dirt cups ahead of time?
Yes! You can assemble them up to 24 hours in advance, but the Oreo dirt will soften over time. For the best crunchy texture, assemble them no more than 2-3 hours before serving. If you want to prep ahead, make the pudding and crush the Oreos separately, then assemble just before your party.
Can I use homemade pudding instead of instant?
You can, but it will change the texture and setting time. Homemade pudding is usually thinner and takes longer to set. If you go that route, make the pudding a day ahead and let it chill thoroughly before layering. The flavor will be richer, but the texture won’t be as firm.
What can I use instead of gummy worms?
Gummy worms are classic, but you can use any Halloween-themed candy. Try gummy spiders, candy corn, candy pumpkins, or even small plastic spiders (washed and food-safe) for a non-edible decoration. For a less sweet option, use pretzel sticks as “bones” sticking out of the dirt.
How do I keep the layers from mixing together?
The key is to let the pudding set completely before adding the top layer of Oreo dirt. Give the pudding a full 5 minutes after whisking to thicken, then chill the assembled cups for at least 30 minutes. Also, don’t press the top layer of dirt too hard—just sprinkle it gently and tap the cup to settle it.
Can I make these in a large dish instead of individual cups?
Absolutely! Use a 9×9-inch baking dish or a large glass trifle bowl. Layer the Oreo dirt, pudding, and more dirt, then press the gummy worms into the top. Serve it like a dirt cake—scoop it out with a spoon and watch the layers show. This is great for a party where you don’t want to fuss with individual cups.
Pin This Recipe!

Best Easy Spooky Halloween Dirt Cups with Gummy Worms
These no-bake Halloween dirt cups feature layers of creamy chocolate pudding, crunchy Oreo ‘soil,’ and gummy worms crawling out of the top. They come together in under 15 minutes and are perfect for parties or a fun treat with kids.
- Prep Time: 15 minutes
- Cook Time: 0 minutes
- Total Time: 15 minutes (plus optional chilling time)
- Yield: 8 servings 1x
- Category: Dessert
- Cuisine: American
Ingredients
- 1 (3.9 oz) box instant chocolate pudding mix
- 2 cups cold whole milk
- 1/8 teaspoon fine sea salt (optional)
- 1 (14.3 oz) package regular Oreo cookies (about 36 cookies)
- 2 tablespoons unsweetened cocoa powder (optional, for darker ‘dirt’)
- 1 (5 oz) bag gummy worms
- Optional garnishes: small candy pumpkins, candy eyeballs, chocolate sprinkles
Instructions
- In a large mixing bowl, combine the instant chocolate pudding mix, 2 cups cold whole milk, and 1/8 teaspoon salt (if using). Whisk vigorously for about 2 minutes, or until the mixture thickens and becomes smooth. Let the pudding sit for 5 minutes to set up completely.
- While the pudding sets, prepare the Oreo ‘dirt.’ Place the entire package of Oreos (filling and all) into a gallon-size Ziploc bag. Seal the bag tightly, squeezing out as much air as possible. Using a rolling pin, crush the cookies until they resemble coarse sand with a few small chunks. Alternatively, pulse in a food processor until desired texture is reached.
- Spoon about 2 tablespoons of the crushed Oreos into the bottom of each clear cup. Gently press it down with the back of a spoon to make an even base layer.
- Spoon or pipe the chocolate pudding on top of the Oreo layer, filling the cup about halfway. Use a spatula to spread it evenly.
- Add another layer of crushed Oreos on top of the pudding—about 2 more tablespoons. This creates the ‘topsoil.’
- Take 2-3 gummy worms and gently press them into the top layer of Oreo dirt, leaving part of the worm sticking out. Arrange them so they look like they’re crawling out of the soil.
- For best texture, refrigerate the dirt cups for at least 30 minutes before serving. This allows the pudding to firm up and the Oreo crumbs to soften slightly.
- Just before serving, add any optional garnishes—a candy pumpkin on top, a pair of candy eyeballs, or a sprinkle of chocolate sprinkles. Serve with spoons.
Notes
For best results, use whole milk for extra creamy pudding. Crush Oreos to a mix of fine dust and small chunks for realistic ‘dirt’ texture. A tiny pinch of salt balances the sweetness and enhances chocolate flavor. Assemble within 2 hours of serving to keep Oreo dirt crunchy. For gluten-free, use gluten-free sandwich cookies and gluten-free pudding mix. For vegan, use plant-based milk, vegan pudding mix, and vegan gummy worms.
Nutrition
- Serving Size: 1 cup
- Calories: 335
- Sugar: 37.5
- Sodium: 375
- Fat: 13.5
- Saturated Fat: 6
- Carbohydrates: 52.5
- Fiber: 1.5
- Protein: 6
Keywords: Halloween dirt cups, Oreo dirt cups, gummy worms, no-bake dessert, Halloween dessert, chocolate pudding cups, spooky treats


