My sister-in-law handed me a wooden board and said, “You figure it out.” I had zero clue what I was doing. Honestly, I thought charcuterie boards were for fancy people with fancy knives and fancy cheese knowledge. I was just trying to throw together something for a casual Sunday football gathering without looking like a complete mess in front of her friends. That first board? It was a disaster. Everything slid around, the cheese was all wrong, and I ended up with a pile of crackers that looked like a sad, broken mosaic. But here’s the thing—nobody cared. They just grabbed stuff and ate it, and by the end of the game, the board was wiped clean. That moment taught me something important: this whole charcuterie thing is way easier than it looks, and you definitely don’t need to be a pro to pull it off.
That first disaster actually became my biggest lesson. I realized you don’t need a culinary degree or a hundred-dollar cheese haul. You just need a little bit of guidance and a few simple tricks. This easy charcuterie board for beginners is built on that exact idea—taking the stress out and putting the fun back in. It’s about grabbing what you like, arranging it without overthinking, and watching it disappear. Whether you’re hosting a game day party or just want a fancy-looking snack for a quiet night in, this guide will walk you through every single step. No fancy terminology, no pressure, just a board that looks like you spent hours on it when you really spent twenty minutes.
I still think about that first board sometimes. It was ugly, but it worked. And that’s the secret, really. It’s not about perfection. It’s about putting good things on a platter and letting people help themselves. This easy charcuterie board for beginners is the method I wish I had back then—a simple, repeatable system that makes you look like a hosting hero without the headache. Trust me, if I can do it, you absolutely can too.
Why You’ll Love This Recipe
This isn’t just another platter of snacks. This easy charcuterie board for beginners is a strategy. It’s the difference between staring blankly at a grocery store aisle and confidently walking out with exactly what you need. I’ve tested this approach on everything from quiet date nights to loud, chaotic parties, and it works every single time. Here’s why you’ll love it:
- Incredibly Simple : No cooking, no complicated recipes, no special skills. If you can unwrap cheese and open a jar, you can build this board. It comes together in about 20 minutes flat.
- No Fancy Ingredients Needed : You don’t need to hunt down rare cheeses or imported meats. Most grocery stores carry everything you need, and I’ll show you what to look for so you don’t feel lost.
- Perfect for Any Occasion : This board works for game day, a casual dinner party, a holiday gathering, or even a solo movie night. It’s endlessly adaptable.
- Always a Crowd-Pleaser : There’s something for everyone here—savory, sweet, salty, and crunchy. Picky eaters, adventurous foodies, and kids all find their happy place on this board.
- Looks Way Harder Than It Is : The arrangement tricks I’ll share make your board look like a professional catering job. Your guests will think you spent an hour on it. You won’t.
What makes this board different from the rest? It’s the balance. Most beginners pile everything on without thinking about flavor flow or texture contrast. This method teaches you the simple “anchor, spread, fill” technique that creates a visually stunning and deliciously balanced board every time. It’s not just another version—it’s the version that takes the guesswork out completely.
Honestly, this is the kind of recipe that makes you feel like a hosting rockstar. You put this board on the table, and people’s eyes light up. They start grazing, chatting, and coming back for more. It’s comfort food without the oven, entertaining without the stress, and it’s perfect for making any gathering feel a little bit special.
What Ingredients You Will Need
Building an easy charcuterie board for beginners starts with the right ingredients. You don’t need a massive list, but you do need a good balance of flavors and textures. Think of it like a puzzle—each piece has a job. Here’s exactly what you’ll need to create a board that’s both beautiful and delicious.
The Cheeses (Your Anchor)
Cheese is the star of the show. For a beginner board, stick with three cheeses that offer variety without overwhelming you. Pick one soft, one semi-hard, and one hard cheese.
- Soft Cheese : Brie or camembert. These are creamy, mild, and feel fancy without any effort. Leave the rind on—it’s edible and adds a nice texture contrast.
- Semi-Hard Cheese : Gouda or cheddar. A good aged gouda has a nutty sweetness, while sharp cheddar brings a tangy punch. Both slice easily and pair with almost everything.
- Hard Cheese : Manchego or parmesan. These are salty, crumbly, and add a bold finish. Manchego is my personal go-to because it’s buttery but firm.
Pro tip from my own kitchen: bring your cheeses to room temperature before serving. It takes about 30 minutes, but the flavor and texture improve dramatically. Cold cheese is like eating a flavorless brick—don’t do it.
The Meats (The Savory Backbone)
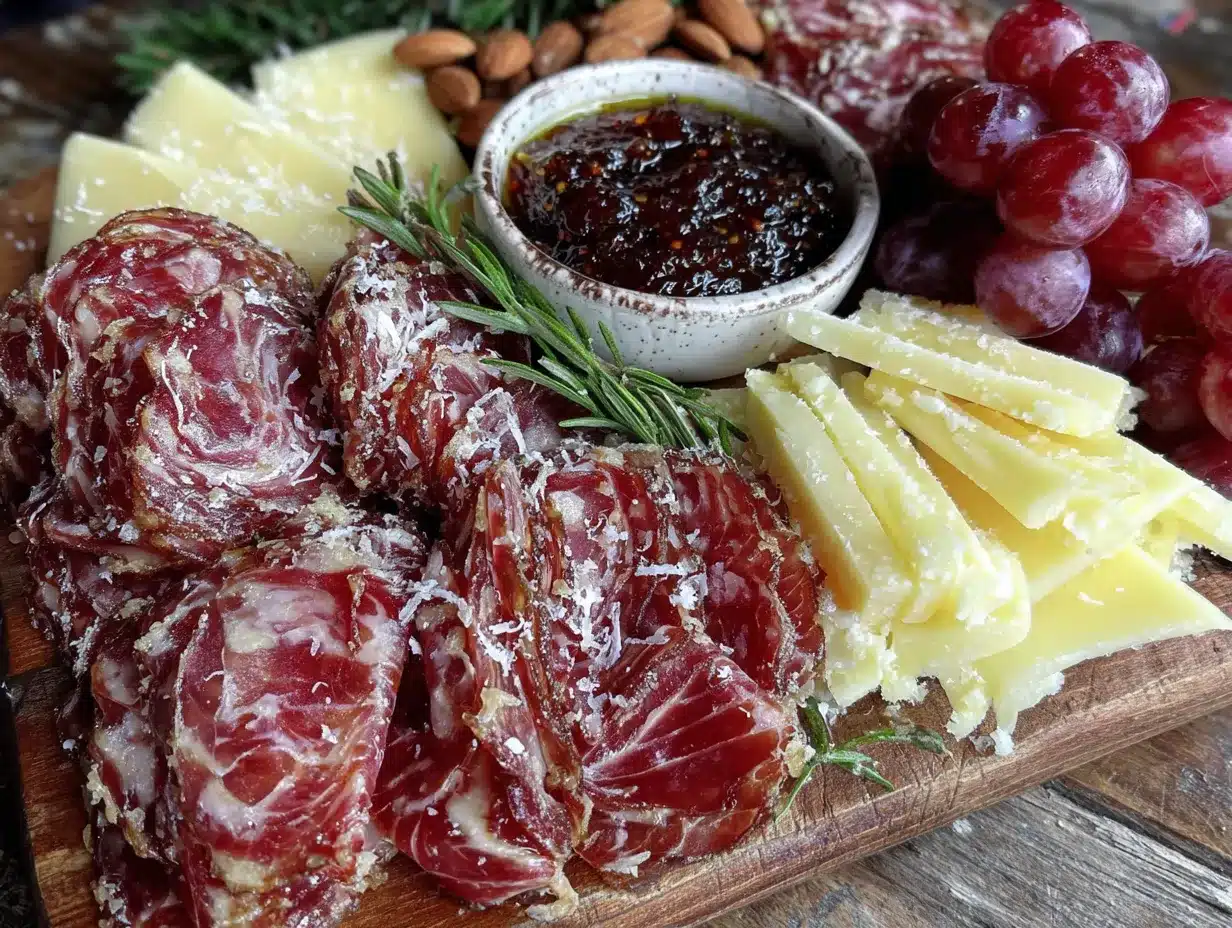
You don’t need a deli counter’s worth of meat. Two to three options are plenty. Look for variety in texture and flavor.
- Prosciutto : Thin, salty, and silky. It’s the classic charcuterie meat for a reason. Buy it pre-sliced if you’re short on time.
- Salami : Choose a hard salami like Genoa or soppressata. Slice it into thin rounds or small cubes. It holds up well and adds a nice chew.
- Chorizo : Spanish chorizo is cured and ready to eat. It’s smoky, spicy, and adds a pop of color to the board. I love using it for a little heat.
If you’re feeding a crowd that includes non-meat eaters, skip one of the meats and add extra cheese or roasted vegetables instead.
The Accompaniments (The Fun Stuff)
This is where your board gets personality. Aim for a mix of sweet, salty, crunchy, and tangy.
- Crackers and Bread : Go with a neutral cracker (water crackers or plain rice crackers) and something more substantial like sliced baguette or grissini (breadsticks). You want vehicles for the cheese and meat, not crackers that overpower everything.
- Fruit : Grapes are the MVP here—they’re sweet, juicy, and easy to grab. Add sliced apples or pears for crunch, and dried apricots or figs for a chewy, sweet bite. In summer, fresh berries are a gorgeous addition.
- Nuts : Almonds, walnuts, or pecans. Toasted is best, but raw works too. They add crunch and a savory note that balances the richness of the cheese. I always keep a bag of Marcona almonds on hand—they’re buttery and slightly salty, and they disappear first.
- Spread or Dip : Honey is the simplest option—just a small bowl for drizzling over cheese. Fig jam or a good grainy mustard also work beautifully. My personal favorite is a honeycomb if you can find it; it’s a showstopper.
- Pickles or Olives : Cornichons (tiny pickles) or a mix of olives add a bright, acidic pop that cuts through the richness. Don’t skip these—they’re the palate cleanser everyone needs.
The Extras (Optional but Lovely)
These aren’t essential, but they take your board from good to great.
- Dark Chocolate : A few squares of good dark chocolate (70% or higher) add a touch of indulgence. It pairs surprisingly well with aged cheese.
- Roasted Vegetables : Roasted red peppers or marinated artichoke hearts bring a savory, tangy element that breaks up the richness.
- Fresh Herbs : A sprig of rosemary or a few thyme leaves scattered on the board add color and a subtle aroma. They’re mostly for looks, but they smell amazing.
Equipment Needed
You don’t need a lot of fancy gear to build an easy charcuterie board for beginners. Here’s what I actually use and recommend.
- A Board or Platter : A wooden cutting board, a marble slab, a large ceramic platter, or even a baking sheet will work. The key is surface area—you need enough room to spread things out without piling them on top of each other. My favorite is a large wooden board from a thrift store that cost me eight dollars.
- Small Bowls : You’ll need a few small ramekins or bowls for dips like honey, jam, or olives. This keeps wet ingredients from making your crackers soggy. I use tiny glass prep bowls I found at a discount store.
- Cheese Knives : You don’t need a full set. One small knife for soft cheese and one for hard cheese is enough. If you don’t have cheese knives, a butter knife and a paring knife work fine.
- Tongs or Small Spoons : For olives, pickles, and anything else that might be messy. It’s not mandatory, but it keeps the board looking tidy.
- A Spatula or Butter Knife for Soft Cheese : Soft cheeses like brie can be a little tricky to serve without a proper knife. A small offset spatula is my secret weapon here.
If you’re just starting out, don’t overthink the equipment. A dinner plate and a couple of butter knives will get the job done. I’ve made plenty of boards using nothing but a cutting board and a spoon. The food is what matters, not the fancy tools.
Preparation Method
This is the part that used to stress me out the most. How do you arrange everything so it looks good without spending an hour moving things around? I’ve broken it down into five simple steps. Follow these, and your easy charcuterie board for beginners will look like it was styled by a pro.
Step 1: Start with the Bowls (2 minutes)
Place your small bowls on the board first. This is where you’ll put any dips, spreads, olives, or wet ingredients. Space them out evenly—think of them as anchors for the rest of the board. I usually put one bowl in the center-left and one in the upper-right corner. This creates visual balance and gives you defined zones for different items. Don’t crowd them; you need room for everything else.
Step 2: Add the Cheese (5 minutes)
Cheese is the visual anchor of the board, so place it next. Cut your hard and semi-hard cheeses into slices or cubes before putting them on the board. Leave soft cheeses like brie whole—it looks more impressive and people can cut what they want. Arrange the cheeses in different spots around the board, not all clustered together. I like to put the brie near one bowl and the cheddar near another. This forces people to move around the board and discover different combinations. Leave a little space between each cheese so they don’t blend together visually.
Step 3: Layer the Meat (3 minutes)
Now add the meat. Fold slices of prosciutto into loose ribbons or rosettes—just bunch them up gently and place them next to a cheese. Salami can be laid flat in a small pile or fanned out in a line. Don’t worry about perfection here. The folds and ripples create texture and make the board look more dynamic. I usually place the meat near the semi-hard cheese because they pair so well together. If you have multiple meats, spread them out so there’s variety in different sections of the board.
Step 4: Fill In with Crackers and Bread (3 minutes)
This is where the board starts to come together. Arrange your crackers and bread slices in the empty spaces between the cheese and meat. Don’t stack them perfectly—a little overlap looks more natural and inviting. I like to fan out crackers in small clusters and place a few breadsticks diagonally across the board for height. Use the crackers to fill gaps and create a sense of abundance. You want the board to look full, not sparse. If you have leftover space, add a few more crackers.
Step 5: Add the Finishing Touches (5 minutes)
This is the fun part. Fill in the remaining gaps with your fruit, nuts, pickles, and chocolate. Scatter grapes in small bunches around the board. Place a pile of almonds next to the brie. Tuck a few dried figs near the manchego. The goal is to create little flavor pockets—places where someone can grab a cheese, a cracker, and a fruit all in one go. Fill every visible gap on the board. A full board looks generous and inviting. An empty board looks sad. Finish with a drizzle of honey over the brie or a small bowl of fig jam on the side. Add a sprig of rosemary for color if you have it.
And that’s it. Twenty minutes, maybe less, and you have a stunning board. The secret is in the order—bowls first, then cheese, then meat, then crackers, then everything else. It sounds simple because it is. I’ve done this method dozens of times, and it never fails.
Cooking Tips & Techniques
Okay, so technically there’s no cooking involved here, but there are definitely techniques that separate a good board from a great one. Here are the lessons I learned the hard way so you don’t have to.
Don’t Overcrowd the Board . I know I said to fill the gaps, but there’s a fine line between abundant and cluttered. Leave a tiny bit of board visible around the edges. It gives the eye a place to rest and makes the whole thing look more intentional. I learned this after making a board so packed that people couldn’t grab anything without knocking something else off.
Cut Cheese Ahead of Time . This is a game-changer. Cut your hard and semi-hard cheeses before you put them on the board. Nobody wants to struggle with a block of cheddar while holding a glass of wine. Pre-cutting also makes the board look more approachable and encourages people to dig in. For soft cheeses like brie, leave them whole but score the top with a knife so people know where to start.
Think About Texture . A good board has a mix of creamy, crunchy, chewy, and crisp. If everything is soft, it feels mushy. If everything is crunchy, it feels dry. Balance is key. That’s why I always include nuts for crunch, grapes for juiciness, and dried fruit for chew. Each bite should feel different from the last.
Don’t Forget the Salt . Cheese and meat are naturally salty, but adding a small dish of flaky sea salt or a few salty olives can elevate the whole board. It’s a small touch that makes a big difference.
Let the Board Sit Out . If you’re making the board ahead of time, cover it with plastic wrap and leave it at room temperature for up to an hour before serving. This brings the cheese to the perfect temperature and softens the meat slightly. Just don’t leave it out longer than two hours for food safety reasons.
My Biggest Failure : I once made a board entirely out of strong, funky cheeses because I thought it would impress people. It did not. Most people prefer a mix of mild and bold. Save the super stinky cheese for a small, separate plate for adventurous eaters. Your main board should be approachable for everyone.
Variations & Adaptations
One of the best things about an easy charcuterie board for beginners is how customizable it is. Here are some variations I’ve tried and loved.
Seasonal Variation
In the fall, swap the grapes for sliced apples and pears, and add a small bowl of pumpkin seeds or candied pecans. In the summer, use fresh berries, stone fruits like peaches or plums, and a honey-lavender goat cheese. Winter calls for dried figs, dates, and a sprinkle of pomegranate seeds for color. Spring is perfect for fresh strawberries and a soft, herbed chèvre.
Dietary Adaptations
For a vegetarian board, skip the meat and double up on cheese varieties. Add roasted vegetables like bell peppers, artichokes, or eggplant. For a vegan board, use plant-based cheeses (there are some really good ones now), hummus or baba ganoush as the spread, and plenty of nuts, fruit, and crackers. For a gluten-free board, choose gluten-free crackers or use sliced vegetables like cucumber and bell pepper as the base.
Flavor Twist
Add a spicy element to your board with pickled jalapeños, a spicy honey drizzle, or a smear of harissa paste. I once made a board with a small bowl of spicy mango chutney and it was a huge hit. The sweet-heat combo pairs beautifully with sharp cheddar and salami.
Personal Variation
My favorite twist is adding a small board of crispy bacon-wrapped jalapeño poppers on the side. The smoky, spicy, creamy poppers are the perfect contrast to the cool, mild cheese on the main board. It’s an unexpected addition that always gets people talking.
Serving & Storage Suggestions
This easy charcuterie board for beginners is best served at room temperature. Pull it out of the fridge about 30 minutes before guests arrive to let the cheese soften and the flavors open up. Arrange everything on the board just before serving, but you can prep all the components ahead of time.
For presentation, I like to put the board in the center of the table with small plates and napkins on the side. Add a few cheese knives and small spoons for the spreads. If you’re serving a crowd, consider making two smaller boards instead of one giant one—it prevents crowding and makes it easier for people to reach everything.
This board pairs beautifully with a crisp white wine like Sauvignon Blanc or a light red like Pinot Noir. For non-alcoholic options, sparkling water with a slice of lemon or a fruity iced tea works great. If you’re serving this as part of a larger meal, it’s perfect alongside a cozy fall harvest vegetable soup with parmesan crisps or a one-pot chili mac and cheese for a hearty dinner spread.
For storage, separate the components before refrigerating. Cheese should be wrapped in wax paper or parchment paper (not plastic wrap—it suffocates the cheese). Meat should be stored in an airtight container. Crackers and nuts can stay in their original packaging. Assemble the board fresh each time you serve it. Most components will keep for 3-5 days in the fridge, though fresh fruit like grapes and apples should be eaten within a day or two.
Flavors actually develop over time with this board. The cheese gets creamier at room temperature, and the fruit releases a bit of juice that mingles with the cheese. It’s one of those rare dishes that gets better the longer it sits out (within reason).
Nutritional Information & Benefits
This easy charcuterie board for beginners is more of a grazing experience than a structured meal, so nutritional values will vary based on what you choose. Here’s a rough estimate for a typical serving (about 100g of cheese, 50g of meat, and a handful of accompaniments):
| Nutrient | Approximate Value |
|---|---|
| Calories | 400-600 |
| Protein | 20-30g |
| Fat | 30-40g |
| Carbohydrates | 20-30g |
| Fiber | 3-5g |
| Sugar | 10-15g |
Cheese is a good source of calcium and protein, while nuts provide healthy fats and fiber. Grapes and other fruits add antioxidants and vitamins. The key is portion control—it’s easy to overeat on a board because everything is so snackable. I like to fill half my plate with fruit and vegetables first, then add smaller portions of cheese and meat.
For dietary considerations, this board is naturally gluten-free if you choose gluten-free crackers. It’s also easy to make vegetarian or vegan with simple swaps. The main allergens to watch for are dairy (cheese) and nuts. If you’re serving someone with allergies, label the components clearly or offer a separate small board with safe options.
Honestly, I don’t stress about the numbers on a charcuterie board. It’s meant to be shared and enjoyed, not measured and tracked. A few bites of good cheese and a handful of nuts is a perfectly reasonable snack. Just don’t eat the whole board in one sitting—trust me, I’ve done it, and it’s not a great feeling.
Conclusion
Building an easy charcuterie board for beginners is one of the most rewarding things you can do in the kitchen without actually cooking. It’s simple, it’s flexible, and it always makes people happy. I’ve made this board for quiet nights in, loud parties, and everything in between, and it never fails to bring a smile to someone’s face. There’s something about a beautiful board of food that makes people feel welcomed and cared for.
I hope you take this guide and make it your own. Swap in your favorite cheese, try a new fruit, add a weird cracker you found at the store. The best boards are the ones that reflect your taste and your personality. Don’t be afraid to experiment—the worst that happens is you eat the evidence.
If you give this easy charcuterie board for beginners a try, I’d love to hear about it. Drop a comment below and tell me what you put on your board. Did you discover a new favorite cheese? Did your guests fight over the last piece of prosciutto? Share your wins and your happy accidents. And if you’re looking for more entertaining ideas, check out my ultimate loaded game day nacho bar with pulled pork or these crispy baked football charcuterie board skewers for another fun, crowd-pleasing option.
Happy snacking, friends. You’ve got this.
Frequently Asked Questions
How far in advance can I make a charcuterie board?
You can prep all the components a day ahead. Cut the cheese, slice the meat, and wash the fruit. Store everything separately in the fridge. Assemble the board about 30 minutes before serving to let everything come to room temperature.
How much food do I need per person?
For a snack board before a meal, plan on about 2-3 ounces of cheese and 2 ounces of meat per person. For a main course board, double those amounts. Add plenty of crackers, fruit, and nuts to fill out the portions.
What if I don’t have a wooden board?
No problem. Use a large dinner plate, a baking sheet, a cutting board, or even a clean pizza pan. The surface doesn’t matter as long as it’s flat and big enough to hold everything.
Can I make a charcuterie board for one person?
Absolutely. Use a small plate or a mini cutting board. Pick one cheese, one meat, a handful of crackers, and a few grapes or nuts. It’s a perfect solo snack for a movie night or a light dinner.
How do I keep crackers from getting soggy?
Keep the crackers away from wet ingredients like olives, pickles, and dips. Use small bowls for anything moist, and place crackers on a dry part of the board. If you’re making the board ahead of time, add the crackers just before serving.
Pin This Recipe!
Easy Charcuterie Board for Beginners: 5 Simple Steps

A simple, no-fuss guide to building a beautiful and delicious charcuterie board in about 20 minutes. Perfect for any occasion, from game day to a quiet night in.
- Prep Time: 20 minutes
- Cook Time: 0 minutes
- Total Time: 20 minutes
- Yield: 4-6 servings 1x
- Category: Appetizer
- Cuisine: French / Italian
Ingredients
- 3–4 ounces Brie or Camembert (soft cheese)
- 3–4 ounces Gouda or Cheddar (semi-hard cheese)
- 3–4 ounces Manchego or Parmesan (hard cheese)
- 2–3 ounces Prosciutto
- 2–3 ounces Genoa Salami or Soppressata
- 2–3 ounces Spanish Chorizo (optional)
- 1 cup Crackers (water crackers or plain rice crackers)
- 1/2 Baguette, sliced
- 1 cup Grapes
- 1 Apple or Pear, sliced
- 1/4 cup Dried Apricots or Figs
- 1/4 cup Almonds, walnuts, or pecans
- 2 tablespoons Honey or Fig Jam
- 1/4 cup Cornichons or mixed Olives
- 1 ounce Dark Chocolate (70% or higher, optional)
- Roasted red peppers or marinated artichoke hearts (optional)
- Fresh herbs like rosemary or thyme (optional)
Instructions
- Place small bowls for dips, spreads, olives, or wet ingredients on the board first. Space them out evenly to create visual balance.
- Cut hard and semi-hard cheeses into slices or cubes. Leave soft cheeses like brie whole. Arrange cheeses in different spots around the board, leaving space between each.
- Fold prosciutto into loose ribbons or rosettes. Lay salami flat in small piles or fan out in a line. Place meat near semi-hard cheese or spread out for variety.
- Arrange crackers and bread slices in empty spaces between cheese and meat. Fan out crackers in small clusters and place breadsticks diagonally for height. Fill gaps to create a full look.
- Fill remaining gaps with fruit, nuts, pickles, and chocolate. Scatter grapes in small bunches, place nuts near cheese, and tuck dried fruit near hard cheese. Drizzle honey over brie or serve fig jam in a small bowl. Add fresh herbs for color if desired.
Notes
Bring cheeses to room temperature before serving for best flavor. Pre-cut hard and semi-hard cheeses for easier serving. Keep crackers away from wet ingredients to prevent sogginess. The board can be prepped a day ahead; assemble 30 minutes before serving.
Nutrition
- Serving Size: 1 serving (approx. 1
- Calories: 400600
- Sugar: 1015
- Sodium: 8001200
- Fat: 3040
- Saturated Fat: 1520
- Carbohydrates: 2030
- Fiber: 35
- Protein: 2030
Keywords: charcuterie board, easy appetizer, party platter, cheese board, beginner charcuterie, game day snack, no-cook recipe


