I was standing in line at the hardware store—of all places—holding a bag of lightbulbs and a new paint scraper when the woman behind me started talking about cake pops. Not just any cake pops, but pink velvet ones she made for her granddaughter’s birthday party. She was maybe seventy, with flour dusted on her sleeve like she’d just come from baking, and she told me the whole story while we shuffled toward the register. She’d tried a dozen recipes before landing on this one, she said, and the secret wasn’t the color or the cream cheese frosting—it was the way you let the cake cool just long enough to handle but not so long it dries out. I almost forgot to pay. I mean, I was at the hardware store, and somehow I walked out with a recipe for Easy Pink Velvet Cake Pops scribbled on the back of a receipt. That was three years ago, and I’ve made them at least once a month since. Honestly, I think about that woman every time—the way she laughed about the first batch that fell apart, the way she said “you just gotta trust the crumb.” Maybe you’ve been there, standing somewhere totally unrelated to baking, and a stranger hands you a piece of kitchen wisdom you didn’t know you needed. That’s how it happened for me.
Let me tell you, these aren’t just pretty little balls of cake on a stick. They’re the kind of treat that makes people close their eyes when they take a bite. The kind that disappears from a platter in minutes. And the best part? They’re genuinely easy. I know, I know—cake pops have a reputation for being finicky. Too dry, too wet, too crumbly to stay on the stick. But this recipe works. It works because the proportions are dialed in, because the chilling time is non-negotiable, and because I’ve made every mistake possible so you don’t have to. I’ve had them fall apart. I’ve had them slide right off the lollipop stick. I’ve had the coating crack like a bad sidewalk. But after dozens of batches, I landed on a method that’s forgiving, fast, and absolutely foolproof. That’s what I’m sharing with you today.
These Easy Pink Velvet Cake Pops are the perfect weeknight project—they come together in under an hour of active time, they use simple ingredients you probably already have, and they make you look like you spent way more effort than you actually did. That’s my favorite kind of recipe, honestly. The one that feels like a secret. So whether you’re making them for a birthday party, a Valentine’s Day treat, or just because it’s Tuesday and you want something pink and delicious, this is the recipe you’ll come back to again and again.
Why You’ll Love This Recipe
I’ve tested this recipe more times than I care to count, and every single batch has taught me something. Here’s why I keep coming back—and why I think you will too.
- Quick & Easy: From start to finish, you’re looking at about 45 minutes of active work. The rest is just chilling time, which means you can make the cake balls ahead and dip them later. Perfect for a busy weeknight when you want something special without the all-day commitment.
- Simple Ingredients: No fancy extracts, no hard-to-find food colorings, no specialty flours. You probably have most of this in your pantry right now. The pink color comes from a few drops of gel food coloring—easy to find at any grocery store or online.
- Perfect for Any Occasion: Birthday parties, baby showers, Valentine’s Day, Mother’s Day, or just because you need a little pink in your life. They’re also great for bake sales and classroom treats—everyone loves a cake pop.
- Crowd-Pleaser: I’ve served these to kids, adults, picky eaters, and dessert snobs. They disappear. Every. Single. Time. There’s something about the combination of tender pink velvet cake, creamy frosting, and that crisp candy coating that hits every note.
- Unbelievably Delicious: The texture is what gets me. It’s not too dense, not too crumbly—just perfectly moist and tender. The cream cheese frosting binds everything together without making it soggy, and the white chocolate coating adds a satisfying snap.
What makes this recipe different from all the others? It’s the ratio of cake to frosting. I’ve seen recipes that use way too much frosting, turning the cake balls into sticky, sweet messes that won’t stay on the stick. Others use too little, and the cake pops crumble apart when you dip them. This recipe hits the sweet spot—enough frosting to hold everything together, but not so much that it overwhelms the cake. It’s a technique I learned after three disastrous batches, and it’s the key to cake pops that actually work.
This recipe isn’t just good—it’s the kind that makes you close your eyes after the first bite. It’s comfort food reimagined: faster, simpler, but with the same soul-soothing satisfaction. Perfect for impressing guests without stress, or turning a simple evening into something memorable.
What Ingredients You Will Need
This recipe uses simple, wholesome ingredients to deliver bold flavor and satisfying texture without the fuss. Most of these are pantry staples, and I’ve included substitution notes where they work well.
For the Pink Velvet Cake
- 1 ½ cups all-purpose flour (spooned and leveled—don’t scoop directly from the bag)
- 1 cup granulated sugar
- ½ cup unsalted butter, softened (I use Land O’Lakes for consistent results)
- 2 large eggs, room temperature (cold eggs can make the batter seize up)
- 1 teaspoon vanilla extract (pure, not imitation, for the best flavor)
- ½ cup buttermilk, room temperature (adds tenderness and a subtle tang)
- 1 tablespoon unsweetened cocoa powder (this is what gives red velvet its signature flavor—just a tiny bit here for pink velvet)
- 1 teaspoon white vinegar (reacts with the baking soda for a tender crumb)
- ½ teaspoon baking soda
- ¼ teaspoon salt
- Pink gel food coloring (I recommend Wilton’s “Rose” or Americolor “Deep Pink”—liquid coloring won’t give you the same vibrant result)
For the Cream Cheese Frosting
- 4 oz cream cheese, softened (full-fat works best for stability)
- 2 tablespoons unsalted butter, softened
- 1 cup powdered sugar (sifted if it’s lumpy)
- ½ teaspoon vanilla extract
For the Coating and Decorating
- 12 oz white candy melts or white chocolate melting wafers (I use Ghirardelli or Wilton—avoid white chocolate chips, which don’t melt as smoothly)
- 1 tablespoon coconut oil or vegetable shortening (helps thin the coating for a smooth dip)
- Lollipop sticks (the 6-inch size works perfectly)
- Sprinkles, sanding sugar, or edible glitter (optional, for decorating)
Ingredient tips: For the best pink color, start with just a few drops of gel food coloring and add more until you reach your desired shade. Remember that the color will lighten slightly once you mix in the frosting. If you’re dairy-free, you can substitute the buttermilk with ½ cup milk mixed with ½ tablespoon lemon juice, and use dairy-free cream cheese—just know the texture will be slightly softer.
Equipment Needed
You don’t need a lot of fancy equipment for these Easy Pink Velvet Cake Pops, but a few tools will make your life much easier.
- 9×9-inch baking pan (or an 8-inch round cake pan—anything that gives you a single layer about an inch thick)
- Electric hand mixer or stand mixer (you can do this by hand, but the frosting will be much smoother with a mixer)
- Large mixing bowls (at least two)
- Cookie scoop or small ice cream scoop (a 1-inch scoop gives you perfectly uniform cake balls)
- Baking sheet lined with parchment paper (for chilling the cake balls)
- Microwave-safe bowl (for melting the coating)
- Styrofoam block or a cardboard box with holes (to hold the cake pops upright while they set—I’ve used an egg carton in a pinch)
- Lollipop sticks (available at craft stores or online)
Budget-friendly alternatives: No cookie scoop? Use a tablespoon measure and shape the balls by hand. No Styrofoam block? Poke holes in a cardboard box or use a clean egg carton turned upside down. I’ve even used a colander turned upside down—whatever works to keep those pops upright while the coating hardens.
Maintenance tip: If you use candy melts frequently, store them in a cool, dry place away from direct sunlight. Humidity can cause them to seize up when melted.
Preparation Method
Let’s get into the nitty-gritty. I’ve broken this down into clear steps with time estimates and sensory cues so you know exactly what to look for at each stage.
Step 1: Make the Pink Velvet Cake (10 minutes prep, 20-25 minutes baking)
Preheat your oven to 350°F (175°C). Grease your 9×9-inch pan with butter or non-stick spray, then line the bottom with parchment paper for easy removal. In a medium bowl, whisk together the flour, cocoa powder, baking soda, and salt. Set aside. In a large bowl, beat the softened butter and sugar together until light and fluffy—about 3 minutes with an electric mixer. You want it to look pale and almost doubled in volume. Add the eggs one at a time, beating well after each addition, then stir in the vanilla extract. The mixture might look a little curdled at this point—that’s totally normal, don’t panic.
In a small bowl or liquid measuring cup, combine the buttermilk and white vinegar. It will start to curdle slightly—that’s the reaction we want. Now, alternate adding the dry ingredients and the buttermilk mixture to the butter mixture, starting and ending with the dry ingredients. Mix on low speed just until combined—overmixing will make the cake tough. Finally, add your pink gel food coloring. Start with 4-5 drops, mix, then add more until you get a shade that’s slightly darker than what you want the final cake pops to be. The color will fade a bit when you add the frosting later.
Pour the batter into your prepared pan and spread it evenly. Bake for 20-25 minutes, or until a toothpick inserted in the center comes out clean or with just a few moist crumbs. The cake should be springy to the touch. Let it cool in the pan for 10 minutes, then turn it out onto a wire rack to cool completely. Important: Don’t rush this step. If the cake is even slightly warm when you crumble it, the frosting will melt and you’ll end up with a sticky mess.
Step 2: Make the Cream Cheese Frosting (5 minutes)
While the cake cools, make your frosting. In a medium bowl, beat the softened cream cheese and butter together until smooth and creamy—about 2 minutes. Add the powdered sugar and vanilla extract, then beat on low speed until combined. Increase the speed to medium and beat for another minute until the frosting is light and fluffy. Taste it—it should be tangy and sweet, not overwhelmingly sugary.
Step 3: Crumble and Combine (10 minutes)
Once the cake is completely cool, break it into large chunks and place them in a large bowl. Use your hands or a fork to crumble the cake into fine crumbs. There shouldn’t be any large pieces—think the texture of wet sand. Add the cream cheese frosting to the bowl, starting with about ¾ of it. Use a spatula or your hands to mix everything together. The mixture should hold together when you squeeze it in your fist. If it’s too dry, add more frosting a tablespoon at a time. If it’s too wet and sticky, you’ve added too much—but that’s why we start with less. The texture should be like play dough: firm but pliable.
Step 4: Shape the Cake Balls (15 minutes)
Using your cookie scoop or a tablespoon, portion out the cake mixture and roll it into smooth balls between your palms. You want them about 1 to 1.5 inches in diameter—roughly the size of a walnut. Place them on the parchment-lined baking sheet. You should get about 24-28 cake balls from this recipe. Pro tip: If your hands get sticky, lightly dampen them with water. This prevents the mixture from sticking to your palms and gives you smoother balls. Once all the balls are formed, refrigerate them for at least 30 minutes. This is crucial—chilled cake balls are much easier to dip without them falling off the stick.
Step 5: Insert the Sticks and Dip (20 minutes)
While the cake balls chill, melt your candy melts. Place them in a microwave-safe bowl with the coconut oil or shortening. Microwave in 30-second intervals, stirring well after each, until completely smooth. Don’t overheat—candy melts are sensitive. The mixture should be thin enough to coat the back of a spoon but not runny.
Take your chilled cake balls out of the fridge. Dip the tip of a lollipop stick into the melted coating, then insert it about halfway into a cake ball. This little bit of coating acts like glue and helps the stick stay put. Return the cake balls to the fridge for 5 minutes to set the glue.
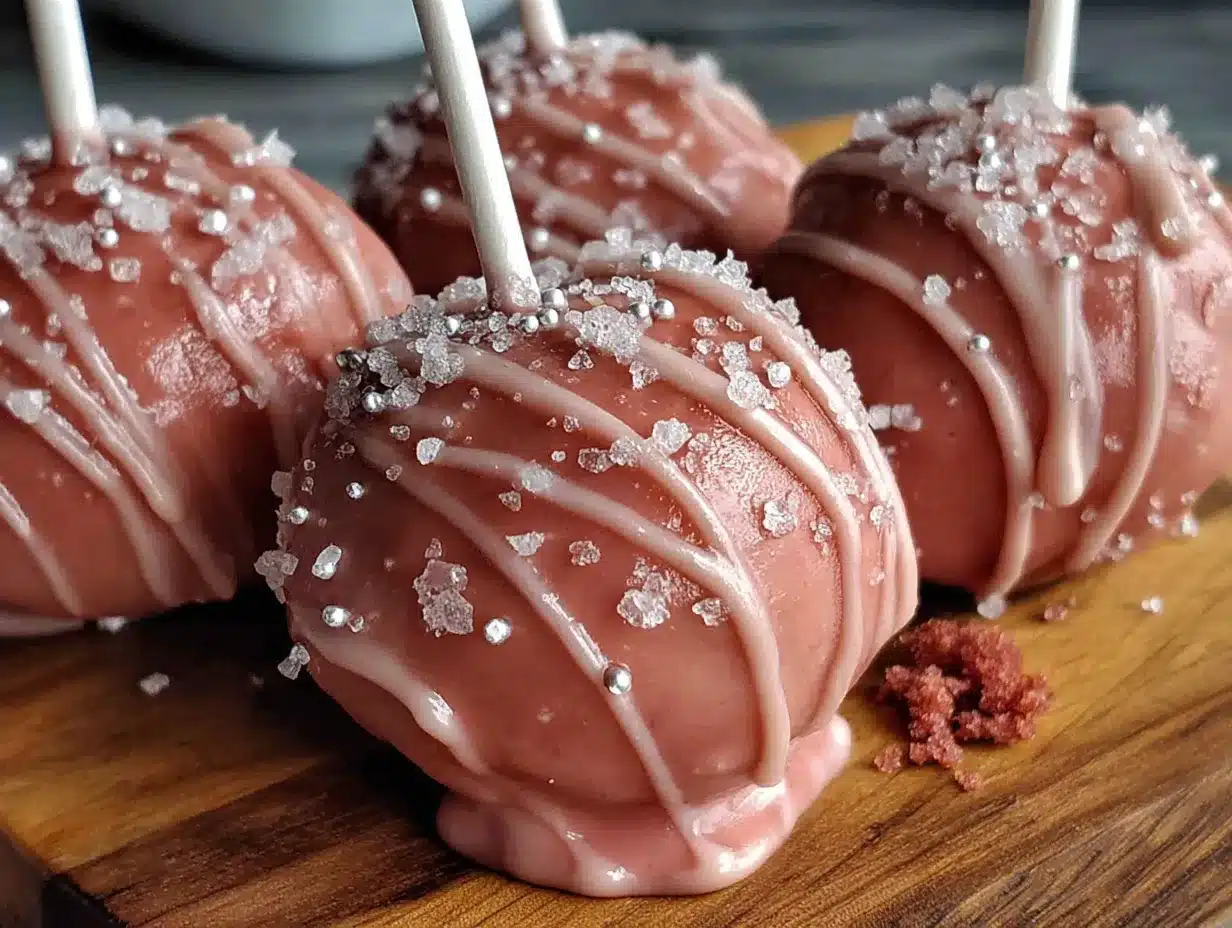
Now for the dipping: Hold a cake pop by the stick and dip it into the melted coating, tilting the bowl slightly so the coating covers the entire ball. Lift it out and let the excess drip off, gently tapping the stick against the edge of the bowl. Don’t swirl it around—that can cause the cake ball to break loose. Once coated, gently tap the stick again to encourage any excess to drip off, then place the pop upright in your Styrofoam block or makeshift stand. Add sprinkles immediately before the coating sets. Repeat with the remaining cake pops.
Let the coating set completely—about 15-20 minutes at room temperature, or 10 minutes in the fridge. And that’s it! You’ve made Easy Pink Velvet Cake Pops that look like they came from a bakery.
Cooking Tips & Techniques
I’ve made every mistake you can imagine with cake pops. Let me save you the trouble.
The biggest mistake: warm cake. I know you’re eager to get going, but if you crumble the cake while it’s still warm, the frosting will melt and you’ll end up with a greasy, sticky mess. Wait until the cake is completely cool to the touch. I usually bake the cake the day before and refrigerate it overnight—it crumbles perfectly when it’s cold.
The second biggest mistake: too much frosting. Start with less than you think you need. You can always add more, but you can’t take it out. The mixture should hold together when squeezed but not feel wet or sticky. If you accidentally add too much frosting, add a few tablespoons of crushed vanilla wafers or graham crackers to absorb the excess moisture.
Chilling is non-negotiable. I know you want to rush, but chilled cake balls are so much easier to work with. They hold their shape, they don’t fall off the stick, and the coating sets more smoothly. Thirty minutes in the fridge is the minimum—an hour is better.
Multitasking strategy: While the cake is baking, make your frosting. While the cake cools, wash your dishes. While the cake balls chill, melt your coating and set up your dipping station. This recipe flows beautifully if you plan ahead.
For consistent results: Use a cookie scoop for uniform cake balls. This isn’t just about looks—uniform balls chill at the same rate and dip more evenly. If you’re making these for a party, weigh the cake mixture: each ball should be about 25-30 grams.
Fix cracked coating: If your coating cracks after it sets, it usually means the cake ball was too cold when you dipped it. Let the cake balls sit at room temperature for 5 minutes before dipping. A tiny bit of coconut oil in the coating also helps prevent cracking.
Variations & Adaptations
One of the best things about this recipe is how easy it is to customize. Here are some variations I’ve tried and loved.
Chocolate Pink Velvet: Replace 2 tablespoons of the all-purpose flour with unsweetened cocoa powder for a deeper chocolate flavor that still lets the pink shine through. This is my personal favorite—the chocolate and cream cheese combination is irresistible.
Lemon Velvet Cake Pops: Omit the cocoa powder and pink food coloring. Add 2 tablespoons of lemon zest to the batter and replace the vanilla in the frosting with lemon extract. Use yellow food coloring instead of pink. These are bright, tangy, and perfect for spring.
Vegan Version: Use plant-based butter, flax eggs (1 tablespoon ground flaxseed + 3 tablespoons water per egg), and dairy-free cream cheese. Replace the buttermilk with almond milk mixed with ½ tablespoon lemon juice. The texture will be slightly denser but still delicious.
Gluten-Free Option: Substitute the all-purpose flour with a 1:1 gluten-free baking flour blend that contains xanthan gum. I’ve used Bob’s Red Mill with great results. The cake might be a bit more delicate, so handle it gently when crumbling.
Funfetti Cake Pops: Add ¼ cup rainbow sprinkles to the cake batter before baking. Use vanilla frosting instead of cream cheese for a classic birthday cake flavor. These are always a hit with kids.
Different coatings: Try dark chocolate or pink candy melts instead of white. You can also drizzle melted chocolate over the white coating for a marbled effect. I’ve even rolled some in crushed freeze-dried strawberries for a pink-on-pink look.
Serving & Storage Suggestions
These Easy Pink Velvet Cake Pops are best served at room temperature. The coating should be firm but not hard, and the cake inside should be tender and moist. If you’ve refrigerated them, let them sit out for 10-15 minutes before serving.
Presentation ideas: Arrange them in a tall glass jar or a small vase for a stunning centerpiece. For parties, insert them into a foam ball covered in tissue paper or place them in a cake pop stand. They also look beautiful arranged on a platter with fresh flowers or berries.
Pairing suggestions: Serve them with a glass of cold milk, a hot cup of coffee, or a glass of rosé for a grown-up treat. They also pair beautifully with fresh strawberries or a scoop of vanilla ice cream.
Storage: Store cake pops in an airtight container in the refrigerator for up to 5 days. Place them in a single layer or stack them with parchment paper between layers to prevent the coating from scratching. Do not store them at room temperature for more than 2 hours, especially if you used cream cheese frosting.
Freezing: You can freeze the undipped cake balls for up to 3 months. Place them on a baking sheet and freeze until solid, then transfer to a freezer bag. When you’re ready to use them, thaw in the refrigerator overnight, then dip as directed. The dipped cake pops can also be frozen for up to 2 months—just wrap them individually in plastic wrap and store in an airtight container.
Flavor development: These cake pops actually taste better the next day. The flavors meld together overnight, and the texture becomes even more tender. If you can resist eating them all right away, make them a day ahead.
Nutritional Information & Benefits
These Easy Pink Velvet Cake Pops are a treat, so I’m not going to pretend they’re health food. But here’s the breakdown so you know what you’re working with.
Per cake pop (based on 24 pops):
- Calories: 165
- Fat: 8g
- Saturated Fat: 5g
- Carbohydrates: 22g
- Sugar: 16g
- Protein: 2g
- Sodium: 85mg
Dietary considerations: This recipe contains wheat, dairy, and eggs. For a dairy-free version, see the variations section. For a gluten-free version, use a 1:1 gluten-free flour blend.
Health benefits of key ingredients: The buttermilk adds a small amount of calcium and probiotics. The cream cheese provides a bit of protein and calcium. And honestly? Sometimes you need a little pink joy in your life, and that has its own benefits for your mental health. I’m a firm believer that food should bring happiness, and these cake pops do exactly that.
Portion control: The great thing about cake pops is that they’re already portioned out. One or two is a satisfying serving, and they’re much easier to manage than a whole slice of cake.
Conclusion
I still think about that woman at the hardware store every time I make these Easy Pink Velvet Cake Pops. She had no reason to share her recipe with a stranger holding lightbulbs, but she did, and that small act of generosity has turned into one of my most-requested treats. That’s the thing about good recipes—they have a way of traveling from person to person, picking up little stories along the way. Now this one has yours.
These cake pops are worth trying because they work. They’re forgiving, they’re delicious, and they make you look like you spent hours in the kitchen when really, you just followed a few simple steps. I hope you make them your own—add your favorite sprinkles, try a different coating, or experiment with flavors. The recipe is a starting point, not a rulebook.
I’d love to hear how yours turn out. Drop a comment below and let me know what variations you tried, or tag me in your photos if you share them online. Did you use pink sprinkles? Add a drizzle of dark chocolate? Make a whole batch for your kid’s class party? Tell me everything. And if you have a recipe story of your own—one that came from an unexpected place—I’d love to hear that too. Happy baking, friend. You’ve got this.
Frequently Asked Questions
Can I use a box cake mix for these cake pops?
Absolutely! If you’re short on time, a box of pink or white cake mix works perfectly. Just bake it according to the package directions, let it cool completely, and follow the same steps for crumbling and mixing with the cream cheese frosting. The texture might be slightly different, but the result will still be delicious.
Why did my cake pops fall off the stick when I dipped them?
This usually happens for one of two reasons: the cake balls weren’t chilled enough, or you didn’t use the “glue” technique. Make sure your cake balls are thoroughly chilled (at least 30 minutes in the fridge), and always dip the tip of the stick in melted coating before inserting it into the cake ball. That little bit of coating acts like cement.
Can I use cream cheese frosting from a can?
You can, but I don’t recommend it. Canned frosting is much softer and contains more liquid, which can make your cake mixture too wet and sticky. Homemade cream cheese frosting is firmer and gives you much better control over the texture. It only takes 5 minutes to make, and the difference is noticeable.
How do I get smooth, crack-free coating?
Two tips: First, let your chilled cake balls sit at room temperature for 5 minutes before dipping. Second, add a tablespoon of coconut oil or vegetable shortening to your candy melts—it thins the coating and helps it set smoothly without cracking. Also, don’t overheat the coating; melt it in short bursts and stir well.
Can I make these cake pops ahead of time for a party?
Yes! In fact, they’re better made a day ahead. You can make the cake balls up to 3 days in advance and store them in the refrigerator, then dip them the day before your event. Or you can fully assemble them and store them in an airtight container in the fridge for up to 5 days. Just let them sit at room temperature for 10-15 minutes before serving.
Pin This Recipe!

Easy Pink Velvet Cake Pops: Best Homemade Recipe

These Easy Pink Velvet Cake Pops are tender, moist, and coated in a crisp white chocolate shell. Perfect for parties, they come together in under an hour of active time and use simple ingredients.
- Prep Time: 45 minutes
- Cook Time: 25 minutes
- Total Time: 1 hour 10 minutes (plus chilling time)
- Yield: 24-28 cake pops 1x
- Category: Dessert
- Cuisine: American
Ingredients
- 1 ½ cups all-purpose flour (spooned and leveled)
- 1 cup granulated sugar
- ½ cup unsalted butter, softened
- 2 large eggs, room temperature
- 1 teaspoon vanilla extract (pure)
- ½ cup buttermilk, room temperature
- 1 tablespoon unsweetened cocoa powder
- 1 teaspoon white vinegar
- ½ teaspoon baking soda
- ¼ teaspoon salt
- Pink gel food coloring (e.g., Wilton’s ‘Rose’ or Americolor ‘Deep Pink’)
- 4 oz cream cheese, softened (full-fat)
- 2 tablespoons unsalted butter, softened
- 1 cup powdered sugar (sifted if lumpy)
- ½ teaspoon vanilla extract
- 12 oz white candy melts or white chocolate melting wafers
- 1 tablespoon coconut oil or vegetable shortening
- Lollipop sticks (6-inch size)
- Sprinkles, sanding sugar, or edible glitter (optional, for decorating)
Instructions
- Preheat oven to 350°F (175°C). Grease a 9×9-inch pan with butter or non-stick spray, then line the bottom with parchment paper.
- In a medium bowl, whisk together flour, cocoa powder, baking soda, and salt. Set aside.
- In a large bowl, beat softened butter and sugar together until light and fluffy (about 3 minutes with an electric mixer).
- Add eggs one at a time, beating well after each addition, then stir in vanilla extract.
- In a small bowl, combine buttermilk and white vinegar (it will curdle slightly).
- Alternate adding dry ingredients and buttermilk mixture to the butter mixture, starting and ending with dry ingredients. Mix on low speed just until combined.
- Add pink gel food coloring (start with 4-5 drops, then add more until desired shade is reached). Mix until evenly colored.
- Pour batter into prepared pan and spread evenly. Bake for 20-25 minutes, or until a toothpick inserted in the center comes out clean or with a few moist crumbs.
- Let cake cool in pan for 10 minutes, then turn out onto a wire rack to cool completely.
- While cake cools, make frosting: In a medium bowl, beat softened cream cheese and butter together until smooth and creamy (about 2 minutes).
- Add powdered sugar and vanilla extract, beat on low until combined, then increase to medium and beat for 1 minute until light and fluffy.
- Once cake is completely cool, break into large chunks and crumble into fine crumbs in a large bowl.
- Add about ¾ of the cream cheese frosting to the crumbs and mix until the mixture holds together when squeezed (like play dough). Add more frosting if needed.
- Using a cookie scoop or tablespoon, portion the mixture and roll into smooth balls about 1 to 1.5 inches in diameter. Place on a parchment-lined baking sheet. You should get 24-28 balls.
- Refrigerate cake balls for at least 30 minutes (or up to 1 hour).
- While cake balls chill, melt candy melts with coconut oil or shortening in a microwave-safe bowl in 30-second intervals, stirring well after each, until smooth.
- Dip the tip of a lollipop stick into the melted coating, then insert it about halfway into a chilled cake ball. Return to fridge for 5 minutes to set.
- Hold a cake pop by the stick and dip it into the melted coating, tilting the bowl to cover the entire ball. Lift out and let excess drip off, gently tapping the stick against the bowl.
- Place the coated pop upright in a Styrofoam block or makeshift stand. Add sprinkles immediately before coating sets.
- Let coating set completely (15-20 minutes at room temperature or 10 minutes in the fridge). Serve at room temperature.
Notes
Chilling the cake balls is non-negotiable for easy dipping. Start with less frosting than you think you need—you can always add more. If coating cracks, let cake balls sit at room temperature for 5 minutes before dipping. For best results, make the cake a day ahead and refrigerate overnight.
Nutrition
- Serving Size: 1 cake pop
- Calories: 165
- Sugar: 16
- Sodium: 85
- Fat: 8
- Saturated Fat: 5
- Carbohydrates: 22
- Protein: 2
Keywords: pink velvet cake pops, easy cake pops, homemade cake pops, pink velvet, cake pops recipe, cream cheese frosting, white chocolate coating


