I was standing in the frozen food aisle last Tuesday, staring at a box of mint chocolate chip ice cream I had no intention of buying, when it hit me. Not the cold from the freezer door—I mean the smell. That sharp, cool hit of peppermint mixed with dark chocolate. And just like that, I was eight years old again, sitting on my neighbor Mrs. Kowalski’s cracked vinyl kitchen stool, watching her pull a pan of brownies out of the oven. She always made them for the holiday block party, and she always crushed up those red-and-white striped candy canes on top. I can still hear the sound of her rolling pin smashing them through a Ziploc bag—thump, thump, thump—while she hummed “Jingle Bell Rock” off-key.
Mrs. Kowalski moved to Florida years ago, and I honestly haven’t thought about those brownies in forever. But standing there in the grocery store, I got this ache to make them myself. The problem? I was already running late to pick up my kid from soccer, I had a sink full of dishes, and the last thing I needed was a complicated baking project. So I did what any reasonable, slightly frazzled person would do: I figured out how to make them in 30 minutes flat. No fancy techniques, no hunting for specialty ingredients, and absolutely no rolling pin required.
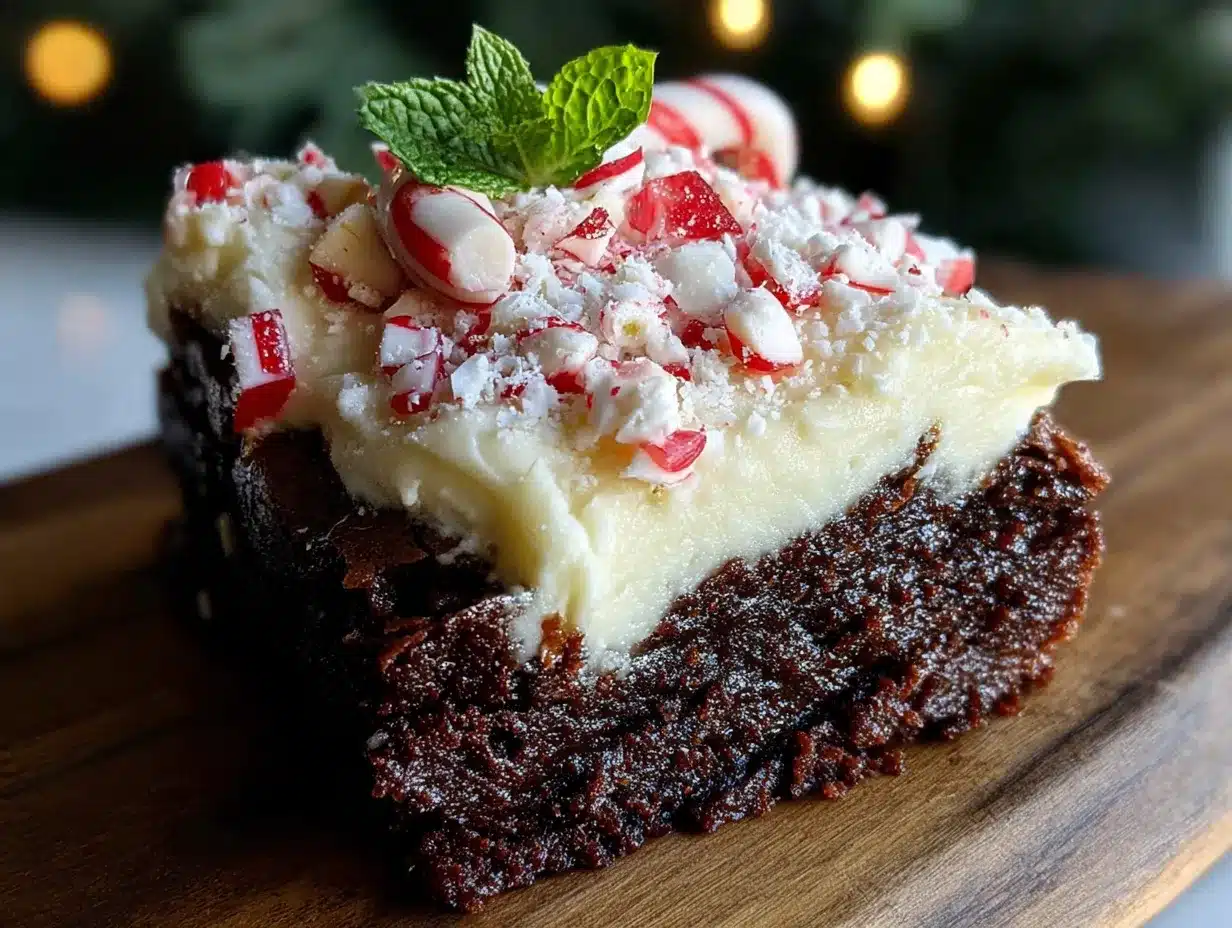
These Easy Christmas Peppermint Brownies are my little tribute to Mrs. K—minus the mess and the time commitment. They start with a boxed mix (because let’s be real, that’s what she used too) and get dressed up with melted chocolate, a splash of peppermint extract, and a generous shower of crushed candy canes. The result is this fudgy, cool, crunchy, ridiculously festive dessert that tastes like Christmas morning but takes less time than a sitcom episode. Maybe you’ve been there too—wanting to make something special but running out of both time and patience. These brownies are for you.
Why You’ll Love This Recipe
Look, I’m not here to pretend that from-scratch brownies aren’t wonderful. They are. But sometimes you need dessert on the table now, not after you’ve melted butter, sifted cocoa powder, and washed three bowls. These peppermint brownies solve that problem without sacrificing an ounce of flavor or festivity.
- 30 Minutes Start to Finish — This isn’t a “30 minutes of active time plus cooling” situation. These brownies go from pantry to plate in about half an hour. The secret? A boxed brownie mix and a microwave shortcut for the ganache.
- Simple Ingredients — You probably already have the brownie mix, eggs, oil, and butter in your kitchen right now. The only special purchase is a box of candy canes and maybe some peppermint extract, both of which are everywhere during December.
- Perfect for Holiday Chaos — Whether you need a last-minute treat for a cookie swap, a classroom party, or just something to put out when the in-laws show up unexpectedly, this recipe has your back. It looks impressive but requires almost zero effort.
- Crowd-Pleaser — I brought a batch to my book club last week, and three people asked for the recipe before I’d even poured my wine. Kids love the crunch, adults love the chocolate-peppermint combo, and everyone loves that it doesn’t taste “boxed.”
- Unbelievably Delicious — The brownie base stays fudgy and rich, the peppermint ganache is silky and cool, and the crushed candy canes add this wonderful snap. It’s the kind of dessert that makes people close their eyes on the first bite.
What makes this different from every other peppermint brownie recipe out there? It’s the double dose of peppermint—extract in the brownie batter and the ganache—plus my trick for crushing candy canes without making a huge mess. It’s not just another holiday brownie. It’s the one you’ll make every single December from now on.
What Ingredients You Will Need
This recipe uses simple, everyday ingredients to create something that feels genuinely special. No obscure extracts, no trips to three different stores. Just honest ingredients that work together beautifully.
- 1 box (18.4 oz) brownie mix — I prefer Ghirardelli Dark Chocolate for its deep flavor, but any standard box mix works. Duncan Hines and Betty Crocker both give great results. Just avoid the “low sugar” or “gluten-free” versions unless that’s a dietary need, as they can behave differently.
- 1 large egg — This helps the brownies set properly. If your eggs are cold, let them sit on the counter for 10 minutes or place them in a bowl of warm water for 5 minutes.
- 1/3 cup vegetable oil — Canola or avocado oil also work. Avoid olive oil here—the flavor is too strong. I’ve used melted coconut oil in a pinch, and it was fine, but the texture was slightly greasier.
- 1/4 cup water — Just tap water. Some box mixes call for more, so always check your specific box instructions first.
- 1/2 teaspoon peppermint extract — This goes into the brownie batter for a subtle minty undertone. I use Nielsen-Massey because it’s pure and not artificial-tasting. Do not use mint extract—it’s different and will make your brownies taste like toothpaste.
- 1 cup semi-sweet chocolate chips — These get melted into the ganache. Guittard or Ghirardelli chips melt the smoothest. You can use dark chocolate chips for a less sweet topping.
- 1/2 cup heavy cream — Full-fat is best for a silky ganache. I’ve tried half-and-half in a pinch, and it worked but was thinner. Do not use milk—it won’t set properly.
- 1/4 teaspoon peppermint extract — For the ganache. Yes, more peppermint. Trust me on this.
- 1/2 cup crushed candy canes (about 6-8 mini candy canes or 3-4 regular-sized) — You want them crushed but not powdered. Some larger pieces for crunch, some smaller bits for sparkle. I’ll show you the easiest way to crush them in the tips section.
- Optional: 1/4 teaspoon kosher salt — Sprinkle this on top right before serving if you like that salty-sweet thing. It’s not traditional, but it’s really, really good.
One note on the candy canes: don’t use the mini ones that come in tubes for stockings. They’re harder to crush evenly. Regular-sized candy canes or the big “jumbo” ones work best. And if you’re feeling fancy, you can use striped peppermint swirl candies instead—they crush even more cleanly.
Equipment Needed
You don’t need a professional bakery setup for these brownies. Here’s what you’ll need:
- 8×8-inch baking pan — Glass, metal, or ceramic all work. I prefer metal for even baking. If you only have a 9×9, the brownies will be slightly thinner and may need 2-3 minutes less baking time.
- Parchment paper — This is non-negotiable for easy removal. You can use aluminum foil in a pinch, but spray it well with nonstick spray.
- Mixing bowls — One medium bowl for the brownie batter, one small microwave-safe bowl for the ganache.
- Whisk or wooden spoon — For mixing the batter. Don’t overmix, so a spoon is actually better than an electric mixer here.
- Measuring cups and spoons — For the oil, water, and extracts.
- Ziploc bag and rolling pin (or heavy skillet) — For crushing the candy canes. I used to use a food processor, but it made the pieces too small and created a lot of dust. The bag method gives you better control.
- Small saucepan or microwave — For heating the cream. The microwave is faster, so that’s what I use.
- Offset spatula or butter knife — For spreading the ganache. An offset spatula is nice but not required.
- Cooling rack — Helps the brownies cool evenly. If you don’t have one, just set the pan on a trivet.
My best budget tip? Skip the fancy brownie mix and use a store brand—seriously, they’re all pretty similar. And if you don’t have a rolling pin, a wine bottle or even a heavy can of tomatoes works perfectly for crushing candy canes. I’ve used all three.
Preparation Method
- Preheat your oven to 350°F (175°C). Line your 8×8 pan with parchment paper, leaving a 2-inch overhang on two opposite sides. This creates handles for lifting the brownies out later. If you’re using foil instead, spray it generously with nonstick spray.
- Make the brownie batter. In a medium bowl, combine the brownie mix, egg, oil, water, and 1/2 teaspoon peppermint extract. Stir with a wooden spoon or whisk until just combined—about 20-30 strokes. You’ll see a few lumps, and that’s totally fine. Overmixing makes brownies tough and cakey instead of fudgy. The batter should be thick and glossy, not runny.
- Bake the brownies. Pour the batter into the prepared pan and spread it evenly with a spatula. Bake for 22-25 minutes. At 22 minutes, insert a toothpick into the center. You want it to come out with a few moist crumbs attached, not clean. If it’s clean, you’ve overbaked them. The edges should look set and slightly pulling away from the pan, but the center should still look a little soft.
- Cool the brownies completely. This step is crucial. Place the pan on a cooling rack and let the brownies cool for at least 20 minutes. If you add the ganache while they’re still warm, it will melt into a puddle instead of forming a nice layer. I’ve made this mistake. It’s still delicious, but it’s not pretty.
- Make the peppermint ganache. While the brownies cool, place the chocolate chips in a small microwave-safe bowl. Heat the heavy cream in a separate microwave-safe cup for 45-60 seconds until it’s steaming but not boiling. Pour the hot cream over the chocolate chips and let it sit for 2 minutes without stirring. Then gently stir until the chocolate is completely melted and the mixture is smooth. Stir in the remaining 1/4 teaspoon peppermint extract. The ganache should be thick and pourable, not runny.
- Crush the candy canes. Place the candy canes in a sturdy Ziploc bag. Seal it, then wrap it in a kitchen towel (this prevents punctures). Smash with a rolling pin or heavy skillet until you have a mix of fine crumbs and small chunks. Aim for pieces about the size of a pencil eraser—some smaller, some larger. Set aside about 2 tablespoons for garnish.
- Assemble the brownies. Pour the ganache over the cooled brownies and spread it evenly with an offset spatula or butter knife. Immediately sprinkle the crushed candy canes over the ganache while it’s still wet so they stick. If you wait too long, the ganache will set and the candy canes will just roll off.
- Let the ganache set. Place the pan in the refrigerator for 15-20 minutes to firm up the ganache. If you’re in a hurry, 10 minutes in the freezer works too—just don’t forget about them.
- Slice and serve. Lift the brownies out using the parchment handles. Use a sharp chef’s knife to cut into 9 or 16 squares. For clean slices, wipe the knife clean between cuts with a damp paper towel. If the ganache cracks a little, that’s fine—it adds to the rustic look.
One more thing: if your ganache seizes up or looks grainy, you probably overheated the cream. Don’t panic—just add another tablespoon of warm cream and stir vigorously. It should smooth right out.
Cooking Tips & Techniques
Let me save you some trouble. I’ve made these brownies probably a dozen times now, and I’ve messed up in almost every way possible. Here’s what I learned:
Don’t overbake. This is the number one mistake people make with boxed brownies. They see the toothpick test and pull them out when it’s clean, but that gives you dry, cakey brownies. You want that toothpick to have moist crumbs. The brownies will continue to cook slightly from residual heat after you pull them out, so err on the side of underdone.
Crush candy canes the smart way. I used to use a food processor, but it turned them into powder and made a mess. The Ziploc bag method gives you more control. Pro tip: crush them before you open the bag, then open it over the sink to avoid candy cane dust everywhere. And don’t crush them too far in advance—they’ll get sticky and clump together.
Room temperature ingredients matter. I know, I know, it’s annoying. But cold eggs can make the batter lumpy, and cold cream can cause the ganache to seize. Take the egg out of the fridge when you preheat the oven, and it’ll be ready by the time you need it. For the cream, just let it sit on the counter while the brownies bake.
Multitask like a pro. While the brownies bake, crush the candy canes and measure out your ganache ingredients. While the ganache sets in the fridge, clean up your kitchen. This recipe is supposed to be easy, so don’t make it stressful.
One thing I learned the hard way: I once tried to make these with mint extract instead of peppermint extract because I grabbed the wrong bottle at the store. Don’t do it. Mint extract has a sharper, more “green” flavor that clashes with chocolate. Peppermint extract is sweeter and cooler. They are not interchangeable.
Variations & Adaptations
One of the best things about this recipe is how flexible it is. Here are some ways to make it your own:
Gluten-Free Version: Use a gluten-free brownie mix (King Arthur Flour makes an excellent one). Everything else stays the same. Just check that your candy canes are gluten-free—most are, but some brands use wheat starch as a binder.
Dairy-Free Version: Substitute the heavy cream with full-fat coconut cream from a can (the solid part, not the liquid). Use dairy-free chocolate chips like Enjoy Life or Pascha. The ganache will be slightly less firm but still delicious. Use a dairy-free brownie mix or one that doesn’t call for butter.
Extra Chocolatey: Stir 1/2 cup mini chocolate chips into the brownie batter before baking. They’ll melt into little pockets of gooey chocolate. I did this for a friend’s holiday party, and people lost their minds.
White Chocolate Peppermint: Swap the semi-sweet chocolate chips for white chocolate chips in the ganache. The white chocolate pairs beautifully with the peppermint and gives the brownies a festive look. Just be careful—white chocolate burns more easily, so use low heat and stir constantly.
Spicy Kick: Add 1/4 teaspoon of cayenne pepper to the brownie batter along with the peppermint extract. The heat and cool combination is surprisingly addictive. I tried this on a whim last year, and it’s now my husband’s favorite version.
No-Bake Option: If you don’t want to turn on the oven, use a no-bake brownie mix or make a simple cookie crust (crushed chocolate wafers mixed with melted butter, pressed into the pan, and chilled). Top with the peppermint ganache and candy canes as directed.
Serving & Storage Suggestions
These brownies are best served at room temperature or slightly chilled. The ganache is firmer when cold, which makes for cleaner slices, but the brownie itself is more fudgy at room temperature. I like to let them sit out for about 10 minutes after coming out of the fridge before serving.
For presentation, cut them into 16 small squares and arrange them on a white platter or a festive Christmas plate. A dusting of powdered sugar on top adds a snowy effect. Or stack them in a clear cellophane bag tied with a red ribbon for a quick homemade gift.
These pair beautifully with a cup of hot cocoa, a peppermint mocha, or even a cold glass of milk. For an adult twist, serve them alongside a small glass of Baileys or a peppermint martini. They also make a fantastic ice cream topping—just crumble them over vanilla bean ice cream and drizzle with chocolate sauce.
Storage: Keep the brownies in an airtight container at room temperature for up to 3 days, or in the refrigerator for up to a week. The candy cane topping will soften over time, so if you’re making them ahead, wait to add the crushed candy canes until just before serving. I learned this the hard way when I made them for a party two days early and the topping turned into a sticky mess.
Freezing: These freeze beautifully. Wrap the entire slab (without the candy cane topping) tightly in plastic wrap, then in foil, and freeze for up to 3 months. Thaw overnight in the refrigerator, then add the ganache and candy canes before serving. Or freeze individual squares for a quick dessert emergency—just wrap each one in plastic wrap and store in a freezer bag.
One more note: the flavors actually get better after a day or two in the fridge. The peppermint mellows out and melds with the chocolate in a really lovely way. So don’t worry if you’re making them ahead—they’ll still be fantastic.
Nutritional Information & Benefits
Let’s be real: these are brownies, not salad. But here’s the estimated nutritional breakdown per square (assuming 16 servings):
- Calories: Approximately 220-250 per square
- Fat: 12-14g (mostly from the oil, chocolate, and cream)
- Carbohydrates: 28-32g (including about 20g of sugar)
- Protein: 2-3g
- Fiber: 1-2g
On the plus side, dark chocolate contains antioxidants called flavonoids, which can support heart health. Peppermint has been shown to aid digestion and can even help relieve headaches—though I’m not sure a brownie qualifies as a medicinal dose. The candy canes are mostly sugar, but they do make people smile, and that has to count for something, right?
If you’re watching your sugar intake, you can use a sugar-free brownie mix and sugar-free chocolate chips. The peppermint extract is already sugar-free, so that’s one less thing to worry about. Just know that the texture will be slightly different—sugar-free brownies tend to be a bit denser.
These brownies are not gluten-free, dairy-free, or vegan as written, but as I mentioned in the variations section, all of those adaptations are possible. They do contain eggs and dairy, so keep that in mind for any allergies.
My personal take? Dessert is about joy, not nutrition. I make these because they make my family happy and they make the holidays feel special. Everything in moderation, including moderation.
Conclusion
These Easy Christmas Peppermint Brownies are exactly what a holiday dessert should be: festive, delicious, and completely stress-free. They come together in 30 minutes with ingredients you probably already have, they look beautiful on a plate, and they taste like the best part of December. Every time I make them, I think of Mrs. Kowalski and her off-key humming and her cracked vinyl stool. And I smile.
But here’s the thing—this recipe is yours now too. Don’t be afraid to play with it. Use dark chocolate instead of semi-sweet. Add a layer of marshmallow fluff under the ganache. Sprinkle crushed candy canes on top in the shape of a Christmas tree. Make it your own, and then make it for the people you love. That’s what the holidays are about.
I’d love to hear how these turn out for you. Did you try a variation? Did you forget the peppermint extract and have to improvise? (I’ve done that too, and vanilla extract actually works in a pinch.) Drop a comment below and let me know. And if you share a photo on Pinterest, tag me—I want to see your beautiful brownies.
Now go preheat that oven. Christmas isn’t going to bake itself.
Frequently Asked Questions
Can I use homemade brownie batter instead of a box mix?
Absolutely. If you have a favorite from-scratch brownie recipe, use it. Just make sure it’s a fudgy recipe, not a cakey one, and that it bakes in about 20-25 minutes in an 8×8 pan. The peppermint extract and ganache will work the same way no matter what base you use.
Why did my ganache turn out grainy?
This usually happens when the cream is too hot or when water gets into the chocolate. Make sure your bowl and utensils are completely dry. If the cream starts to boil, let it cool for 30 seconds before pouring it over the chocolate. If it still seizes, add a tablespoon of warm cream and stir vigorously until smooth.
Can I make these brownies vegan?
Yes, with a few swaps. Use a vegan brownie mix (or make your own with flax eggs), dairy-free chocolate chips, and full-fat coconut cream instead of heavy cream. Most candy canes are vegan, but check the label to be sure. The texture will be slightly different, but they’ll still be delicious.
How far in advance can I make these?
You can bake the brownies and make the ganache up to 2 days ahead. Store them in the refrigerator, but wait to add the crushed candy canes until just before serving. The candy canes will soften and become sticky if they sit on the ganache too long. If you’re making them for a party, I recommend assembling them no more than 4-6 hours ahead.
Can I use a different pan size?
Sure. A 9×9 pan will give you thinner brownies that bake faster (check at 18-20 minutes). A 9×13 pan will make very thin brownies that bake in about 15-17 minutes. Just adjust your baking time and keep an eye on them. You’ll also need to double the ganache recipe if you use a 9×13 pan to get a nice thick layer on top.
Pin This Recipe!

Easy 30-Minute Christmas Peppermint Brownies Recipe

These Easy Christmas Peppermint Brownies are a quick, festive dessert made with a boxed brownie mix, a double dose of peppermint extract, and a generous topping of crushed candy canes. Ready in just 30 minutes, they’re perfect for holiday gatherings, cookie swaps, or last-minute treats.
- Prep Time: 10 minutes
- Cook Time: 22-25 minutes
- Total Time: 30 minutes
- Yield: 16 servings 1x
- Category: Dessert
- Cuisine: American
Ingredients
- 1 box (18.4 oz) brownie mix
- 1 large egg
- 1/3 cup vegetable oil
- 1/4 cup water
- 1/2 teaspoon peppermint extract
- 1 cup semi-sweet chocolate chips
- 1/2 cup heavy cream
- 1/4 teaspoon peppermint extract
- 1/2 cup crushed candy canes (about 6–8 mini or 3–4 regular-sized)
- Optional: 1/4 teaspoon kosher salt
Instructions
- Preheat your oven to 350°F (175°C). Line an 8×8-inch baking pan with parchment paper, leaving a 2-inch overhang on two opposite sides.
- In a medium bowl, combine the brownie mix, egg, oil, water, and 1/2 teaspoon peppermint extract. Stir until just combined (about 20-30 strokes). The batter should be thick and glossy.
- Pour the batter into the prepared pan and spread evenly. Bake for 22-25 minutes. Insert a toothpick into the center; it should come out with a few moist crumbs attached, not clean.
- Cool the brownies completely in the pan on a cooling rack for at least 20 minutes.
- While the brownies cool, make the ganache: Place the chocolate chips in a small microwave-safe bowl. Heat the heavy cream in a separate microwave-safe cup for 45-60 seconds until steaming but not boiling. Pour the hot cream over the chocolate chips and let sit for 2 minutes without stirring. Then stir until smooth. Stir in the remaining 1/4 teaspoon peppermint extract.
- Crush the candy canes: Place them in a sturdy Ziploc bag, seal, wrap in a kitchen towel, and smash with a rolling pin or heavy skillet until you have a mix of fine crumbs and small chunks. Set aside about 2 tablespoons for garnish.
- Pour the ganache over the cooled brownies and spread evenly. Immediately sprinkle the crushed candy canes over the ganache while it’s still wet.
- Place the pan in the refrigerator for 15-20 minutes to firm up the ganache.
- Lift the brownies out using the parchment handles. Use a sharp chef’s knife to cut into 9 or 16 squares. Wipe the knife clean between cuts for neat slices.
Notes
Don’t overbake the brownies; the toothpick should have moist crumbs. Crush candy canes in a Ziploc bag for better control. Use peppermint extract, not mint extract. For clean slices, wipe the knife between cuts. The flavors improve after a day in the fridge.
Nutrition
- Serving Size: 1 square
- Calories: 235
- Sugar: 20
- Sodium: 150
- Fat: 13
- Saturated Fat: 5
- Carbohydrates: 30
- Fiber: 1.5
- Protein: 2.5
Keywords: peppermint brownies, Christmas brownies, easy brownies, 30-minute brownies, holiday dessert, boxed brownie mix, candy cane brownies


