Jen wasn’t trying to impress anyone. I’d stopped by her place on a rainy Tuesday to borrow a torque wrench—don’t ask—and the smell hit me before I got through the door. It was deep and smoky, with this warmth that made me forget why I’d even come. She was stirring a pot on the stove, completely nonchalant, while her kids ran circles around the kitchen island. “It’s just chili,” she said when I asked, shrugging like I’d complimented her on a load of laundry. But let me tell you, that “just chili” was the best I’d ever tasted. I stood there for twenty minutes, torque wrench forgotten, just watching her work and trying to figure out what she was doing differently.
Jen’s secret, it turned out, was venison. Her husband hunts, and she’s always looking for ways to use up the freezer stash. She tossed it in the slow cooker that morning with a handful of pantry staples and went about her day. No fuss, no fancy techniques. She just let the meat do the talking. I mean, honestly, that’s the kind of cooking I aspire to—effortless but unforgettable. You know that feeling when you taste something and immediately start planning when you’ll make it yourself? That was me, standing in her kitchen, mentally taking notes.
So I went home, dug out my slow cooker, and started experimenting. This recipe is the result of about six attempts, a few burned batches, and one very patient family who ate chili for two weeks straight. It’s the one I now make for every game day, every potluck, every time I need to feed a crowd without breaking a sweat. And honestly? It still tastes like that rainy Tuesday at Jen’s house. That’s the kind of recipe this is—one that stops you in your tracks and makes you wonder why you ever bothered with anything else.
Why You’ll Love This Recipe
Let’s be real for a second. There are a million chili recipes out there, and most of them are fine. But this one? This one is different. It’s the kind of chili that makes people ask for the recipe before they’ve finished their first bowl. Here’s why it works so well, especially when you’re feeding a crowd.
- Set It and Forget It: This is the ultimate hands-off meal. You brown the meat, toss everything in the slow cooker, and walk away. Eight hours later, you’ve got a pot of chili that tastes like you’ve been slaving over it all day.
- Game Meat, No Gamey Taste: I know what you’re thinking—venison can be tricky. But this recipe handles it perfectly. The slow cooking process, combined with the right spices and a splash of beer, transforms it into something incredibly tender and rich. No weird flavors, I promise.
- Built for a Crowd: This recipe makes a massive batch. We’re talking 12 to 14 servings, easy. It’s perfect for potlucks, Super Bowl parties, or that annual chili cook-off you keep meaning to enter. Plus, it scales beautifully if you need even more.
- Deep, Complex Flavor: The secret is layering. You toast the spices, deglaze the pan, and let the slow cooker do its magic. The result is a chili with serious depth—smoky, a little sweet, with just enough heat to keep things interesting.
- Crowd-Pleaser Guaranteed: I’ve served this to hunters who swear by their own recipes and to folks who’d never tried venison in their lives. Every single time, the pot comes back empty. It’s that good.
This isn’t just another chili recipe. It’s the one you’ll make when you want to impress people without actually trying. The one that makes you look like a hero while you’re just sitting on the couch, watching the game. And honestly? That’s the best kind of recipe to have in your back pocket.
What Ingredients You Will Need
This recipe relies on simple, hearty ingredients to build layers of flavor. Most of these are pantry staples or easy to find at any grocery store. The venison is the star, but everything else plays a supporting role that matters just as much.
- For the Meat Base:
- 3 pounds ground venison (or ground beef if you can’t find venison)
- 1 pound ground pork sausage (adds fat and richness that venison lacks)
- 4 slices thick-cut bacon, chopped (trust me on this one)
- For the Aromatics:
- 2 large yellow onions, diced (about 3 cups)
- 6 cloves garlic, minced (I use a microplane for this)
- 2 jalapeños, seeded and minced (leave seeds in if you want more heat)
- For the Spice Blend:
- 3 tablespoons chili powder (I prefer Penzeys for the best depth)
- 1 tablespoon ground cumin
- 1 tablespoon smoked paprika
- 2 teaspoons dried oregano
- 1 teaspoon chipotle powder (adds smokiness without overwhelming heat)
- 1 teaspoon cocoa powder (this is my secret weapon)
- Salt and black pepper to taste
- For the Liquid Base:
- 1 bottle dark beer (12 ounces, like a stout or porter—don’t use light beer here)
- 2 cups beef broth (low sodium, so you can control the salt)
- 1 can (14.5 ounces) fire-roasted diced tomatoes
- 1 can (15 ounces) tomato sauce
- 2 tablespoons tomato paste
- For the Beans and Veggies:
- 2 cans (15 ounces each) kidney beans, drained and rinsed
- 1 can (15 ounces) black beans, drained and rinsed
- 1 can (15 ounces) pinto beans, drained and rinsed
- 1 large bell pepper (any color), diced
- For Garnish (Optional but Highly Recommended):
- Shredded cheddar cheese
- Sour cream or Greek yogurt
- Fresh cilantro, chopped
- Green onions, sliced
- Pickled jalapeños
- Cornbread or tortilla chips for serving
A few notes on ingredients. For the venison, if you’re using meat from a hunter, make sure it’s been properly trimmed of silver skin and any excess fat. Venison is lean, which is why we add the pork sausage and bacon—they provide the fat needed for flavor and moisture. If you’re substituting with ground beef, use 80/20 blend for the best results.
For the beans, I know there’s a whole debate about whether chili should have beans. I’m firmly in the pro-beans camp, especially when feeding a crowd. They stretch the recipe further and add great texture. But if you’re a purist, feel free to leave them out or swap in extra meat.
And that cocoa powder? Don’t skip it. It doesn’t make the chili taste like chocolate. It just deepens the savory notes and rounds out the heat. Trust the process on this one.
Equipment Needed
You don’t need a ton of fancy gear for this recipe, which is part of the beauty. Here’s what you’ll need to get the job done.
- Large Slow Cooker: You’ll want at least a 6-quart model for this batch. I use a 7-quart Crock-Pot and it’s perfect. If yours is smaller, reduce the recipe by half or cook in batches.
- Large Skillet or Dutch Oven: For browning the meat and cooking the aromatics. A cast-iron skillet works beautifully here because it holds heat well and gives you a good sear.
- Wooden Spoon or Spatula: For breaking up the meat as it browns. I prefer a wooden spoon because it won’t scratch your pans.
- Chef’s Knife and Cutting Board: You’ll be doing a fair amount of chopping. A sharp knife makes all the difference.
- Measuring Cups and Spoons: For accurate spice measurements. I keep a set of magnetic measuring spoons on my fridge for easy access.
- Can Opener: Basic, but essential. I’ve definitely tried opening a can with a knife before and it’s not pretty.
- Mixing Bowls: For holding prepped ingredients. I like to have everything measured and ready before I start cooking—it makes the process so much smoother.
- Ladle: For serving. A deep ladle works best for chili.
If you don’t have a slow cooker, you can absolutely make this on the stovetop or in a Dutch oven. Just simmer it for about 2 hours on low heat, stirring occasionally. The flavor will be just as good, though you’ll need to keep an eye on the liquid level.
Preparation Method
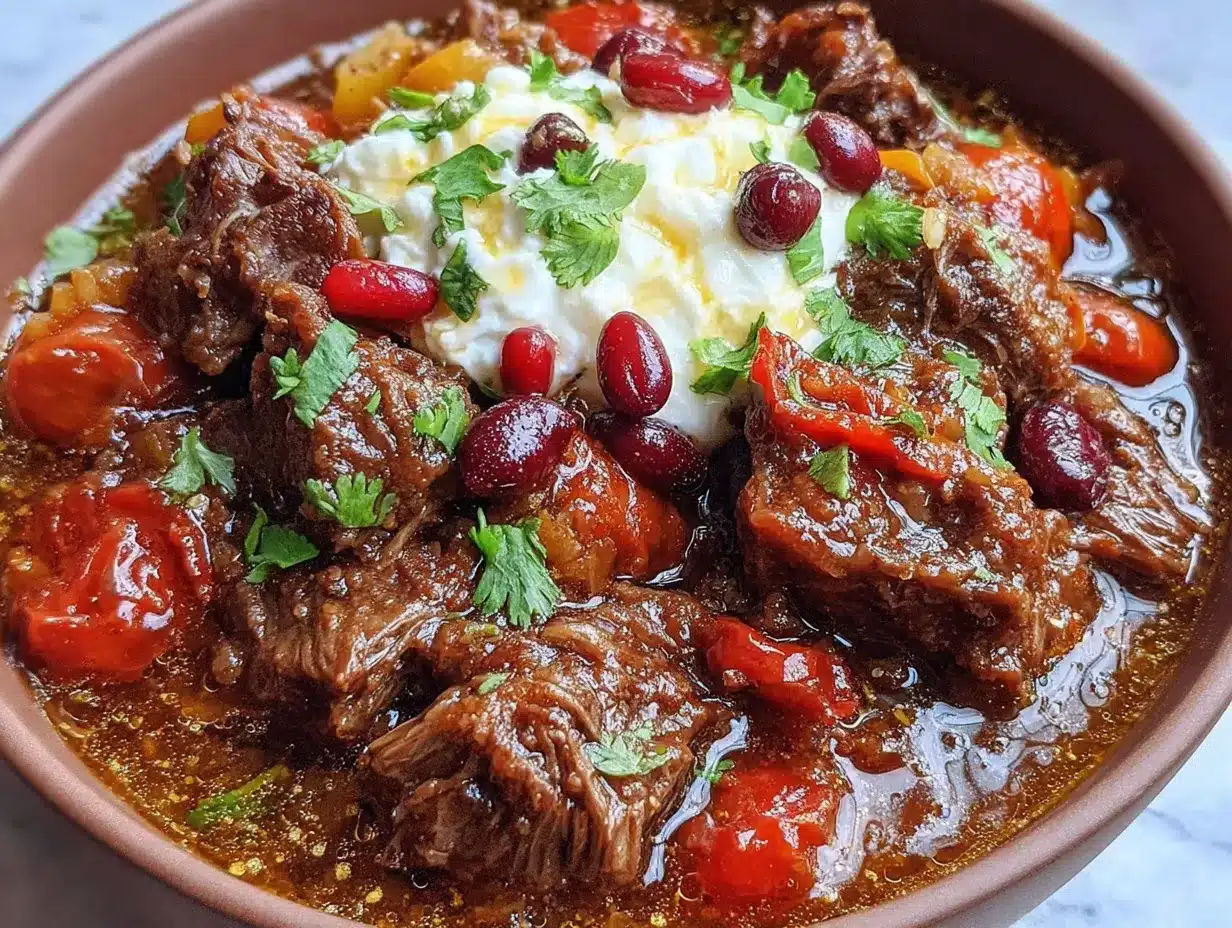
Alright, let’s get cooking. This recipe takes about 30 minutes of active prep time and then 6 to 8 hours in the slow cooker. The payoff is absolutely worth it.
- Cook the Bacon: Place the chopped bacon in a cold large skillet or Dutch oven. Turn the heat to medium and cook until the bacon is crispy and the fat has rendered, about 8 to 10 minutes. Use a slotted spoon to transfer the bacon to a plate, leaving the rendered fat in the pan. This bacon fat is liquid gold—don’t you dare pour it out.
- Brown the Venison and Sausage: Add the ground venison and pork sausage to the hot bacon fat. Break the meat up with a wooden spoon as it cooks. You want it well-browned, not just gray. Let it sit undisturbed for a few minutes between stirring to develop a good crust. This takes about 8 to 10 minutes total. Once browned, use a slotted spoon to transfer the meat to the slow cooker. Leave about 2 tablespoons of fat in the pan.
- Cook the Aromatics: Add the diced onions to the pan with a pinch of salt. Cook over medium heat until they’re soft and translucent, about 5 to 7 minutes. Scrape up any browned bits from the bottom of the pan—that’s flavor you don’t want to waste. Add the minced garlic and jalapeños and cook for another minute until fragrant. Transfer everything to the slow cooker.
- Toast the Spices: Here’s where the magic happens. Reduce the heat to medium-low and add the chili powder, cumin, smoked paprika, oregano, chipotle powder, and cocoa powder to the now-empty pan. Stir constantly for about 30 to 60 seconds until the spices smell incredibly fragrant. Be careful not to burn them—they can turn bitter in a flash. If the pan seems dry, add a splash of the beer to loosen things up.
- Deglaze the Pan: Pour the bottle of beer into the pan and bring it to a simmer. Use your wooden spoon to scrape up every last bit of those toasted spices and browned bits from the bottom. Let it simmer for 2 to 3 minutes to cook off some of the alcohol. Pour this liquid into the slow cooker.
- Add the Remaining Ingredients: To the slow cooker, add the beef broth, fire-roasted diced tomatoes (with their juices), tomato sauce, and tomato paste. Stir everything together until the tomato paste is fully incorporated. Then add the diced bell pepper and all three cans of beans. Give it one more good stir.
- Season and Cook: Add about 1 teaspoon of salt and 1/2 teaspoon of black pepper to start. Remember, you can always add more later. Cover the slow cooker and cook on low for 6 to 8 hours or on high for 3 to 4 hours. Low and slow is better here—it gives the flavors more time to meld and the venison to become incredibly tender.
- Finish and Adjust: About 30 minutes before serving, taste the chili and adjust the seasoning. You’ll probably need more salt—I usually add another teaspoon. If you want more heat, stir in some hot sauce or extra chipotle powder. If it’s too thick, add a splash of beef broth. If it’s too thin, leave the lid off for the last 30 minutes to let some liquid evaporate.
- Serve and Garnish: Ladle the chili into bowls and let everyone top it with their favorites. I always set out a little bar of shredded cheese, sour cream, cilantro, green onions, and pickled jalapeños. Cornbread on the side is non-negotiable in my house.
A quick note on timing. If you’re making this for a party, I recommend starting it in the morning so it’s ready by dinner time. The chili actually gets better the longer it sits, so don’t worry if it’s done an hour early—just switch the slow cooker to warm and let it hang out.
Cooking Tips & Techniques
After making this recipe more times than I can count, I’ve picked up a few tricks that make a real difference. Here are the ones I swear by.
Don’t Skip the Browning: I know it’s tempting to just dump everything in the slow cooker raw, but browning the meat and aromatics first is non-negotiable. That caramelization adds a depth of flavor that you simply can’t get any other way. The Maillard reaction is your friend here—embrace it.
Toast Your Spices: This is a game-changer that most people skip. Toasting the spices in the hot pan for just 30 seconds wakes up their essential oils and makes them exponentially more flavorful. It’s a small step that makes a huge difference in the final dish.
Watch Your Salt: Venison is lean and can easily become tough if you oversalt it early. I always start with less salt than I think I need and adjust at the end. The bacon, sausage, and canned tomatoes all add sodium, so taste before you add more.
The Beer Matters: Don’t use a light beer here—it won’t add enough flavor. A dark stout or porter brings this rich, almost chocolatey note that pairs beautifully with the venison. I’ve used Guinness, Founders Breakfast Stout, and even a local oatmeal stout, and they all work wonderfully.
Let It Rest: Chili is one of those dishes that genuinely tastes better the next day. The flavors continue to meld and deepen as it sits. If you can, make this a day ahead and reheat it for serving. Your guests won’t know what hit them.
One Mistake I Made: The first time I made this, I added all the beans without rinsing them first. The chili turned out cloudy and a little slimy from the canned bean liquid. Now I always drain and rinse my beans thoroughly. It’s a small step, but it keeps the chili looking beautiful and tasting clean.
Multitasking Tip: While the meat is browning, you can chop your onions and mince your garlic. Just keep an eye on the pan so nothing burns. I also like to measure out my spices into a small bowl while the aromatics cook. Having everything ready makes the process feel effortless.
Variations & Adaptations
One of the best things about chili is how adaptable it is. Here are some variations I’ve tried and loved, depending on who I’m feeding and what I have on hand.
Beef and Pork Version: If you can’t find venison or just prefer beef, substitute 3 pounds of ground beef (80/20 blend) and use 1 pound of ground pork. The flavor will be slightly different but still absolutely delicious. I actually made this version for a friend’s Super Bowl party and got just as many compliments.
Turkey and Chicken Chili: For a lighter option, use ground turkey and ground chicken instead of venison and pork. You’ll need to add a tablespoon of olive oil when browning since poultry is leaner. The flavor won’t be as rich, but it’s still fantastic—especially topped with avocado and Greek yogurt.
Vegetarian Version: I made this for my sister who’s vegetarian, and it turned out surprisingly well. Substitute the meat with 4 cups of cooked lentils and an extra can of beans. Use vegetable broth instead of beef broth, and add a tablespoon of liquid smoke to mimic that smoky depth. It’s not the same, but it’s really good in its own right.
Extra Spicy: If you’re feeding a crowd that loves heat, add 2 to 3 tablespoons of your favorite hot sauce along with the broth. I like using Cholula or Valentina for a vinegary kick. You can also throw in a diced habanero (seeds removed unless you’re brave) for serious heat.
Smoky Sweet: For a sweeter, smokier profile, add 1 cup of diced sweet potatoes along with the bell pepper. They’ll break down during cooking and add a natural sweetness that balances the heat. I also like to use ancho chili powder instead of regular chili powder for a deeper, fruitier smokiness.
Stovetop Method: If you don’t have a slow cooker, make this in a large Dutch oven. After browning everything, bring the chili to a boil, then reduce the heat to low, cover, and simmer for 2 to 3 hours. Stir occasionally and add more broth if it gets too thick. The flavor develops faster on the stovetop, so it’s great when you’re short on time.
Serving & Storage Suggestions
This chili is a star all on its own, but the right accompaniments can take it to the next level. Here’s how I like to serve it and keep it for later.
Serving Temperature: Serve the chili piping hot, straight from the slow cooker. I like to set up a little topping bar so everyone can customize their bowl. It makes the meal feel special without any extra work for you.
What to Serve Alongside: Cornbread is my go-to—it’s sweet, buttery, and perfect for soaking up every last drop of chili. I also love serving this with a simple side salad dressed with lime vinaigrette to cut through the richness. Tortilla chips are always a hit for scooping, and a cold beer is the obvious beverage choice.
Presentation Tips for a Crowd: If you’re serving this at a party, transfer the chili to a large, beautiful serving bowl and garnish with a swirl of sour cream, a sprinkle of cilantro, and a few pickled jalapeños on top. It looks gorgeous and tells people this is something special. Set out small bowls of toppings so guests can help themselves.
Storage Instructions: This chili stores beautifully. Let it cool completely, then transfer it to airtight containers. It will keep in the refrigerator for up to 5 days. The flavors actually get better after a day or two, so don’t be afraid to make it ahead.
Freezing Tips: Chili freezes like a dream. Portion it into freezer-safe bags or containers, leaving about an inch of headroom for expansion. It will keep for up to 3 months. To thaw, transfer it to the refrigerator overnight and reheat gently on the stovetop or in the microwave.
Reheating Instructions: Reheat chili on the stovetop over medium-low heat, stirring occasionally. If it’s too thick, add a splash of beef broth or water to loosen it up. You can also reheat individual portions in the microwave—just cover the bowl with a damp paper towel to prevent splatters.
How Flavors Develop: Here’s something interesting—this chili is actually better on day two. The spices meld together, the meat becomes even more tender, and the overall flavor becomes more harmonious. If I’m making this for a party, I always make it the day before and reheat it. Nobody has ever complained.
Nutritional Information & Benefits
This chili is hearty and satisfying, but it also has some surprising nutritional perks. Here’s a rough breakdown per serving (based on 12 servings, without garnishes).
- Calories: Approximately 420 per serving
- Protein: 35 grams (venison is incredibly lean and high in protein)
- Fat: 18 grams (mostly from the pork sausage and bacon)
- Carbohydrates: 30 grams (from beans and vegetables)
- Fiber: 10 grams (beans are an excellent source of fiber)
- Iron: 25% of daily value (venison is rich in iron)
- Vitamin C: 15% of daily value (from bell peppers and tomatoes)
Health Benefits: Venison is one of the leanest red meats available, with less fat than beef and more iron. It’s also a great source of B vitamins, which help with energy metabolism. The beans add soluble fiber, which is great for heart health and keeping you full. And the tomatoes are packed with lycopene, a powerful antioxidant.
Dietary Considerations: This recipe is naturally gluten-free (just check your spice blends and broth for hidden gluten). It’s also dairy-free as written, though many garnishes contain dairy. For a lower-carb version, skip the beans and add extra bell peppers and zucchini instead.
Allergen Notes: This recipe contains no common allergens in the base, but be mindful of toppings. The beer contains gluten, so use a gluten-free beer if needed. Most spice blends are safe, but always check labels if you’re cooking for someone with severe allergies.
My Personal Take: I love that this chili is indulgent enough to feel like a treat but has enough nutritional value that I don’t feel guilty eating it. It’s the kind of meal that fills you up without weighing you down—perfect for a long day of watching football or hanging out with friends.
Conclusion
This slow cooker venison chili is the recipe I turn to whenever I need to feed a crowd without stress. It’s rich, smoky, and deeply satisfying—the kind of dish that makes people close their eyes after the first bite and just enjoy the moment. And honestly? It’s so easy that you’ll wonder why you ever bought canned chili.
I love that this recipe is flexible enough to adapt to whatever you have on hand, but special enough to serve at a party. Whether you’re using venison from a hunter friend or just picking up ground beef at the store, the result is always incredible. It’s become my go-to for game days, potlucks, and those cozy winter evenings when all you want is a bowl of something warm and comforting.
Now I want to hear from you. Have you ever cooked with venison before? What’s your favorite way to serve chili for a crowd? Drop a comment below and let me know—I read every single one and I love hearing about your kitchen adventures. And if you make this recipe, tag me in your photos. There’s nothing that makes me happier than seeing someone else fall in love with a dish that means so much to me.
Happy cooking, friends. Your slow cooker is about to become your new best friend.
Frequently Asked Questions
Can I use frozen venison directly in the slow cooker?
I strongly recommend thawing the venison completely before browning it. Frozen meat won’t brown properly, and you’ll miss out on all that flavor from the Maillard reaction. Plus, it’s a food safety risk to put frozen meat directly into a slow cooker—it can spend too long in the danger zone temperature-wise.
How can I thicken my chili if it’s too watery?
If your chili is thinner than you’d like, leave the lid off the slow cooker for the last 30 to 45 minutes of cooking. The excess liquid will evaporate and the chili will thicken naturally. You can also mash some of the beans against the side of the slow cooker with a spoon—they’ll release their starches and thicken the broth beautifully.
Can I make this chili in an Instant Pot?
Absolutely. Use the sauté function to brown the meat and cook the aromatics, then add all remaining ingredients. Pressure cook on high for 20 minutes, then let the pressure release naturally for 10 minutes before quick releasing. The flavor won’t be quite as deep as the slow cooker version, but it’s still fantastic and much faster.
What’s the best way to remove the gamey taste from venison?
Venison gets a bad rap for being gamey, but most of that flavor comes from fat and silver skin. The key is to trim the meat well before grinding or cooking. Soaking the venison in buttermilk or a saltwater brine for a few hours before cooking can also help. In this recipe, the pork sausage, bacon, and bold spices do an excellent job of masking any remaining gamey notes.
How far in advance can I make this chili for a party?
You can make this chili up to 3 days in advance and keep it in the refrigerator. In fact, I recommend it—the flavor only gets better. Just reheat it gently on the stovetop or in the slow cooker set to low. If you’re serving it at a party, transfer it to a slow cooker to keep it warm throughout the event. It will stay perfect for several hours on the warm setting.
PrintBest Slow Cooker Venison Chili Recipe for a Crowd
This rich, smoky venison chili is the ultimate hands-off meal for feeding a crowd. With deep, complex flavor from toasted spices and a splash of dark beer, it’s a guaranteed crowd-pleaser that tastes even better the next day.
- Prep Time: 30 minutes
- Cook Time: 6 hours
- Total Time: 6 hours 30 minutes
- Yield: 12 servings 1x
- Category: Main Course
- Cuisine: American
Ingredients
- 3 pounds ground venison (or ground beef if you can’t find venison)
- 1 pound ground pork sausage
- 4 slices thick-cut bacon, chopped
- 2 large yellow onions, diced (about 3 cups)
- 6 cloves garlic, minced
- 2 jalapeños, seeded and minced
- 3 tablespoons chili powder
- 1 tablespoon ground cumin
- 1 tablespoon smoked paprika
- 2 teaspoons dried oregano
- 1 teaspoon chipotle powder
- 1 teaspoon cocoa powder
- Salt and black pepper to taste
- 1 bottle dark beer (12 ounces, like a stout or porter)
- 2 cups beef broth (low sodium)
- 1 can (14.5 ounces) fire-roasted diced tomatoes
- 1 can (15 ounces) tomato sauce
- 2 tablespoons tomato paste
- 2 cans (15 ounces each) kidney beans, drained and rinsed
- 1 can (15 ounces) black beans, drained and rinsed
- 1 can (15 ounces) pinto beans, drained and rinsed
- 1 large bell pepper (any color), diced
- Shredded cheddar cheese (for garnish)
- Sour cream or Greek yogurt (for garnish)
- Fresh cilantro, chopped (for garnish)
- Green onions, sliced (for garnish)
- Pickled jalapeños (for garnish)
- Cornbread or tortilla chips (for serving)
Instructions
- Cook the Bacon: Place the chopped bacon in a cold large skillet or Dutch oven. Turn the heat to medium and cook until the bacon is crispy and the fat has rendered, about 8 to 10 minutes. Use a slotted spoon to transfer the bacon to a plate, leaving the rendered fat in the pan.
- Brown the Venison and Sausage: Add the ground venison and pork sausage to the hot bacon fat. Break the meat up with a wooden spoon as it cooks. Let it sit undisturbed for a few minutes between stirring to develop a good crust. This takes about 8 to 10 minutes total. Once browned, use a slotted spoon to transfer the meat to the slow cooker. Leave about 2 tablespoons of fat in the pan.
- Cook the Aromatics: Add the diced onions to the pan with a pinch of salt. Cook over medium heat until they’re soft and translucent, about 5 to 7 minutes. Scrape up any browned bits from the bottom of the pan. Add the minced garlic and jalapeños and cook for another minute until fragrant. Transfer everything to the slow cooker.
- Toast the Spices: Reduce the heat to medium-low and add the chili powder, cumin, smoked paprika, oregano, chipotle powder, and cocoa powder to the now-empty pan. Stir constantly for about 30 to 60 seconds until the spices smell incredibly fragrant. Be careful not to burn them. If the pan seems dry, add a splash of the beer to loosen things up.
- Deglaze the Pan: Pour the bottle of beer into the pan and bring it to a simmer. Use your wooden spoon to scrape up every last bit of those toasted spices and browned bits from the bottom. Let it simmer for 2 to 3 minutes to cook off some of the alcohol. Pour this liquid into the slow cooker.
- Add the Remaining Ingredients: To the slow cooker, add the beef broth, fire-roasted diced tomatoes (with their juices), tomato sauce, and tomato paste. Stir everything together until the tomato paste is fully incorporated. Then add the diced bell pepper and all three cans of beans. Give it one more good stir.
- Season and Cook: Add about 1 teaspoon of salt and 1/2 teaspoon of black pepper to start. Cover the slow cooker and cook on low for 6 to 8 hours or on high for 3 to 4 hours.
- Finish and Adjust: About 30 minutes before serving, taste the chili and adjust the seasoning. You’ll probably need more salt—I usually add another teaspoon. If you want more heat, stir in some hot sauce or extra chipotle powder. If it’s too thick, add a splash of beef broth. If it’s too thin, leave the lid off for the last 30 minutes to let some liquid evaporate.
- Serve and Garnish: Ladle the chili into bowls and let everyone top it with their favorites. I always set out a little bar of shredded cheese, sour cream, cilantro, green onions, and pickled jalapeños. Cornbread on the side is non-negotiable in my house.
Notes
For best flavor, make this chili a day ahead and reheat. The flavors meld and deepen overnight. If using frozen venison, thaw completely before browning. Don’t skip toasting the spices—it’s a small step that makes a huge difference. For a thicker chili, leave the lid off for the last 30 minutes of cooking.
Nutrition
- Serving Size: 1 bowl (about 1.5 cu
- Calories: 420
- Sugar: 6
- Sodium: 800
- Fat: 18
- Saturated Fat: 6
- Carbohydrates: 30
- Fiber: 10
- Protein: 35
Keywords: venison chili, slow cooker chili, game meat chili, chili for a crowd, venison recipe, chili recipe


