There used to be a little bakery on the corner of Elm and 4th — the kind with a chalkboard menu and a bell that jingled when you walked in. Every October, they’d set up this table by the register stacked with little plastic cups that looked like they were filled with actual dirt. I mean, honest-to-goodness crushed Oreos that looked like you could scoop it up and plant something in it. And then, poking out of that “dirt” were these bright green gummy worms, wiggling their way up like they were escaping. My kids lost their minds over those things. When that bakery closed two years ago — the owner retired, which I totally get but still — my youngest looked at me with those big eyes and said, “So who’s gonna make them now?”
Oh boy. The pressure was on.
After six tries — yes, six, and let me tell you, the first batch was a soupy disaster — I finally cracked the code. It turns out, getting that perfect “dirt” texture is a little trickier than you’d think. And the pudding? You can’t rush it. Honestly, I almost gave up after attempt number three when I accidentally used instant pudding that hadn’t set properly. But you know that feeling when you just *know* you can get it right? That kept me going. Now, this recipe for Easy Halloween Dirt Cups with Gummy Worms has become our little tradition. It’s the one my kids request every single year, and honestly, it’s the simplest thing to throw together. Maybe you’ve been there — trying to recreate a store-bought treat that just hits different when it’s homemade. Let me tell you, this is it.
Why You’ll Love This Recipe
Let’s face it — Halloween treats can get expensive. Between the bags of candy and the themed decorations, feeding a family on a sensible budget gets tricky. That’s where these dirt cups come in. They use ingredients you probably already have in your pantry, and they come together in under 20 minutes of actual work. No fancy equipment, no weird ingredients, no stress. Just pure, silly, delicious fun.
- Quick & Easy: From start to finish, you’re looking at about 15 minutes of prep time. The hardest part is waiting for the pudding to set in the fridge.
- Simple Ingredients: Pudding mix, milk, Oreos, cream cheese, and gummy worms. That’s it. No trips to a specialty store required.
- Perfect for Halloween Parties: Whether it’s a classroom party, a family gathering, or just a spooky movie night at home, these cups are a guaranteed hit.
- Crowd-Pleaser: I’ve yet to meet a kid — or an adult, honestly — who can resist digging into a cup of “dirt” with gummy worms poking out. It’s just too fun.
- Unbelievably Delicious: The creamy, slightly tangy pudding paired with the crunchy chocolate cookie “dirt” is next-level comfort food. It’s like a pudding parfait that decided to dress up for Halloween.
What makes this recipe different from all the other dirt cup recipes out there? It’s the cream cheese. A lot of versions skip it, but I’ve found that folding in a little softened cream cheese gives the pudding a richness and a slight tang that balances the sweetness perfectly. It’s that one little trick that makes people say, “Wait, what’s in this? It’s so good!” It’s not just another version — it’s my best version, tested and approved by a panel of very picky little eaters.
This recipe isn’t just good — it’s the kind that makes you close your eyes after the first bite. It’s comfort food reimagined for a holiday that’s all about fun. Perfect for impressing the other parents at the school party without spending a fortune, or turning a simple Tuesday night into something memorable.
What Ingredients You Will Need
This recipe uses simple, wholesome ingredients to deliver that creamy, crunchy, slightly spooky experience without the fuss. Most of these are pantry staples, especially if you keep a box of Oreos around for emergencies — which, let’s be honest, you should.
- 1 (3.9 oz) package instant chocolate pudding mix — I prefer Jell-O brand for consistent results. Make sure it’s the instant kind, not the cook-and-serve, or you’ll be standing at the stove forever.
- 2 cups cold milk — Whole milk gives the creamiest texture, but 2% works fine. For a dairy-free version, use oat milk or almond milk, though the pudding might be slightly less thick.
- 4 oz cream cheese, softened — This is my secret weapon. It adds a subtle tang and a velvety richness that takes the pudding from good to unforgettable. Let it sit out for 30 minutes before you start.
- 1/4 cup powdered sugar — Just a little to sweeten the cream cheese so it blends seamlessly with the pudding. Don’t skip this — granulated sugar won’t dissolve properly and you’ll end up with gritty pudding.
- 1 (14.3 oz) package Oreo cookies — You’ll need about 20 cookies for the “dirt” and a few extra for crumbling on top. Regular Oreos work best, but Double Stuf is fine too — just know the crumb will be a little lighter in color.
- 1/2 cup (1 stick) unsalted butter, melted — This helps the Oreo crumbs clump together slightly, giving that realistic dirt texture. If you use salted butter, just skip adding any extra salt.
- 1 (5 oz) bag gummy worms — The classic Halloween kind with the bright colors. I use the Trolli brand because they’re a little firmer and don’t get too sticky. Feel free to use sour worms for an extra kick.
- Optional: Green food coloring — A drop or two in the pudding gives it that slightly eerie, swampy look. Totally optional, but the kids love it.
- Optional: Whipped topping — A dollop on top before the “dirt” adds another layer of creaminess. I use Cool Whip, but homemade whipped cream is lovely too.
Equipment Needed
You don’t need a fancy kitchen for this one. Here’s what you’ll need:
- 6 small clear plastic cups or glass jars — The clear cups are key for showing off the layers. I use 8-ounce plastic cups from the party supply store — they’re cheap and perfect for this. You can also use small mason jars or even repurposed yogurt cups.
- Mixing bowls — One medium bowl for the pudding, one small bowl for the cream cheese mixture.
- Whisk or electric hand mixer — A whisk works fine for the pudding, but a hand mixer makes quick work of the cream cheese mixture. If you’re using a whisk, make sure the cream cheese is really soft.
- Measuring cups and spoons — Standard set for the milk, sugar, and butter.
- Rolling pin or food processor — For crushing the Oreos. A rolling pin and a zip-top bag is my go-to because it’s less cleanup. A food processor gives a finer crumb if you prefer.
- Spatula — For folding the cream cheese into the pudding.
- Spoon or small cookie scoop — For layering the “dirt” and pudding into the cups.
- Refrigerator — You’ll need space to let the cups chill for at least 2 hours.
Preparation Method
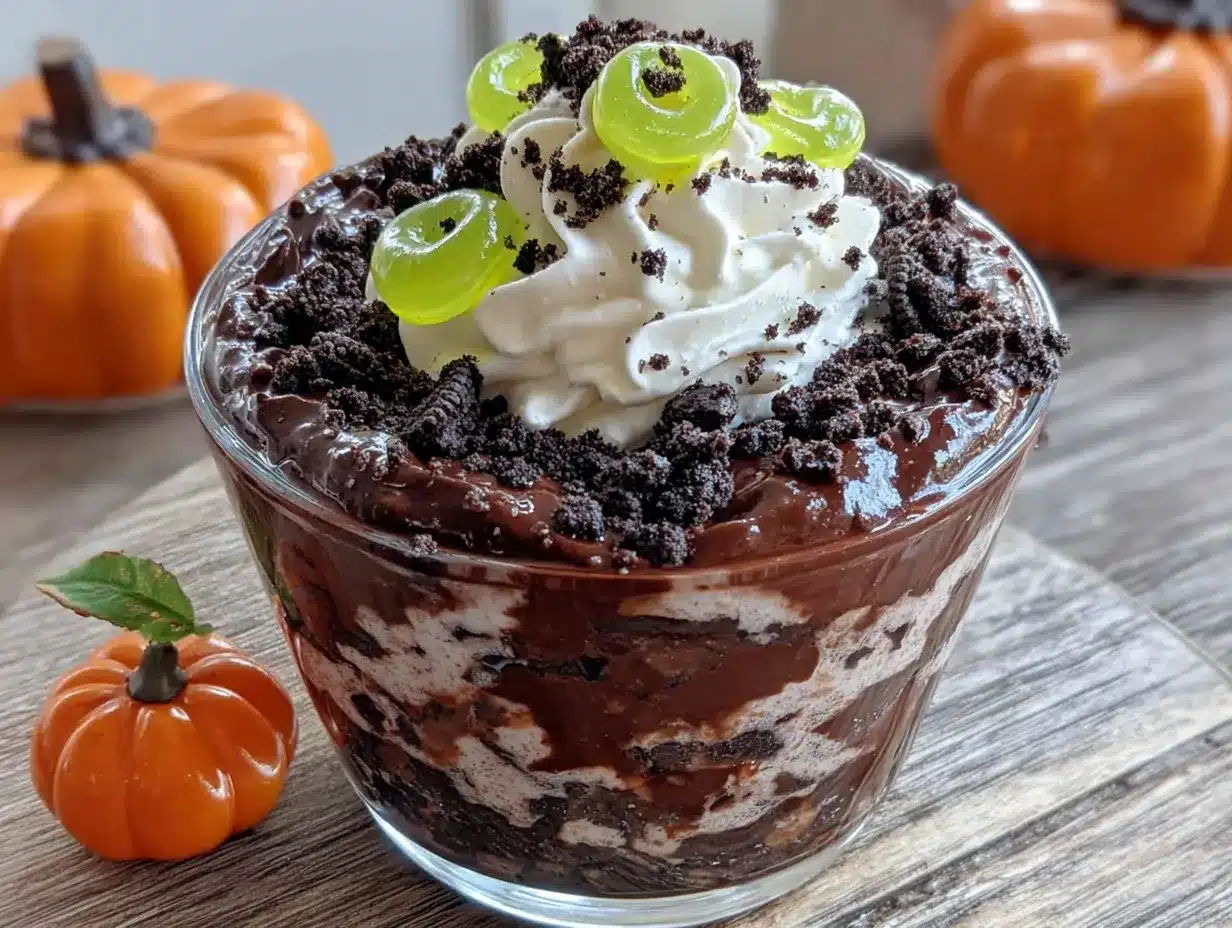
Alright, let’s get our hands dirty — literally. Here’s how to make these spooky little treats step by step.
- Make the pudding: In a medium mixing bowl, whisk together the instant chocolate pudding mix and 2 cups of cold milk. Whisk for about 2 minutes until it starts to thicken. It will be fairly thin at first — don’t panic, that’s normal. Set it aside for 5 minutes to let it set up slightly. It should be the consistency of a thick milkshake when you’re done.
- Prepare the cream cheese mixture: In a separate small bowl, beat the softened cream cheese with the powdered sugar until smooth and fluffy. If you’re using a hand mixer, this takes about 30 seconds. If you’re using a whisk, make sure the cream cheese is really soft — like, leave-it-out-for-an-hour soft. You don’t want lumps in your final pudding.
- Combine the two: Gently fold the cream cheese mixture into the chocolate pudding until it’s fully incorporated. Don’t overmix — you want it smooth, not whipped. The color should be an even, rich chocolate brown. If you’re using green food coloring, add a drop or two now and stir gently until it’s swirled through. I usually leave it out because my kids prefer the classic chocolate look, but a little green tint is fun for Halloween.
- Crush the Oreos: Place about 20 Oreo cookies in a large zip-top bag. Seal it, then use a rolling pin to crush them into fine crumbs. You want a mix of fine powder and slightly larger pieces — that’s what gives the “dirt” its realistic texture. If you’re using a food processor, pulse them about 10 times. Don’t overdo it or you’ll end up with Oreo dust. Transfer the crumbs to a medium bowl.
- Add the melted butter: Pour the melted butter over the Oreo crumbs and stir with a fork until everything is evenly moistened. The mixture should look like damp soil — clumping together slightly when you press it. This step is crucial because it helps the “dirt” hold its shape and not just sink into the pudding.
- Layer the cups: Start with a layer of the Oreo “dirt” at the bottom of each cup — about 2 tablespoons per cup. Press it down gently with the back of a spoon. This creates a solid base so the worms have something to poke into. Next, spoon about 1/4 cup of the pudding mixture on top of the dirt. Spread it evenly. Then add another layer of Oreo crumbs — about 1 to 2 tablespoons — on top of the pudding. You want the top to look like a little mound of earth.
- Add the gummy worms: Here’s the fun part. Gently push 2 or 3 gummy worms into the top layer of Oreo crumbs so they look like they’re crawling out of the dirt. You can leave some partially buried and some fully exposed. I like to have one worm “escaping” over the side of the cup for dramatic effect. My kids fight over who gets the cup with the most worms visible.
- Chill: Place the cups in the refrigerator for at least 2 hours, but overnight is even better. This allows the pudding to set fully and the Oreo crumbs to soften slightly, which makes the whole thing taste like a creamy, dreamy dirt parfait. Don’t skip this step — impatient dirt cups are sad dirt cups.
- Serve cold: Take the cups out of the fridge about 5 minutes before serving. If you want, add a dollop of whipped cream on top and a few extra Oreo crumbs for garnish. Serve with a spoon and watch the magic happen.
Cooking Tips & Techniques
I’ve made these dirt cups more times than I care to count, and I’ve learned a few things along the way. Let me save you the trouble of my early mistakes.
Don’t skip the cream cheese step. I know it’s an extra bowl and an extra step, but it really does make a difference. The first time I made these, I just used straight pudding, and they were fine — but they weren’t *amazing*. The cream cheese adds a subtle tang that cuts through the sweetness and makes the whole thing taste more sophisticated. It’s the difference between a kids’ treat and a treat that adults will also sneak from the fridge.
Crush the Oreos in batches. If you’re making a big batch — say, for a classroom party — crush the cookies in two separate bags. It’s easier on your arms and gives you more control over the texture. I like to leave a few slightly larger chunks for that realistic “rocky” dirt look.
Watch your timing. The pudding needs at least 2 hours to set, but the Oreo crumbs will start to get soft after about 4 hours. If you’re making these the night before, that’s fine — they’ll still taste great. But if you want that crunchy “dirt” texture, assemble them no more than 4 hours before serving. I learned this the hard way when I made them the night before a party and the dirt turned into mud. Still delicious, but not as visually impressive.
Keep the worms chilled. Gummy worms can get sticky and soft if they sit out too long. Store the bag in the fridge until you’re ready to use them. Cold worms are easier to handle and poke into the dirt without bending.
Double the recipe for a crowd. These cups are small — about 8 ounces each — so one batch makes about 6 servings. If you’re feeding a crowd, double everything. The recipe scales perfectly.
Variations & Adaptations
One of the best things about this recipe is how easy it is to customize. Here are a few ways I’ve changed it up over the years.
Dairy-Free Version: Use dairy-free cream cheese and a plant-based milk like oat milk or almond milk. The pudding might be slightly less thick, so add an extra tablespoon of cornstarch to the pudding mix if you’re feeling ambitious. I’ve made this for a friend who’s lactose intolerant, and she said it was just as good as the original.
Gluten-Free Option: Use gluten-free chocolate sandwich cookies — there are several brands on the market now. Just check the label on the pudding mix to make sure it’s certified gluten-free. Most instant pudding mixes are, but it’s worth double-checking.
Spooky Swamp Version: Add a few drops of green food coloring to the pudding mixture before layering. Then, instead of gummy worms, use gummy spiders or frogs. My kids call these “Swamp Cups,” and they’re a huge hit for a Halloween movie night.
Pumpkin Dirt Cups: Swap the chocolate pudding for vanilla or butterscotch pudding, and use crushed graham crackers instead of Oreos. Add a little pumpkin pie spice to the cream cheese mixture for a fall twist. Top with candy corn instead of gummy worms. This is my personal favorite for Thanksgiving.
Low-Sugar Version: Use sugar-free pudding mix and reduced-fat cream cheese. You can also swap the Oreos for a lower-sugar chocolate cookie. The texture will be slightly different, but the flavor is still great. I’ve made this for a friend who’s watching her sugar intake, and she loved it.
Serving & Storage Suggestions
These dirt cups are best served cold, straight from the fridge. I like to take them out about 5 minutes before serving so the pudding softens slightly — it makes the texture even creamier. If you’re serving them at a party, arrange them on a tray with a few extra gummy worms scattered around for a spooky effect.
For a fun presentation, use clear cups so the layers show through. You can also add a little plastic spider ring on the rim of each cup for an extra creepy touch. My kids love that.
Storage: Leftover dirt cups can be stored in the refrigerator for up to 3 days. Cover them with plastic wrap or a lid to prevent the pudding from absorbing any fridge odors. The Oreo crumbs will soften over time, so they won’t be as crunchy on day two — but they’ll still taste amazing.
Freezing: I don’t recommend freezing these. The pudding will separate and become watery when thawed, and the gummy worms will get rock-hard. If you need to make them ahead, assemble them up to 24 hours in advance and keep them chilled.
Reheating: There’s no reheating here — these are meant to be eaten cold. But if you somehow end up with leftovers that have been sitting out too long, just pop them back in the fridge for an hour. They’ll firm right up.
Nutritional Information & Benefits
Let’s be real — these are a treat, not a health food. But they’re not as bad as you might think, especially compared to a lot of store-bought Halloween candy. Here’s a rough estimate per serving (one 8-ounce cup):
- Calories: Approximately 380
- Fat: 18g
- Carbohydrates: 52g
- Protein: 7g
- Sugar: 36g
- Fiber: 2g
These numbers will vary depending on the brands you use and whether you add whipped cream. The cream cheese adds a little protein and calcium, and the milk provides vitamin D. The Oreos? Well, they provide happiness. That’s a nutrient, right?
For those with dietary concerns, this recipe contains dairy, gluten, and soy (from the Oreos). The gummy worms may contain gelatin, so check the label if you’re serving vegetarians. I’ve made a version with vegan-friendly gummy worms and dairy-free alternatives, and it worked beautifully.
Conclusion
Look, I know there are a million dirt cup recipes out there. But this one? This one is the real deal. It’s the one that finally matched that bakery version my kids still talk about. It’s the one that made my youngest say, “Mom, these are even better than the ones from the store.” And honestly, that’s all I needed to hear.
These Easy Halloween Dirt Cups with Gummy Worms are more than just a dessert — they’re a little moment of joy in a season that can feel overwhelming. They’re simple enough for a busy weeknight, fun enough for a party, and budget-friendly enough that you can make a big batch without guilt. Plus, they’re endlessly customizable — you can switch up the cookies, the pudding flavor, the candy, and make them your own.
So go ahead — grab some cups, crush some cookies, and get a little dirty. Your kids will thank you. And if you come up with your own twist on these, I’d love to hear about it. Drop a comment below and tell me how you made them your own. Happy Halloween, friends!
Frequently Asked Questions
Can I make these dirt cups ahead of time?
Absolutely. You can assemble them up to 24 hours in advance and keep them covered in the refrigerator. Just wait to add the gummy worms until about an hour before serving so they stay firm and bright. The Oreo crumbs will soften slightly over time, but the flavor will still be fantastic.
Can I use homemade pudding instead of instant?
You can, but it changes the texture. Instant pudding sets up quickly and stays creamy, while homemade pudding (cook-and-serve) tends to be thicker and more gelatinous. If you use homemade, make sure it’s completely cooled before layering, and expect a slightly different consistency. I’ve done it both ways, and instant is definitely easier for this recipe.
How do I keep the gummy worms from getting sticky?
Store the gummy worms in the refrigerator until you’re ready to use them. Cold worms are firmer and less sticky, which makes them easier to poke into the dirt without bending. Also, don’t add them too far in advance — about an hour before serving is perfect.
Can I use a different type of cookie for the dirt?
Of course! Chocolate wafer cookies, graham crackers, or even crushed pretzels can work. Just keep in mind that the flavor and texture will change. Graham crackers give a lighter, sweeter “dirt,” while pretzels add a salty crunch. I’ve used chocolate wafer cookies in a pinch, and they were great — just a little less sweet than Oreos.
How many servings does this recipe make?
This recipe makes about 6 servings if you’re using 8-ounce cups. If you’re using smaller cups (like 4-ounce shot glasses for a party), you’ll get about 12 servings. The recipe doubles easily, so feel free to scale it up for a crowd.
PrintEasy Halloween Dirt Cups with Gummy Worms Recipe
These Easy Halloween Dirt Cups with Gummy Worms are a fun, no-bake treat that looks like real dirt with gummy worms poking out. Made with creamy chocolate pudding, a secret cream cheese layer, and crunchy Oreo ‘dirt,’ they’re a guaranteed hit at any Halloween party.
- Prep Time: 15 minutes
- Cook Time: 0 minutes
- Total Time: 2 hours 15 minutes (includes chilling time)
- Yield: 6 servings 1x
- Category: Dessert
- Cuisine: American
Ingredients
- 1 (3.9 oz) package instant chocolate pudding mix
- 2 cups cold milk
- 4 oz cream cheese, softened
- 1/4 cup powdered sugar
- 1 (14.3 oz) package Oreo cookies (about 20 cookies)
- 1/2 cup (1 stick) unsalted butter, melted
- 1 (5 oz) bag gummy worms
- Optional: Green food coloring
- Optional: Whipped topping
Instructions
- Make the pudding: In a medium mixing bowl, whisk together the instant chocolate pudding mix and 2 cups of cold milk. Whisk for about 2 minutes until it starts to thicken. Set it aside for 5 minutes to let it set up slightly.
- Prepare the cream cheese mixture: In a separate small bowl, beat the softened cream cheese with the powdered sugar until smooth and fluffy.
- Combine the two: Gently fold the cream cheese mixture into the chocolate pudding until fully incorporated. If using green food coloring, add a drop or two now and stir gently.
- Crush the Oreos: Place about 20 Oreo cookies in a large zip-top bag. Seal it, then use a rolling pin to crush them into fine crumbs with some slightly larger pieces. Transfer the crumbs to a medium bowl.
- Add the melted butter: Pour the melted butter over the Oreo crumbs and stir with a fork until everything is evenly moistened.
- Layer the cups: Start with a layer of the Oreo ‘dirt’ at the bottom of each cup (about 2 tablespoons per cup). Press it down gently. Next, spoon about 1/4 cup of the pudding mixture on top. Then add another layer of Oreo crumbs (about 1 to 2 tablespoons) on top of the pudding.
- Add the gummy worms: Gently push 2 or 3 gummy worms into the top layer of Oreo crumbs so they look like they’re crawling out of the dirt.
- Chill: Place the cups in the refrigerator for at least 2 hours, but overnight is even better.
- Serve cold: Take the cups out of the fridge about 5 minutes before serving. If desired, add a dollop of whipped cream on top and a few extra Oreo crumbs for garnish.
Notes
Don’t skip the cream cheese step—it adds a subtle tang and richness. Crush Oreos in batches for better control. The pudding needs at least 2 hours to set, but Oreo crumbs will soften after about 4 hours, so assemble no more than 4 hours before serving for crunchiest texture. Keep gummy worms chilled until ready to use. Recipe doubles easily for a crowd.
Nutrition
- Serving Size: 1 cup (8 ounces)
- Calories: 380
- Sugar: 36
- Sodium: 320
- Fat: 18
- Saturated Fat: 10
- Carbohydrates: 52
- Fiber: 2
- Protein: 7
Keywords: Halloween dirt cups, gummy worms, Oreo dirt, chocolate pudding, no-bake dessert, Halloween treat, easy dessert, kids dessert


