This was supposed to be a batch of classic chocolate truffles for a Halloween party. I had the ganache chilling, the cocoa powder ready for dusting, and I was feeling pretty good about myself. Then my neighbor’s cat, a big black fluffball named Bagheera, decided to jump onto the counter and knock over the entire bowl of melted chocolate. It went everywhere—on the floor, on me, and honestly, I just stood there staring at the mess. I mean, what else could I do?
I grabbed the only other sweet thing I had in the pantry: a family-size pack of Oreos. I crushed them up, mixed them with cream cheese, and rolled them into little balls. They looked nothing like the elegant truffles I had planned. But when I dipped one in black candy melts and stuck on some candy eyes, I realized I had accidentally made something way more fun. These Easy Black Cat Oreo Truffles were born out of a complete kitchen disaster, and honestly, they turned out better than anything I had originally planned.
Let me tell you, there is something deeply satisfying about turning a frustrating moment into a tray of adorable little cats. Maybe you have been there—standing in a messy kitchen, ready to give up, when a random idea saves the night. That is exactly how these truffles came to be. They are ridiculous, they are cute, and they are the easiest Halloween treat I have ever made. No baking, no fancy skills, just a little patience and a sense of humor. And every time I make them, I remember that sometimes the best recipes are the ones you never meant to create.
Why You’ll Love This Recipe
These Easy Black Cat Oreo Truffles are not just another Halloween dessert. They are the kind of treat that makes people stop and smile before they even take a bite. Here is why this recipe deserves a spot in your Halloween rotation:
- Quick & Easy: You can have these ready in under 30 minutes of active time. The hardest part is waiting for the chocolate to set, and that is just a patience game.
- Simple Ingredients: Oreos, cream cheese, and candy melts. That is it. No fancy grocery store runs or obscure baking supplies.
- Perfect for Halloween Parties: These little black cats are the star of any dessert table. Kids love them, adults sneak them, and nobody guesses how simple they are.
- Crowd-Pleaser: I have brought these to three different Halloween gatherings now, and they disappear every single time. People cannot resist the combination of creamy Oreo filling and crunchy chocolate coating.
- Unbelievably Delicious: The texture is what gets you. The inside is soft and fudgy, like an Oreo cheesecake bite, and the outside is snappy and sweet. It is next-level comfort food in a tiny package.
What makes this recipe different from every other truffle out there is the technique. I learned the hard way that you have to freeze the Oreo balls before dipping them. Skip that step, and you will end up with a melted mess and a lot of swearing. Trust me, I have been there. This is my best version—tested through failures, perfected through practice, and now ready for you to make without the drama.
These truffles are not just good. They are the kind of treat that makes you close your eyes after the first bite. It is comfort food reimagined—faster, simpler, but with the same soul-soothing satisfaction. Perfect for impressing your Halloween guests without stress, or turning a regular Tuesday into something memorable.
What Ingredients You Will Need
This recipe uses simple, store-bought ingredients to deliver big flavor and adorable results. You probably already have most of these in your kitchen, which is part of the magic.
- Oreo cookies (regular, not double-stuffed): You need one full 14.3-ounce package. Do not use the double-stuffed version—the filling ratio throws off the texture. I prefer the classic Oreo brand, but any chocolate sandwich cookie works. Just make sure it has the white cream center.
- Cream cheese (full-fat, softened): One 8-ounce block. This is non-negotiable for the right texture. Low-fat cream cheese makes the filling too loose, and your truffles will not hold their shape. Let it sit on the counter for 30 minutes before mixing.
- Black candy melts: One 12-ounce bag. I recommend the Wilton brand for the best melting consistency. You can also use black chocolate melting wafers, but stay away from regular chocolate chips—they do not melt smoothly and will seize up on you.
- Candy eyes: Small edible eyes, about 6mm in size. You can find them in the baking aisle at most craft stores. They come in packs of 50 or 100, and you will use about half of them.
- Black licorice strings or black decorating icing: For the whiskers. I prefer the icing because it is easier to control, but thin licorice strings cut into small pieces also work. Just make sure they are soft enough to bite through.
- Coconut oil or shortening: One teaspoon. This helps thin out the candy melts for a smoother dipping experience. Do not skip this—it makes a huge difference in the final look.
That is literally everything. No eggs, no butter, no flour. Just five ingredients plus a tiny bit of oil. The simplicity is what makes this recipe so reliable. You do not need to be a pastry chef to pull this off. You just need a food processor, some patience, and maybe a good podcast to listen to while you dip.
One ingredient tip I learned from a friend who runs a bakery: crush the Oreos as finely as possible. If you leave chunks, the truffles will be crumbly and hard to shape. Pulse them in the food processor until they look like dark sand. Then add the cream cheese and pulse again until it forms a dough. It should hold together when you squeeze a handful.
Equipment Needed
You do not need a fancy kitchen to make these truffles. Here is what you will actually use:
- Food processor: This is the most important tool. A blender works in a pinch, but a food processor gives you the most consistent crumb. If you do not have either, you can crush the Oreos by hand in a zip-top bag with a rolling pin. It takes longer, but it works.
- Baking sheet: For holding the truffles while they freeze and set. Line it with parchment paper or wax paper for easy removal.
- Microwave-safe bowl: For melting the candy melts. Glass or ceramic works best. Avoid plastic bowls—they can hold onto residue that affects the melting.
- Small cookie scoop or melon baller: This makes portioning the truffles consistent. I use a 1-tablespoon scoop, and it is perfect. If you do not have one, just use your hands and eyeball it.
- Fork or dipping tool: For dipping the frozen truffles into the melted coating. A regular dinner fork works fine. Just tap off the excess on the side of the bowl.
- Piping bag or toothpick: For attaching the candy eyes and drawing whiskers. A toothpick is actually easier than a piping bag for small details.
I bought my first food processor from a thrift store for eight dollars. It is ugly, it is loud, and it has a crack in the lid, but it has crushed hundreds of Oreos without complaining. Do not let fancy equipment stop you from making these. A rolling pin and some elbow grease work just as well.
Preparation Method
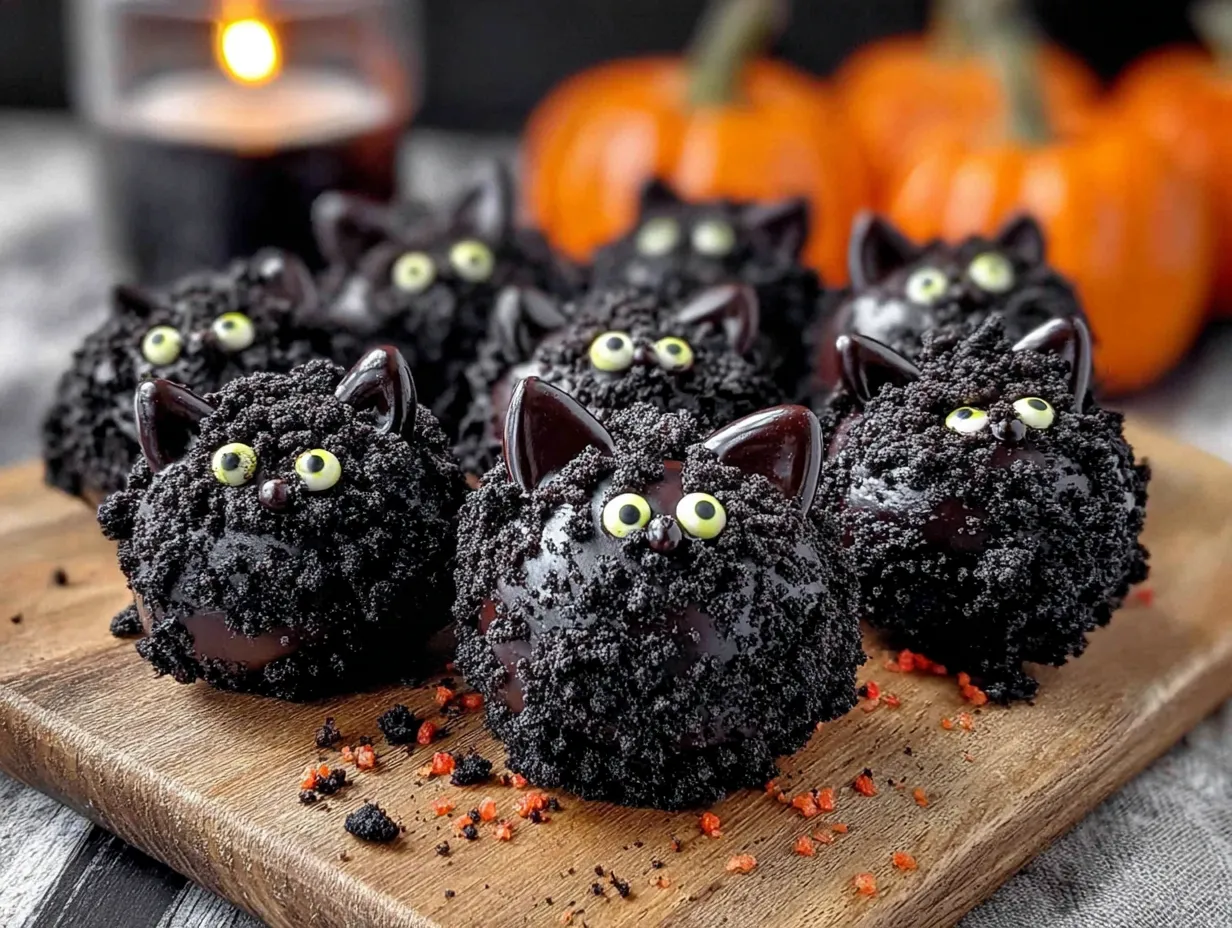
Follow these steps carefully, and you will have a tray of adorable black cat truffles in no time. The freezing step is the most important—do not rush it.
- Crush the Oreos: Place the entire package of Oreos (cream filling included) into your food processor. Pulse until the cookies turn into fine crumbs. This takes about 30 seconds. You should not see any large chunks. If you are crushing by hand, put the cookies in a zip-top bag and smash them with a rolling pin until they are as fine as possible.
- Mix in the cream cheese: Add the softened cream cheese to the food processor. Pulse again until the mixture comes together into a thick dough. It should look like dark cookie dough and hold its shape when pressed. Scrape down the sides once to make sure everything is evenly mixed.
- Shape the truffles: Scoop out tablespoon-sized portions of the mixture and roll them into smooth balls using your hands. If the mixture feels too sticky, chill it in the refrigerator for 15 minutes first. Place each ball on the parchment-lined baking sheet. You should get about 24 truffles from one batch.
- Freeze the truffles: Place the baking sheet in the freezer for at least 30 minutes. This is the step that saves you from disaster. Frozen truffles hold their shape when dipped. Warm truffles fall apart in the melted coating. Do not skip this.
- Melt the candy melts: Place the black candy melts in a microwave-safe bowl. Add one teaspoon of coconut oil or shortening. Microwave in 30-second intervals, stirring after each, until completely smooth. Do not overheat—candy melts burn easily and turn into a thick paste.
- Dip the truffles: Remove the truffles from the freezer, working with only 4-5 at a time so they stay cold. Drop one truffle into the melted coating. Use a fork to gently roll it around until fully covered. Lift it out with the fork, tap off the excess coating, and place it back on the parchment paper. Repeat with the remaining truffles.
- Add the faces: While the coating is still wet, gently press two candy eyes onto each truffle. Use a toothpick dipped in the melted coating to draw tiny whiskers on each side. If you are using black decorating icing, wait until the coating has set, then pipe the whiskers on top.
- Let them set: Allow the truffles to sit at room temperature until the coating hardens completely. This takes about 20-30 minutes. Do not put them in the refrigerator to speed this up—condensation will make the coating sticky and dull.
Here is a sensory cue to watch for: when you tap the fork against the side of the bowl, the excess coating should drip off in a smooth, steady stream. If it is thick and gluggy, add another drop of coconut oil. If it is too thin and runs off completely, let it cool for a minute before continuing.
One time, I forgot to freeze the truffles before dipping. I ended up with misshapen blobs that looked more like sad potatoes than cute cats. They still tasted great, but they were not Instagram-worthy. Learn from my mistake—freeze them.
Cooking Tips & Techniques
After making these truffles about a dozen times, I have collected a few tricks that make the process smoother. Here is what I wish someone had told me the first time.
Keep your hands cold. The warmth of your hands can soften the Oreo mixture while you are rolling it into balls. If the mixture starts sticking to your palms, rinse your hands in cold water and dry them thoroughly. You can also wear disposable gloves—they help keep the heat off.
Work in small batches. Do not take all the frozen truffles out of the freezer at once. They warm up fast, and warm truffles are the enemy of smooth dipping. Take out 4-5 at a time, dip them, and then grab the next batch. This keeps everything under control.
Fix mistakes immediately. If a truffle falls apart in the coating, fish out the pieces and start over. Do not try to patch it together—it will look lumpy and weird. Just crush the pieces back into the mixture, reshape, refreeze, and try again. Nobody needs to know.
Use a deep bowl for dipping. A shallow bowl means you have to tilt and roll the truffle to coat it, which increases the chance of it breaking. A tall, narrow bowl lets you submerge the truffle completely with one quick dip. I use a 2-cup glass measuring cup, and it works perfectly.
Tap, tap, tap. After lifting the truffle out of the coating, tap the fork handle against the edge of the bowl a few times. This shakes off the excess and gives you a smooth, even finish. If you skip this step, you will get thick, clumpy bottoms on your truffles.
My biggest failure with this recipe happened when I tried to melt the candy melts in a pan on the stove. I walked away for two minutes, and the entire batch turned into a burnt, grainy mess. The smell lingered in my kitchen for days. Microwave is the way to go—it is faster and easier to control.
Variations & Adaptations
Once you master the basic black cat truffle, the possibilities are endless. Here are a few variations I have tried and loved.
White Cat Truffles: Use white Oreos (the birthday cake flavor works great) and white candy melts. Add pink candy eyes instead of black and white ones. These are perfect for a non-Halloween party or a winter-themed event. My niece requested these for her birthday, and they were a hit.
Pumpkin Spice Cat Truffles: Add one teaspoon of pumpkin pie spice to the Oreo mixture before shaping. Use orange candy melts instead of black. These taste like fall in a bite-sized form. I made these for a Friendsgiving gathering, and they disappeared before the actual pumpkin pie.
Gluten-Free Version: Use gluten-free chocolate sandwich cookies. The texture will be slightly different—gluten-free cookies tend to be more crumbly—but the taste is still amazing. Just add an extra tablespoon of cream cheese to help the mixture hold together.
Vegan Adaptation: Use vegan cream cheese (I like the Kite Hill brand) and vegan chocolate sandwich cookies. Most candy melts are accidentally vegan, but check the label to be sure. This version works surprisingly well—the texture is almost identical to the original.
Mini Cat Truffles: Use a teaspoon-sized scoop instead of a tablespoon. You will get about 48 mini truffles instead of 24. These are perfect for party platters where people want to grab a quick bite without committing to a full truffle. Just reduce the freezing time to 20 minutes since they are smaller.
I have also experimented with adding a pinch of sea salt to the Oreo mixture. It cuts through the sweetness and adds a savory edge that balances the whole thing. Try it once, and you will never go back.
Serving & Storage Suggestions
These truffles are best served cold, straight from the refrigerator. The coating stays snappy, and the inside stays firm and fudgy. If you leave them at room temperature for too long, the coating can get soft and sticky, especially in warm weather.
For presentation, arrange the truffles on a black or orange platter to make the candy eyes pop. You can also place each truffle in a mini paper cupcake liner for a cleaner look. I like to scatter a few candy pumpkins or spider rings around the platter for extra Halloween flair.
These pair beautifully with a glass of cold milk or a hot cup of coffee. The sweetness of the truffle cuts through the bitterness of coffee, and the creamy texture is a perfect contrast to a crisp drink. For a Halloween party, serve them alongside a bowl of popcorn or a plate of fruit to balance out the sugar.
Storage: Place the truffles in an airtight container, layered between sheets of parchment paper. They will keep in the refrigerator for up to one week. Do not stack them too high—the weight can smush the bottom layer and ruin the cat faces.
Freezer storage: These truffles freeze beautifully. Place them in a single layer on a baking sheet and freeze until solid, then transfer to a freezer-safe container. They will keep for up to three months. Thaw them in the refrigerator overnight before serving. Do not thaw them at room temperature—condensation will ruin the coating.
One thing I have noticed: the flavors actually get better after a day or two in the refrigerator. The Oreo and cream cheese meld together into something richer and more cohesive. So if you have the time, make these a day ahead. Your future self will thank you.
Nutritional Information & Benefits
Let us be real—these are a treat, not a health food. But here is what you are working with per truffle (based on 24 servings):
- Calories: Approximately 180-200 calories per truffle
- Fat: 11g (mostly from cream cheese and candy melts)
- Carbohydrates: 22g
- Protein: 2g
- Sugar: 16g
On the positive side, Oreos do contain a small amount of iron and calcium from the enriched flour. The cream cheese adds a bit of protein and calcium as well. Is that a health benefit? Barely. But it is something.
If you are looking for a slightly lighter option, you can use reduced-fat cream cheese. The texture will be a little softer, but the taste is still great. For a lower-sugar version, use the Oreo Thins—they have less cookie and less filling, which cuts the sugar by about 30% per truffle.
These truffles are not gluten-free unless you use gluten-free cookies. They are also not vegan unless you make the substitutions listed above. They do contain dairy from the cream cheese, so keep that in mind if you are serving someone with lactose intolerance.
From a wellness perspective, I believe in balance. These truffles are a once-a-year Halloween treat, not an everyday snack. Enjoy them, share them, and do not feel guilty about it. Life is too short to skip dessert.
Conclusion
These Easy Black Cat Oreo Truffles are proof that sometimes the best things come from kitchen disasters. What started as a melted chocolate catastrophe turned into my most-requested Halloween recipe. They are simple, they are adorable, and they taste incredible.
I love this recipe because it does not require any special skills. You do not need to be a baker. You do not need expensive equipment. You just need Oreos, cream cheese, and a little bit of patience. The result is a treat that looks like you spent hours on it when really, you spent about 20 minutes of active time.
I encourage you to make these your own. Change the colors, swap the flavors, experiment with different decorations. That is the beauty of a simple recipe—it leaves room for creativity. And if something goes wrong? Laugh about it. That is how my best recipes were born.
Have you tried making these truffles? I would love to hear how they turned out. Leave a comment below with your variations, your successes, or even your funny failures. Share this recipe with a friend who loves Halloween as much as you do. And if you post a photo on social media, tag me—I want to see your adorable little black cats.
Happy Halloween, and happy snacking. You have got this.
Frequently Asked Questions
Can I use double-stuffed Oreos for this recipe?
I do not recommend it. Double-stuffed Oreos have too much cream filling, which makes the truffle mixture too soft and sticky. The truffles will not hold their shape well, and they will be harder to dip. Stick with regular Oreos for the best results.
How far in advance can I make these truffles?
You can make them up to one week ahead and store them in the refrigerator. They also freeze well for up to three months. Just make sure they are in an airtight container with parchment paper between layers. Thaw frozen truffles in the refrigerator overnight before serving.
Why did my candy melts turn out thick and lumpy?
This usually happens when the candy melts get too hot or when moisture gets into the bowl. Microwave in short 30-second bursts and stir well between each. Adding a teaspoon of coconut oil or shortening helps thin the coating. If your candy melts seize up, unfortunately, you have to start over with a fresh batch.
Can I use white chocolate instead of candy melts?
You can, but white chocolate is trickier to work with. It is more sensitive to heat and can seize easily. If you want to use white chocolate, add a teaspoon of coconut oil to help it melt smoothly. You will also need to add black food coloring, which can be messy. Candy melts are easier and give a more consistent color.
How do I keep the candy eyes from falling off?
Press the candy eyes into the coating while it is still wet. If the coating has already set, dab a tiny bit of melted coating on the back of each eye and stick it on. The coating acts like glue. Let the truffles set completely before handling them to make sure the eyes stay in place.
PrintEasy Black Cat Oreo Truffles: Perfect Halloween Treat

These Easy Black Cat Oreo Truffles are adorable, no-bake Halloween treats made with Oreos, cream cheese, and black candy melts. They are quick to make, require simple ingredients, and are perfect for parties.
- Prep Time: 20 minutes
- Cook Time: 0 minutes
- Total Time: 1 hour 10 minutes (includes freezing and setting time)
- Yield: 24 truffles 1x
- Category: Dessert
- Cuisine: American
Ingredients
- 1 (14.3-ounce) package Oreo cookies (regular, not double-stuffed)
- 1 (8-ounce) block cream cheese, softened
- 1 (12-ounce) bag black candy melts
- Small edible candy eyes (about 6mm)
- Black licorice strings or black decorating icing (for whiskers)
- 1 teaspoon coconut oil or shortening
Instructions
- Crush the Oreos: Place the entire package of Oreos (cream filling included) into a food processor. Pulse until the cookies turn into fine crumbs, about 30 seconds.
- Mix in the cream cheese: Add the softened cream cheese to the food processor. Pulse until the mixture comes together into a thick dough that holds its shape when pressed.
- Shape the truffles: Scoop out tablespoon-sized portions and roll into smooth balls. Place on a parchment-lined baking sheet. You should get about 24 truffles.
- Freeze the truffles: Place the baking sheet in the freezer for at least 30 minutes.
- Melt the candy melts: Place black candy melts in a microwave-safe bowl with 1 teaspoon coconut oil or shortening. Microwave in 30-second intervals, stirring after each, until completely smooth.
- Dip the truffles: Remove truffles from the freezer, working with 4-5 at a time. Drop one truffle into the melted coating, roll to cover, lift with a fork, tap off excess, and place back on parchment. Repeat.
- Add the faces: While coating is still wet, press two candy eyes onto each truffle. Use a toothpick dipped in melted coating to draw tiny whiskers on each side. If using decorating icing, wait until coating sets, then pipe whiskers.
- Let them set: Allow truffles to sit at room temperature until coating hardens completely, about 20-30 minutes.
Notes
Freeze the truffles before dipping to prevent them from falling apart. Work in small batches to keep truffles cold. Use a deep bowl for dipping to coat truffles easily. Tap the fork to remove excess coating for a smooth finish.
Nutrition
- Serving Size: 1 truffle
- Calories: 190
- Sugar: 16
- Sodium: 150
- Fat: 11
- Saturated Fat: 5
- Carbohydrates: 22
- Fiber: 1
- Protein: 2
Keywords: Halloween treats, Oreo truffles, black cat truffles, no-bake dessert, easy Halloween recipe