My brother-in-law Mark had ‘avoided vegetables at parties’ for as long as anyone could remember. Seriously, the man would pick a single pea out of fried rice. Then last Halloween, I set out a platter of raw veggies shaped like a pumpkin, and I found him standing over it, eating a bell pepper wedge like it was a potato chip. “This doesn’t count,” he said with his mouth full. “It’s shaped like a jack-o’-lantern.”
That’s the thing about this festive Halloween pumpkin veggie tray, you know? It tricks you into eating healthy without feeling like a punishment. I mean, honestly, I made it just to have something colorful on the snack table next to all the candy. But watching a grown man argue with himself about whether a carrot stick ‘counts’ as a vegetable when it’s arranged in a circle was the highlight of my night.
The first time I tried making a veggie pumpkin, I used a round platter and just piled everything in the middle. It looked like a sad salad had an accident. Then I figured out the trick—you need a round board or tray, and you arrange the veggies in concentric circles to mimic those pumpkin ridges. Let me tell you, the visual payoff is huge for almost no effort.
Maybe you’ve been there—staring at a table full of sugary Halloween treats and wishing there was one thing that didn’t require a sugar crash later. This tray is that thing. It’s the dish that disappears first, and not just because people are hungry. It’s because it looks fun, it’s easy to grab, and honestly, hummus makes everything better. I keep making this because it proves something I’ve always suspected: presentation is half the battle. And catching Mark in the act of proving himself wrong? That never gets old.
Why You’ll Love This Recipe
Let me tell you why this festive Halloween pumpkin veggie tray has become my go-to for every October gathering. I’ve tested this at four different parties now, and it always gets the same reaction—surprise, then delight, then empty platter.
- Quick & Easy: Comes together in under 20 minutes, perfect for last-minute Halloween prep or when you realize the party starts in an hour. No cooking required.
- Simple Ingredients: No fancy grocery trips needed. You likely already have most of these veggies in your fridge, plus a tub of hummus or ranch dip.
- Perfect for Halloween Parties: Great for classroom celebrations, office potlucks, trunk-or-treat events, or pre-trick-or-treating fuel for the kids.
- Crowd-Pleaser: Always gets rave reviews from both kids and adults. I’ve watched children who “don’t eat vegetables” grab three bell pepper strips because they were shaped like a pumpkin face.
- Unbelievably Delicious: The combination of crunchy fresh veggies with creamy dip is honestly hard to stop eating. It’s comfort food that happens to be healthy.
What makes this different from every other veggie tray? The shape, obviously, but also the strategy. Instead of just dumping veggies on a plate, you’re creating a centerpiece that doubles as a conversation starter. The orange bell peppers and cherry tomatoes create that perfect pumpkin color, while the cucumber slices and broccoli florets add texture contrast. It’s not just another veggie tray—it’s your best version.
This recipe isn’t just good—it is the kind that makes you smile before you even take a bite. It’s Halloween fun reimagined: healthier, faster, but with the same festive satisfaction. Perfect for impressing guests without stress, or turning a simple snack into something memorable.
What Ingredients You Will Need
This festive Halloween pumpkin veggie tray uses simple, fresh ingredients to deliver that crisp, satisfying crunch without any fuss. The beauty is in the arrangement, not complicated cooking.
- For the Pumpkin Base:
- 1 large round platter or wooden board (12-14 inches diameter) — the foundation for your pumpkin shape
- 2 large orange bell peppers, sliced into thin strips (these create the pumpkin color; look for the brightest orange ones you can find)
- 1 cup cherry tomatoes, halved (adds more orange-red color and juicy pops of flavor)
- 1 cup baby carrots, halved lengthwise if large (adds crunch and more orange tones)
- For the Pumpkin Ridges:
- 1 large cucumber, sliced into rounds or half-moons (creates the greenish-white contrast between pumpkin segments)
- 1 cup broccoli florets, broken into bite-sized pieces (adds texture and a darker green accent)
- 1 cup cauliflower florets (adds white contrast and crunch)
- For the Pumpkin Face:
- 1 small cucumber, cut into triangular shapes for eyes (use a small knife to cut triangles)
- 1 small piece of yellow bell pepper, cut into a small triangle for the nose
- 1 small piece of red bell pepper, cut into a jagged mouth shape (or use a few black olives sliced into thin strips for a spooky mouth)
- 1 celery stalk, cut into a small stem shape (place at the top of the pumpkin)
- For the Dip Center:
- 1 cup hummus (classic or roasted red pepper works best; I personally love the Sabra roasted red pepper hummus for extra color)
- OR 1 cup ranch dressing (for a more traditional veggie tray dip)
- 1 small bowl or ramekin to hold the dip in the center
- Optional Garnishes:
- Fresh parsley or cilantro sprigs (arranged around the stem to look like pumpkin leaves)
- Black olives, sliced into rings (for extra spooky face details)
- Pumpkin seeds (pepitas), scattered around the tray for texture
Substitution Guidance: You can use any orange vegetable for the base—try roasted sweet potato wedges (cooled) or even orange cauliflower if you want to get creative. For the dip, use dairy-free ranch or tzatziki if you prefer. In summer, swap in fresh cherry tomatoes from the garden for the best flavor.
Equipment Needed
You don’t need much for this festive Halloween pumpkin veggie tray, which is part of the charm. Here’s what you’ll want to have on hand:
- Large round platter or wooden board (12-14 inches) — the key to the pumpkin shape. I use a simple round bamboo board I found at Target for $12. A large dinner plate works too.
- Sharp chef’s knife — for slicing vegetables cleanly. A dull knife will crush bell peppers and make uneven cuts.
- Cutting board — preferably a large one so you have room to prep everything at once.
- Small bowl or ramekin (about 4 ounces) — for the dip in the center. A glass custard cup works perfectly.
- Vegetable peeler — optional, for peeling carrots if you prefer.
- Small paring knife — for cutting the face details. I’ve used a steak knife in a pinch and it worked fine.
- Paper towels — for drying washed vegetables thoroughly (wet veggies slide around and make the tray look messy).
Budget-friendly tip: Don’t have a round platter? Use a large round pizza pan or even a round baking sheet. Cover it with a piece of parchment paper cut to size, and you’re good to go. I’ve also used a large round serving tray from a dollar store—it worked perfectly.
Preparation Method
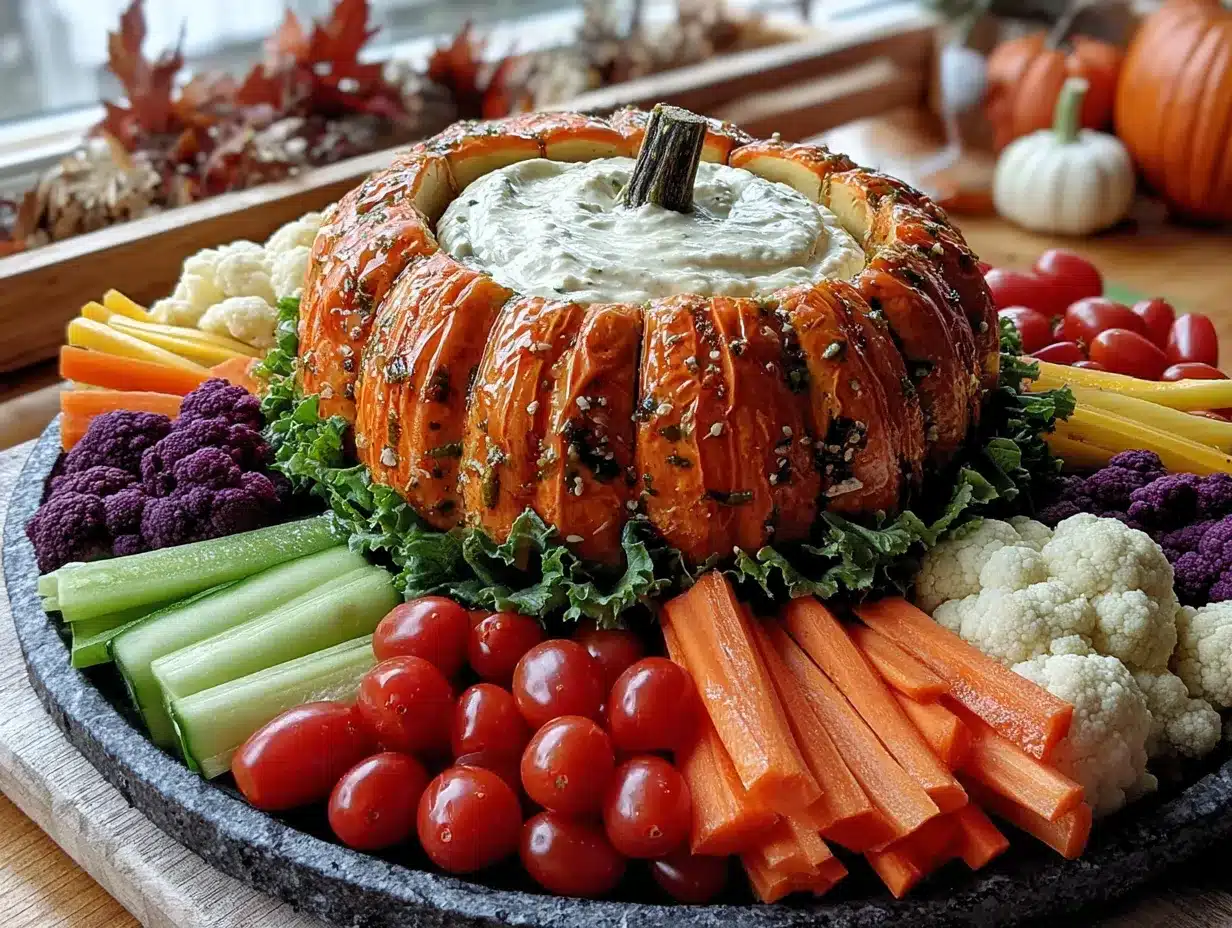
Here’s how to build your festive Halloween pumpkin veggie tray step by step. Trust me, the first time you see it come together, you’ll be amazed at how easy it is.
- Wash and dry all vegetables thoroughly. This is crucial—wet veggies slide around and your pumpkin will fall apart. Pat everything dry with paper towels. Lay them out on a clean kitchen towel to air dry while you prep the other ingredients. (About 5 minutes)
- Prepare the dip center. Place your small bowl or ramekin in the exact center of your round platter. This will be the “hole” of your pumpkin. Fill it with hummus or ranch dressing. Don’t overfill—leave about a quarter inch of space at the top so it doesn’t spill when people dip. (About 2 minutes)
- Slice the orange bell peppers. Cut each pepper in half, remove the seeds and white ribs, then slice into thin strips about 2-3 inches long and half an inch wide. You want them to look like little orange planks. Set them aside in a bowl. (About 3 minutes)
- Prepare the cherry tomatoes. Halve each cherry tomato. If they’re very small, leave them whole. The goal is to have pieces that are roughly the same size as the bell pepper strips for visual consistency. (About 2 minutes)
- Cut the cucumber. Slice the large cucumber into rounds about a quarter-inch thick. For the half-moon shapes, cut the rounds in half. You’ll use these to create the greenish-white stripes between the pumpkin ridges. (About 2 minutes)
- Break the broccoli and cauliflower. Break or cut the broccoli and cauliflower into bite-sized florets. Try to keep them roughly the same size so the tray looks uniform. I like to leave a little stem on the broccoli for easier dipping. (About 3 minutes)
- Create the pumpkin face. Using the small cucumber, cut out two triangular shapes for eyes. Cut a small triangle from the yellow bell pepper for the nose. For the mouth, cut a jagged, smiling shape from the red bell pepper, or use thin strips of black olive arranged in a zigzag pattern. Set these aside on a small plate. (About 3 minutes)
- Arrange the first ring. Starting at the outer edge of your platter (about an inch from the edge), arrange a ring of orange bell pepper strips, cherry tomato halves, and baby carrots. Alternate them in a pattern—two pepper strips, three tomatoes, two carrots—whatever looks good to you. The key is to create a solid ring of orange color. (About 3 minutes)
- Add the ridge lines. Inside your first ring, place a ring of cucumber half-moons and broccoli florets. This creates the visual “ridges” of the pumpkin. Space them evenly, about an inch apart, radiating outward from the center dip bowl. Think of them like the lines on a real pumpkin. (About 2 minutes)
- Fill the inner rings. Continue working inward, alternating rings of orange veggies (peppers, tomatoes, carrots) with rings of green and white veggies (cucumber, broccoli, cauliflower). Each ring should be slightly smaller than the last, creating a layered pumpkin effect. (About 4 minutes)
- Place the face. Once you’ve filled the space around the dip bowl, carefully arrange the pumpkin face on top of the veggies. Place the cucumber eyes above the dip bowl, the yellow pepper nose in the center, and the jagged mouth below. Press them gently into the veggies so they stay in place. (About 2 minutes)
- Add the stem and garnish. Place the celery stalk at the top of the pumpkin, sticking up like a stem. Arrange a few parsley or cilantro sprigs around the base of the stem to look like leaves. If you’re using pumpkin seeds, scatter them lightly around the outer edge of the tray. (About 2 minutes)
- Final check and serve. Step back and look at your creation. Adjust any veggies that have shifted. Make sure the face is visible and the pumpkin shape is clear. Serve immediately or refrigerate until ready. (About 1 minute)
Sensory cue: When you’re done, you should see a beautiful orange pumpkin shape with green ridges, a smiling face, and a stem on top. The colors should be vibrant and the arrangement should look almost too pretty to eat—almost.
Cooking Tips & Techniques
After making this festive Halloween pumpkin veggie tray about six times (and messing up the first three), I’ve learned a few things the hard way. Let me save you the trouble.
Don’t overpack the tray. The first time I made this, I crammed every vegetable I could find onto the platter. It looked like a veggie explosion, not a pumpkin. Leave a little breathing room between the rings so the shape is visible. You want people to see the pumpkin, not guess at it.
Cut vegetables uniformly. This is the biggest secret to making it look professional. If your bell pepper strips are all different sizes, the pumpkin will look lumpy. Take the extra minute to slice everything to roughly the same thickness and length. Your future self (and your guests) will thank you.
Use a small dip bowl. I tried using a big bowl once, thinking it would be easier. It swallowed the entire center of the pumpkin and left no room for the face. A small ramekin or custard cup is perfect—it leaves enough space for the face details while still providing plenty of dip.
Keep veggies dry. I cannot stress this enough. Wet veggies slide around like they’re on ice. After washing, spread them out on a clean kitchen towel and let them air dry for at least 10 minutes. Pat them dry again before arranging. Your pumpkin will stay intact for hours.
Make it ahead, but add the face last. You can prep all the veggies and arrange the rings up to 4 hours ahead. Cover the tray with plastic wrap and refrigerate. But don’t add the face until just before serving—the cucumber eyes can dry out and curl at the edges if they sit too long.
Timing strategy: I usually wash and slice all the veggies the night before, store them in separate zip-top bags in the fridge, and then assemble the tray about 30 minutes before the party starts. This way, everything is fresh and the face looks perfect.
Variations & Adaptations
One of the best things about this festive Halloween pumpkin veggie tray is how easy it is to change up. Here are some variations I’ve tried and loved.
Low-Carb/Keto Version: Skip the carrots (they’re higher in sugar) and use extra bell peppers, cucumber, and celery. Add some radish slices for crunch and color. Use a high-fat dip like ranch dressing made with full-fat sour cream or a creamy blue cheese dip.
Spooky Skeleton Version: Instead of a pumpkin face, arrange the veggies to look like a skeleton. Use cauliflower florets for the skull, celery sticks for the ribs, and cucumber rounds for the joints. It’s a fun twist for older kids who want something a little creepier.
Rainbow Pumpkin Version: Use a mix of colored bell peppers—orange, yellow, red, and green—to create a rainbow effect. The pumpkin shape still works, but it looks like a tie-dye pumpkin. I made this for a friend’s Halloween brunch and it was a huge hit.
Dip Variations: Switch up the dip to match your crowd. Try roasted red pepper hummus for extra pumpkin color, spinach and artichoke dip for a warm option, or guacamole for a creamy, festive green center. I’ve even used a small bowl of warm queso for a spicy twist.
Allergen-Friendly: This recipe is naturally gluten-free, dairy-free (if you use hummus instead of ranch), and nut-free. For a soy-free option, make sure your hummus doesn’t contain soybean oil—many brands use it. Serve with a side of gluten-free crackers for extra crunch.
Personal Variation I’ve Tried: Last year, I added a ring of pickled jalapeño slices around the outer edge. The spicy-sour kick was unexpected and amazing. It gave the whole tray a little heat that paired perfectly with the cool ranch dip. Just be sure to warn guests if you do this—nobody expects a spicy veggie tray!
Serving & Storage Suggestions
This festive Halloween pumpkin veggie tray is best served cold or at room temperature. I usually take it out of the fridge about 15 minutes before serving so the veggies lose that chill and the flavors come through better.
Presentation tips: Place the tray on a dark-colored tablecloth or a black serving board to make the orange pumpkin color pop. I like to surround it with a few spooky Halloween cookies or a bowl of candy corn for contrast. The bright orange of the veggies against the dark background is striking.
Complementary dishes: This tray pairs beautifully with other Halloween snacks. Serve it alongside a bowl of creamy pumpkin dip with apple slices, or a platter of mini sliders for a full party spread. For drinks, a pitcher of Halloween punch or apple cider completes the theme.
Storage instructions: If you have leftovers (unlikely, but possible), remove the face pieces and store them separately. Cover the remaining veggie tray tightly with plastic wrap and refrigerate for up to 24 hours. The veggies will stay crunchy, but the dip might get a little watery—just stir it before serving again.
Reheating methods: This is a cold dish, so no reheating needed. If the veggies have softened slightly after being in the fridge, you can crisp them up by spreading them on a paper towel-lined tray for 10 minutes before serving again.
Flavor development note: The flavors actually get better after a few hours in the fridge. The veggies absorb a little moisture from the dip, and the hummus or ranch flavors meld together nicely. That said, the face pieces (cucumber and pepper) will start to dry out after about 6 hours, so add them fresh if you’re making this a day ahead.
Nutritional Information & Benefits
Here’s a rough estimate for the entire festive Halloween pumpkin veggie tray, assuming you use hummus as the dip and serve it as a shared appetizer for about 8 people. Values are per serving.
| Nutrient | Amount Per Serving |
|---|---|
| Calories | 85-110 |
| Total Fat | 3-5g |
| Carbohydrates | 12-15g |
| Fiber | 4-6g |
| Protein | 3-4g |
| Vitamin C | 80-120% DV |
| Vitamin A | 60-80% DV |
Health benefits: This tray is packed with vitamins and antioxidants. Bell peppers are loaded with vitamin C (more than oranges!), carrots provide beta-carotene for eye health, and broccoli offers fiber and vitamin K. The hummus adds plant-based protein and healthy fats from chickpeas and tahini.
Dietary considerations: This recipe is naturally gluten-free, dairy-free (with hummus), vegan, and nut-free. It’s also low in calories and high in fiber, making it a great option for weight management or healthy eating goals. The only potential allergen is sesame (in tahini-based hummus), so check labels if serving to someone with sesame allergies.
Personal wellness perspective: I love that this tray lets me enjoy Halloween parties without feeling guilty. It’s a way to balance out all the candy and treats without feeling deprived. Honestly, I feel better eating a handful of these veggies than I do reaching for another piece of chocolate—and they’re just as satisfying.
Conclusion
This festive Halloween pumpkin veggie tray is more than just a snack—it’s a conversation starter, a healthy option in a sea of sugar, and honestly, a lot of fun to make. I’ve watched kids who swore they hated vegetables grab handfuls of bell peppers because they were “part of the pumpkin face.” I’ve seen adults argue about whether the cucumber eyes should be triangles or circles. It brings people together in the best way.
I hope you’ll try this recipe and make it your own. Maybe you’ll add a different dip, or arrange the face in a goofy expression, or use purple cauliflower for a truly unique look. That’s the beauty of it—there’s no wrong way to build a veggie pumpkin.
If you make this, I’d love to hear about it. Leave a comment below and tell me how your pumpkin turned out, or share a photo on social media and tag me. Did your kids help arrange the face? Did your guests fight over the last broccoli floret? I want to know all about it.
Until next time, happy Halloween, and may your veggie tray be the first thing to disappear from the snack table.
Frequently Asked Questions
Can I make this veggie tray the night before?
Yes, you can prep everything the night before. Wash and slice all the vegetables, store them in separate zip-top bags in the fridge, and assemble the tray the next day. Just add the face pieces right before serving so they don’t dry out.
What if I don’t have a round platter?
No problem! Use a large round dinner plate, a pizza pan, or even a round baking sheet. You can also use a square platter and arrange the veggies in a square pumpkin shape—it still looks festive and fun.
How long will this veggie tray stay fresh at a party?
It will stay fresh for about 2-3 hours at room temperature. After that, the veggies might start to wilt and the dip can get warm. If your party is longer, keep the tray in the fridge and bring it out in batches.
Can I use different vegetables for the pumpkin face?
Absolutely! Use whatever you have on hand. Black olives, red onion slices, bell pepper pieces, or even small pieces of cheese all work well. Just make sure they’re cut small enough to fit on top of the veggies without falling off.
Is this recipe kid-friendly for making together?
Yes, this is a great recipe to make with kids. Let them arrange the veggies in rings and place the face pieces. It’s a fun way to get them excited about eating vegetables. Just supervise the knife work—let them use a plastic knife for softer veggies like cucumber.
PrintEasy Festive Halloween Pumpkin Veggie Tray
A fun and healthy Halloween snack that looks like a pumpkin, made with fresh vegetables and dip. Perfect for parties, it tricks even picky eaters into enjoying their veggies.
- Prep Time: 20 minutes
- Cook Time: 0 minutes
- Total Time: 20 minutes
- Yield: 8 servings 1x
- Category: Appetizer
- Cuisine: American
Ingredients
- 2 large orange bell peppers, sliced into thin strips
- 1 cup cherry tomatoes, halved
- 1 cup baby carrots, halved lengthwise if large
- 1 large cucumber, sliced into rounds or half-moons
- 1 cup broccoli florets, broken into bite-sized pieces
- 1 cup cauliflower florets
- 1 small cucumber, cut into triangular shapes for eyes
- 1 small piece of yellow bell pepper, cut into a small triangle for the nose
- 1 small piece of red bell pepper, cut into a jagged mouth shape (or a few black olives sliced into thin strips)
- 1 celery stalk, cut into a small stem shape
- 1 cup hummus (classic or roasted red pepper) or 1 cup ranch dressing
- Fresh parsley or cilantro sprigs for garnish (optional)
- Black olives, sliced into rings for garnish (optional)
- Pumpkin seeds (pepitas) for garnish (optional)
Instructions
- Wash and dry all vegetables thoroughly. Pat dry with paper towels and let air dry on a clean kitchen towel.
- Place a small bowl or ramekin in the center of a large round platter (12-14 inches). Fill with hummus or ranch dressing, leaving about 1/4 inch of space at the top.
- Slice the orange bell peppers in half, remove seeds and ribs, then slice into thin strips about 2-3 inches long and 1/2 inch wide.
- Halve the cherry tomatoes. If very small, leave whole.
- Slice the large cucumber into rounds about 1/4 inch thick. For half-moons, cut rounds in half.
- Break or cut broccoli and cauliflower into bite-sized florets, keeping them roughly the same size.
- Cut two triangular shapes from the small cucumber for eyes. Cut a small triangle from the yellow bell pepper for the nose. Cut a jagged mouth shape from the red bell pepper or use thin strips of black olive.
- Starting at the outer edge of the platter (about 1 inch from the edge), arrange a ring of orange bell pepper strips, cherry tomato halves, and baby carrots. Alternate them in a pattern.
- Inside the first ring, place a ring of cucumber half-moons and broccoli florets to create the visual ridges of the pumpkin.
- Continue working inward, alternating rings of orange veggies with rings of green and white veggies, each ring slightly smaller than the last.
- Carefully arrange the pumpkin face on top of the veggies: place the cucumber eyes above the dip bowl, the yellow pepper nose in the center, and the jagged mouth below. Press gently into the veggies.
- Place the celery stalk at the top of the pumpkin for a stem. Arrange parsley or cilantro sprigs around the base of the stem. Scatter pumpkin seeds around the outer edge if desired.
- Step back and adjust any veggies that have shifted. Serve immediately or refrigerate until ready.
Notes
Keep veggies dry to prevent sliding. Cut vegetables uniformly for a professional look. Use a small dip bowl to leave room for the face. Make ahead up to 4 hours, but add the face just before serving. For a low-carb version, skip carrots and use extra bell peppers, cucumber, and celery.
Nutrition
- Serving Size: 1 serving (about 1/8
- Calories: 85110
- Sugar: 57
- Sodium: 150200
- Fat: 35
- Saturated Fat: 0.51
- Carbohydrates: 1215
- Fiber: 46
- Protein: 34
Keywords: Halloween, veggie tray, pumpkin, healthy snack, party appetizer, vegetable platter, festive, easy


